DIY brick grill
Portable light barbecues are good in nature, but near the house or in the country you want more convenience, and aesthetics. All this can be provided by brick barbecues. Due to the plasticity of the material, they can be small - occupy about one square space of the area, or there can be decent corner complexes with a hearth, a hob, and even with a sink and supplied water / sewage. Even a completely inexperienced bricklayer can lay out the simplest brick braziers with their own hands. One of these projects will be described in detail below. It can be used as a training mission before building something more serious.
The content of the article
Simple brick brazier
Any brick structure requires a foundation. And even such a small barbecue, as presented below, is very undesirable to put directly on the ground. The foundation will have to be poured. You can make it tape or slab. The slab is safer: in winter it will not lead and the masonry will not fall apart.
Even a beginner can fold this simple brick brazier with his own hands.
The dimensions of the foundation for a brick brazier are 10-15 cm larger than its dimensions. First, the vegetation layer is removed, if necessary, the pit deepens by 10-15 cm. Its bottom is leveled and rammed. A 10 cm layer of crushed stone is poured and rammed again. It is advisable to use a vibrating plate in this case: you will not compact enough soil with a manual rammer. The height of the tape is 20-30 cm, the thickness of the slab foundation is 10 cm.
Depending on the type of foundation chosen, an appropriate formwork is constructed. For greater strength, reinforcement is made with a rod of 10-12 mm in diameter. For the tape - two threads are laid along the perimeter, a "cage" is made for the slab: the bars are laid along and across with a step of 20 cm. Everything is poured with concrete of a grade not lower than M200.
If the temperature during construction is kept around + 20 ° C, work can be continued after about a week: the concrete has gained more than half its strength. Two rows of waterproofing (roofing felt, roofing felt, modern roll waterproofing) are laid on it, coated with bitumen mastic or other liquid waterproofing solution. After that, you can start laying.
Dimensions and materials
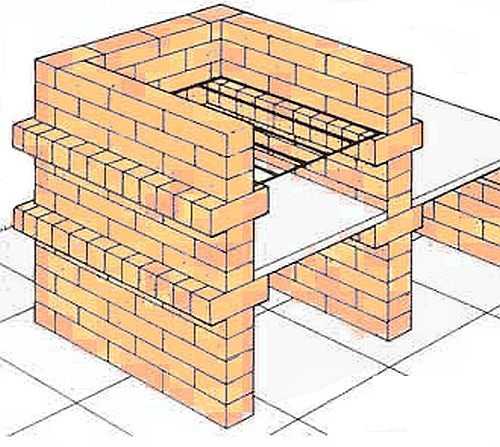
This is a small brazier made of bricks with your own hands, you can even fold it without any experience. It is a structure in the shape of the letter "P". There are two parts: the brazier itself and a table next to it. The design is simple and easy to modify. You can add another section side by side, make it wider or narrower, deeper or shallower. You can make two ledges under the grates - this is if a large number of kebabs will be prepared.
In the basic version, the dimensions are:
- width 180 cm;
- depth 90 cm;
- barbecue height 100 cm.
For laying this garden barbecue, you can take a solid ceramic brick, you can also use fireclay SHA-8. For the order given below, 202 bricks were used.
For the lower part - up to the 5th row - the mortar is used cement-sand 1: 3 or with the addition of one part of lime to it. Further, where heating will already take place, a clay-sand mortar is used. Its proportions are selected based on the qualities of the clay (oily, normal, skinny). Density - it should not be too liquid, but not too thick. About how good thick sour cream is.
Order and order of work
This country brazier is made of bricks laid on the bed. Two protruding rows (bricks are laid across) serve as a support for a brazier sheet and a brazier mesh.Here you can put it on a spoon (put on a narrow part), then the sheet will rise a little higher. In the lower part, you can stack firewood or use it for other household needs.
The rows are put in a dressing - with an offset, for this you need halves of bricks. They can be cut with a grinder. The first six rows form the brazier and table on the right. Starting from the 7th row, the laying goes only in the part where the brazier itself will be located.
Seam thickness 5-8 mm. It should be the same.
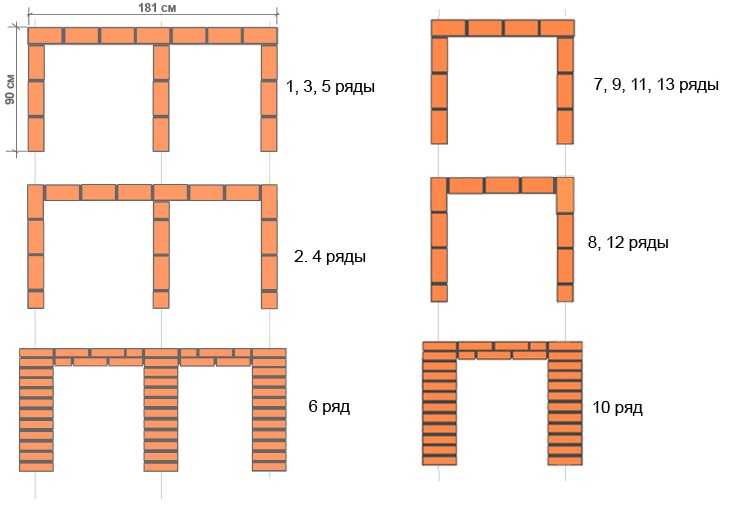
Ordering a small country grill made of bricks
In order not to break the geometry during construction, you can stretch the cords and align all the rows along them. But each brick and each row are controlled by the level for horizontalness. You constantly need to check the verticality of the walls and corners. To do this, use a construction plumb line (a cord with a load at the end). You can check the verticality with the level, but it has an error, especially if it is not a professional, but an amateur instrument. So with such a check, there is a solid likelihood of getting a brazier with oblique, heaped walls.
The order of this brick barbecue is simple, and does not require additional explanations. Questions about drying may arise. If the weather is dry, leave the grill to dry for three to four days. Then you can start a fire little by little. Heat for a couple of days in a gentle mode, using thin firewood and a little. Then you can fry the first batch of kebabs.
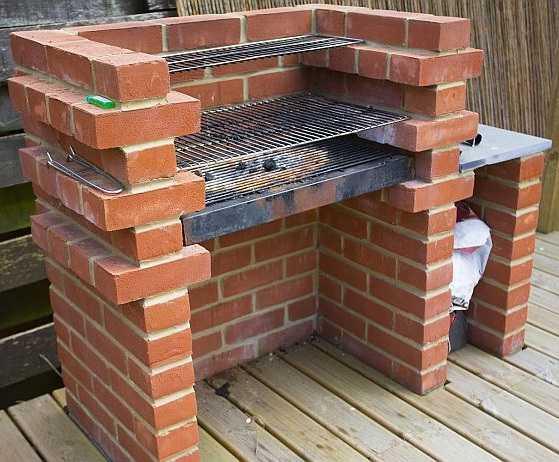
One of the options for a simple brick barbecue. It differs from the basic version in that there are two rows of protruding bricks. Another difference - the table is smaller.
If rain is foreseen, and there is no canopy over the barbecue, cover it with oilcloth. After about a week, you can start slowly drying: light the fire small and for a short time. Drying will also take 2-3 days. Then a brick brazier, folded with your own hands, can be tested.
You may be interested in reading "How to make a brazier out of metal with your own hands»
Video ordering of a brick barbecue with a stove
For those who perceive visuals better than words, it will be more convenient to look than to read the description. For you, detailed explanations of how to build a brazier out of bricks with your own hands in video format.
This structure is more monumental - the vault at the firebox is round and the stove is nearby. Without any experience at all, it will be difficult to cope.
Brazier made of bricks in the gazebo
If you are going to install a brick barbecue in a gazebo, the options proposed above will not work - the smoke will be all under the roof, which will not add joy to you. For gazebos you need a brazier with a chimney. This structure is more complex, but you can easily do this option yourself. The order of a brick barbecue for a gazebo given below is also not very difficult to fold with your own hands. She also, like the first, has an even arch, which is much easier to do in the absence of experience.
Dimensions and materials
This brick brazier / BBQ is medium in size:
- width 150 cm;
- depth 75 cm;
- total height to the beginning of the chimney 217.5 cm.
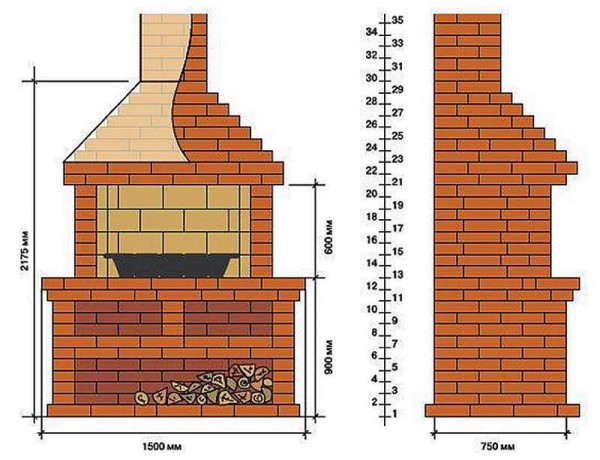
The appearance and sections of a brick barbecue. You can do it yourself in the gazebo
For masonry, you can use solid ceramic bricks. For the zone where the fire will burn, it is possible (but not necessary) to use fireclay bricks. In the figure, it is indicated in light yellow.
The laying of the "cold" belt - up to row 11 inclusive - can be done on a cement-sand mortar (1: 3). Next, you need to use clay-sand. The seam thickness is in any case 5-7 mm. To withstand it exactly.
Structurally, this brazier consists of three "cold" compartments, in which you can store firewood and use for household items. The hot zone starts from the 12th row. Here they make a fire, set up a grill under a barbecue or barbecue racks.
Construction example arbors made of wood are described here, and one of the possible summer kitchen options - in this article.
Order and explanation
The order of this brick grill is a little more complicated, therefore explanations are needed. The first row is laid out flush with the floor of the gazebo. If your foundation turned out to be low, you can also raise it with bricks laid on cement mortar.
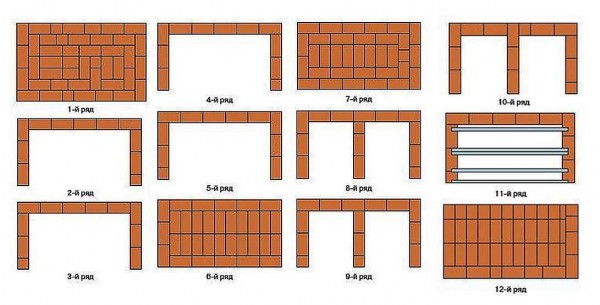
Ordering a brick grill for a gazebo
The next four rows are laid with a dressing. This will be a firewood - an area where it is convenient to store firewood. On the fifth row, three strips of metal 3 mm thick and 50 mm wide are laid from above. They will serve as a support for the next row of bricks. Lay the sixth and seventh rows according to the scheme.
In the 8th row, the formation of two chambers for household items begins. Look carefully at the location of the seams. This is essential: none should match the seam of the bottom row. Only in this way will the brick wall be strong enough. Where it is required by the scheme, the bricks are cut off: halves and even quarters are used.
In the 11th row, the middle wall is no longer placed, but metal strips are again put on top: the next row will rest on them, overlapping the utility compartment. The 12th row is slightly larger in size than all those located below: everything goes smoothly along the back wall, and in front of the bricks protrude about 3 cm.
The 13th row is also laid out solid. A brazier will be installed on it. In size, it is still slightly larger than the previous one.
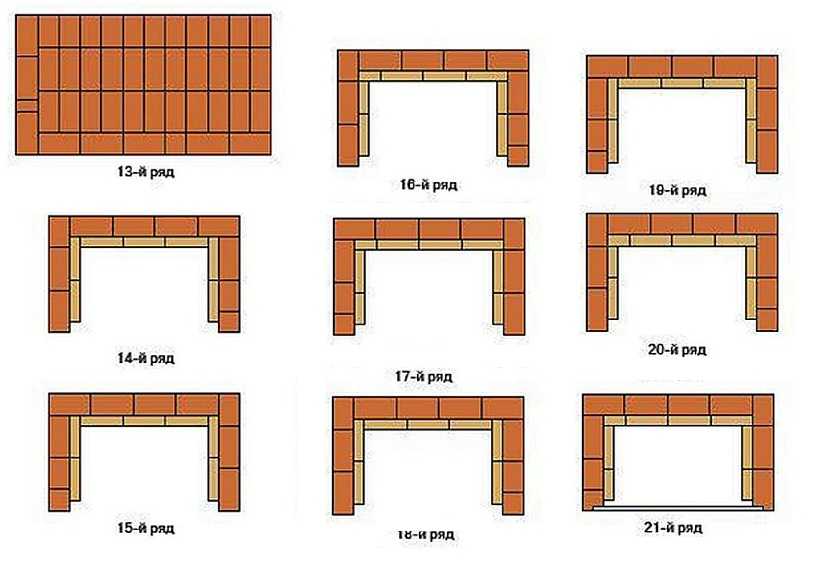
The middle part of the order: we form the hearth zone
The next rows form a "hot" zone - a fire will burn here. This zone is smaller in size than all the underlying rows. To make it more resistant to fire, it is lined with fireclay bricks, placed on the narrow side. It does not match in size with ceramic and the height of the rows and seams will be different. Ignore it by laying it out regardless of ceramic. Just follow the alternation as indicated in the diagrams.
In the 21st row, a steel corner is laid. It can be used from black or stainless steel with a thickness of 3-4 mm. The dimensions of the corner are 40 * 40 mm or 50 * 50 mm. Length - from the middle of the brick on the right to the middle of the one on the left. The front wall of the chimney will rest on this corner.
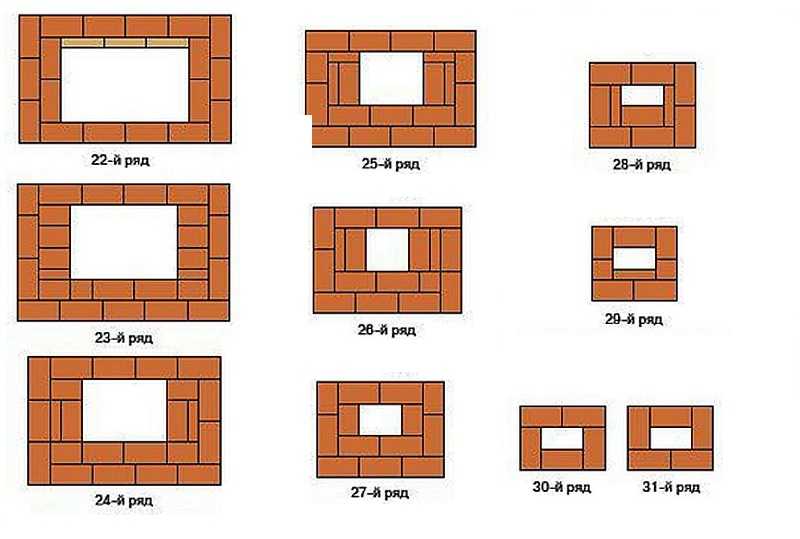
Formation of a pipe for removing smoke from the barbecue
In the 22nd row, there is also fireclay bricks, and the front wall of the chimney appears, resting on a corner. In size, this row is larger than the previous ones: in front of the bricks hang over the corner by 3 cm. The next row becomes even wider, and then there is a gradual decrease. The smoke channel becomes narrower row by row. By the 30th row, a pipe is formed. It rises above the roof of the gazebo by at least 50 cm. During its construction, the 30th and 31st rows alternate. ON this brazier made of bricks with your own hands can be considered built. Now you need to dry it without fire for 5-7 days, and then gradually heat it for several days, evaporating the water from the masonry.
The easiest way is to make a brazier from a gas cylinder. How, read the article “How to make a brazier from a gas cylinder, barrels, pipes "
Brick masonry grill: another project
Another option for a brick barbecue grill in a gazebo is presented in the video. There are no explanations, but everything is clear enough and there are no difficulties in this project. Perhaps it should be said that starting from 52 seconds 4 sawn bricks are laid. The front upper part of them is cut off at an angle of 45 °. In the video, the sawn parts have a lighter shade.
Also in the second minute (1:35) the vault is being formed. It is easier to do this if you cut and fix the drywall template, and lay bricks on it.
Brazier with a brick cauldron
Another option for a barbecue, but more complicated: under a cauldron with a stove. The video instruction is detailed, there are explanations in the frame from the author.
The construction of a brick gazebo is described here.
Corner brazier made of brick
Sometimes you want to fit a brick manga into a corner. For this there is a special shape of the firebox, although no one bothers to make one of the previously proposed options, but to attach the utility surface with an angle.One of the corner barbecues made of bricks is laid out in the order below. This is already quite serious work, with doors, latches and other attributes of the stove business.
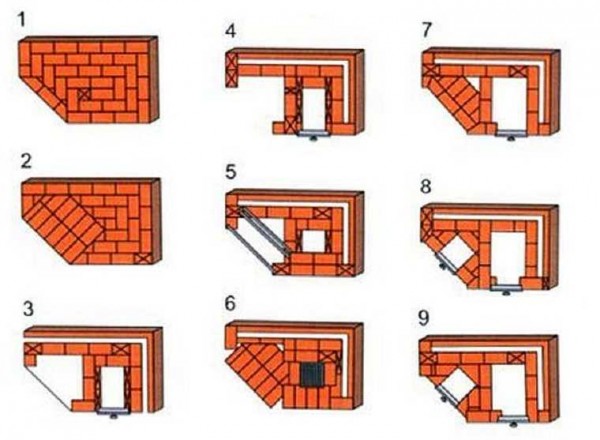
Brick corner brazier: the first part of the order
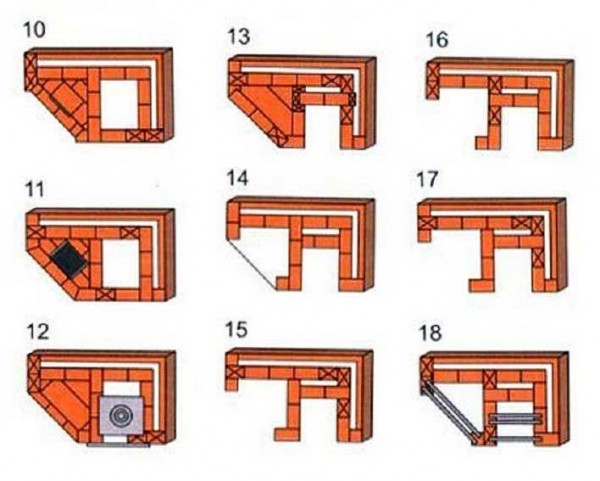
The second part of the order
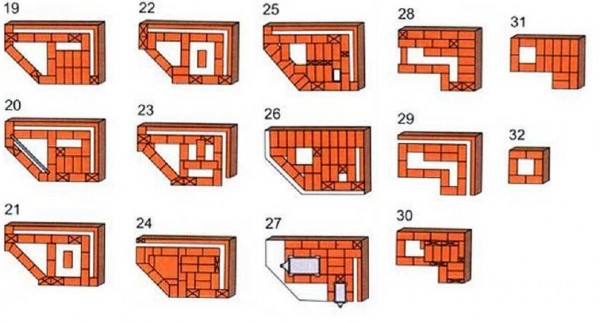
The final rows of brickwork of a corner barbecue
-
 Buying an apartment: what documents are required, their verification
-
 How to deal with cockroaches in an apartment, the best remedy for cockroaches
-
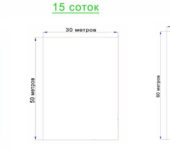 How many square meters in a hundred square meters of land: measurement, calculation
-
 Conversion of inches to cm and mm, centimeters to inches, tables, applications, formulas
-
 Floor stands for flowers


