How to cook with electric welding
In a private house, in a country house, in a garage and even in an apartment - there are many jobs everywhere that require metal welding. This need is felt especially acutely during the construction process. Here, especially often you need to cook or cut something. And if you can still cut it off with a grinder, then there is nothing to reliably connect metal parts except for welding. And if the construction is carried out by hand, then the welding work can be done independently. Especially in places where the beauty of the seam is not required. We will tell you how to cook by welding correctly in this article.
The content of the article
The basics of electric welding
Welded joints of metal today are the most reliable: pieces or parts are fused into a single whole. This happens as a result of exposure to high temperatures. Most modern welding machines use an electric arc to melt metal. It heats the metal in the affected zone to the melting point, and this happens over a small area. Since an electric arc is used, welding is also called an electric arc.

This is not quite the right way to weld)) At least you need mask
Types of electric welding
An electric arc can be formed by both direct and alternating current. Welding transformers are cooked with alternating current, inverters with direct current.
Working with a transformer is more complicated: the current is alternating, therefore the welded arc "jumps", the apparatus itself is heavy and cumbersome. There is also a lot of annoying noise that the arc and the transformer itself emit during operation. There is one more nuisance: the transformer strongly "sags" the network. Moreover, there are significant voltage surges. The neighbors are not very happy about this circumstance, and your household appliances may suffer.
Inverters mainly operate from a 220 V network. At the same time, they have small dimensions and weight (about 3-8 kilograms), they work quietly, and have almost no effect on voltage. The neighbors will not even know that you have started using the welding machine, unless they see. In addition, since the arc is caused by direct current, it does not jump, it is easier to mix and control it. So if you decide to learn how to weld metal, start with a welding inverter. Read about choosing an inverter welding machine here.
Welding technology
For an electric arc to occur, two conductive elements with opposite charges are required. One is a metal piece and the other is an electrode.
The electrodes used for manual electric arc welding are a metal core covered with a special protective compound. There are also graphite and carbon non-metallic welding electrodes, but they are used for special work and are unlikely to be useful to a novice welder.
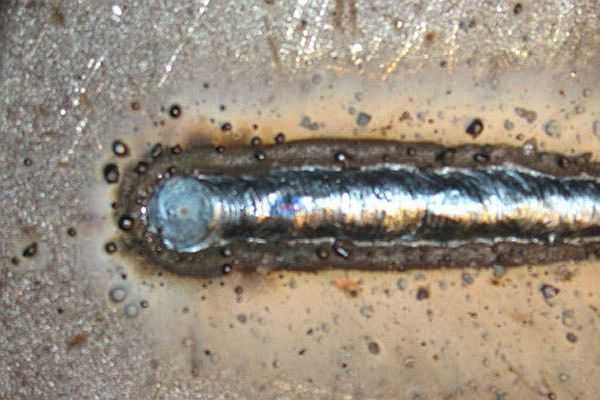
When the electrode and metal, which have different polarities, touch, an electric arc occurs. After its appearance, in the place where it is directed, the metal of the part begins to melt. At the same time, the metal of the electrode rod melts, being transferred with the electric arc to the melting zone: the welded pool.
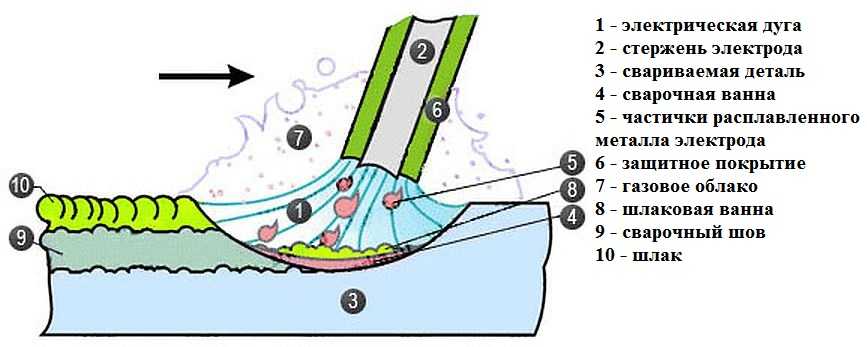
How a weld pool is formed. Without understanding this process, you will not understand how to cook metal correctly (To increase the size of the picture, right-click on it)
In the process, the protective coating also burns, partially melting, partially evaporating and emitting a certain amount of hot gases. The gases surround the weld pool, protecting the metal from interaction with oxygen. Their composition depends on the type of protective coating.The molten slag also covers the metal, helping to maintain its temperature. To weld properly, it is necessary to ensure that the slag covers the weld pool.
The weld is obtained by moving the bath. And it moves when the electrode moves. This is the whole secret of welding: you need to move the electrode at a certain speed. It is also important, depending on the required type of connection, to correctly select its angle of inclination and current parameters.
As the metal cools down, a slag crust forms on it - the result of the combustion of protective gases. It also protects the metal from contact with oxygen in the air. After cooling it is hammered with a hammer. In this case, hot fragments fly away, therefore eye protection is required (wear special glasses).
About, how to make a brazier from a cylinder or a barrel can be read here... Just practice.
How to learn to cook by welding
It all starts with the preparation of the workplace. It is necessary to pay special attention to safety when working with electric welding: there is a possibility of injury from both electricity and high temperatures. Therefore, take the preparation seriously.
Learning to cook with electric welding is more convenient on a thick piece of metal: it is better to practice on it. In addition to him and the welding machine, you will need leggings (thick gloves) and welder mask... You also need tight clothing that protects the whole body, sturdy shoes of thick leather. They must be resistant to sparks and dross. You will also need a hammer and a metal brush in order to knock down the slag. To protect your eyes, you will need glasses.
How to connect the electrode
Welding work for beginners will be easier to carry out if you take a universal electrode with a diameter of 3 mm (3.2 mm, to be exact). They are more expensive, but easier to work with. After you learn how to cook metal, you can try using cheaper ones, but it's better to start with these.
The electrode is inserted into a holder attached to one of the welding cables. There are two types of clamps - spring and screw. If the electrode holder is spring-loaded, press the button on the handle and insert the electrode into the socket that appears. With a screw clamp, the handle rotates. Unscrew it, insert the electrode and clamp it. In any case, he should not stagger. By installing the electrode, you can connect the cables.
There are two outputs on the DC welder, positive and negative. There are also two welding cables:
- one ends with a metal clip-retainer - connected to the part;
- the other is an electrode holder.
Which polarity to connect for welding depends on the type of work. If we talk about inverters, then more often the plus is connected to the part, and the minus is fed to the electrode. This option is called straight polarity. But there is a list of works in which reverse polarity is applied: minus - to the part, plus - to the electrode (for example, for welding stainless steel).
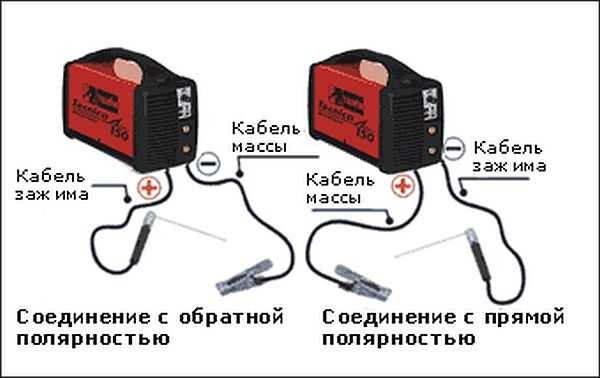
Forward and reverse polarity of connection on the welding inverter
Direct polarity provides better heating of the metal, which is necessary for most of the connections. This is because electrons move from the negatively charged pole - with direct polarity, this is the electrode - to the positive - of the part. At the same time, they additionally transfer their energy to the metal, increasing its temperature.
Start welding: strike the arc
We figured out how to connect the electrode to the inverter. Now about how to light the arc. It arises from direct contact between the electrode and the part. There are two ways:
- striking;
- by tapping.
Everything is clear from the name: in one case, you need to run the electrode along the seam (so that there are no traces left), in the second - to hit the part with the tip of the electrode several times.
When the electrode is new, its tip is exposed, ignition is easy. If it was already in operation, a wall of several millimeters of protective coating formed around the rod.This coating must be beaten off by hitting the part with the tip several times.
Both methods of ignition are used, here everyone chooses who is comfortable. This is the first skill you will need to master if you want to learn how to use electric welding.
So you take a few electrodes, a thick piece of metal, and try to light the arc. As soon as you get it right, you can proceed to the next stage of training.
Electrode tilt
The main position of the electrode is tilted slightly towards itself - at an angle from 30 ° to 60 ° (see figure). The value of the slope is selected depending on the required weld and on the set current. They are guided by the condition of the welded pool.
The first position is called the "back angle". In this case, the bath and molten slag moves behind the tip of the electrode. Its angle of inclination and speed of movement should be such that the slag had time to cover the molten metal. In this position, we get the heating of the metal to a great depth.
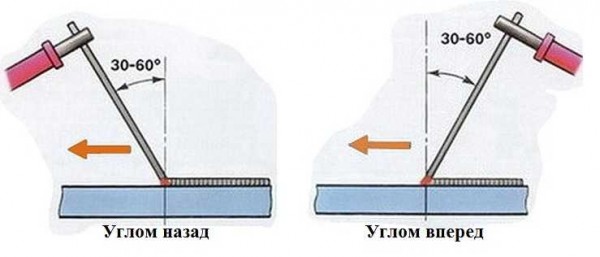
Manual arc welding technique: position of the electrode with an angle forward and an angle backward
There are situations when the metal does not need to be strongly heated. Then the angle of inclination changes to the opposite, the seam and the bath "pull" behind the electrode. In this case, the heating depth is minimal.
Electrode movements
The answer to the question “how to cook with electric welding” is simple: you need to control the welded pool. To do this, it is necessary to keep the electrode at a distance of 2-3 mm from the metal surface and control the condition and size of the weld pool. This is where the skill of the welder lies.
The difficulty lies in the fact that you have to control several parameters at the same time:
- move the electrode along one of the trajectories shown in the photo,
- as it burns out, lower it a little lower, keeping a constant distance of 2-3 mm;
- monitor the size and condition of the weld pool, accelerating or slowing down the movement of the electrode;
- follow the direction of the seam.
The movements of the electrode tip are shown in the figure. Those who want to learn electric welding for home use do not need to master them all, but you will need two or three movements: for different situations, seams and metals.
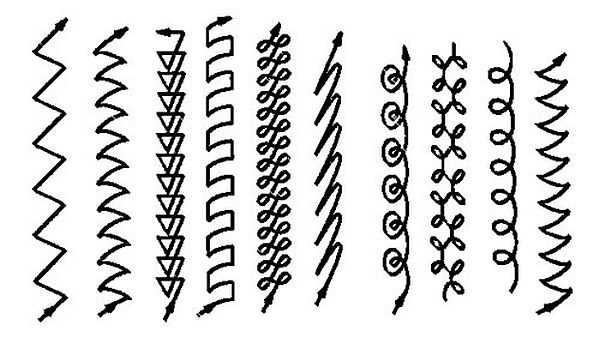
Another element of manual arc welding technique: the tip of the electrode must move along one of these trajectories (or along some similar one)
How to learn how to cook with electric welding? Practice movements on a thick piece of metal. Then it turns out not seams, but rollers. This stage is the initial one. On it, you will master the elementary skills of a welder: learn to control the distance from the tip of the electrode to the part, and at the same time, move it along a given trajectory, follow the welded pool and the slag in it.
To do this, take a thick metal, draw a line on it with chalk: you will need to lay a roller along it. Light up the arc and begin to master the movements, learning to control the bath at the same time. You will not succeed the first, and, even, not the tenth time. You will probably use a dozen electrodes. When the technique of manual arc welding has been worked out: the roller is uniform, its width and height are constant (or almost), you can try to connect the parts.
You should get similar rollers. So you can learn how to cook correctly with electrode welding.
How to make a gazebo on a metal frame, read this article, and here it is described building a barn on a metal frame.
How to weld metal correctly
Learning how to properly hold the electrode and move the bath is not enough for a good result. You need to know some of the subtleties of the behavior of the metals being joined. And the peculiarity lies in the fact that the seam "pulls" the details, because of which they can be skewed. As a result, the shape of the product can be very different from the intended one.
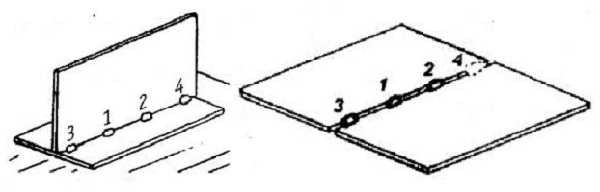
Electric welding technology: before starting the seam, the parts are connected with tacks - short seams located at a distance of 80-250 mm from each other
Therefore, before work, the parts are fixed with clamps, ties and other devices.In addition, tacks are made - short transverse seams, laid after a few tens of centimeters. They hold the parts together, giving the product shape. When welding the joints, they are applied on both sides: this is how the resulting stresses are compensated. Only after quiet preparatory measures start welding.
How to choose a welding current
It is impossible to learn how to cook with electric welding if you do not know how to set the current. It depends on the thickness of the parts to be welded and the electrodes used. Their dependence is presented in the table.
But with manual electric arc welding, everything is interconnected. For example, the voltage dropped in the network. The inverter simply cannot provide the required current. But even under these conditions it is possible to work: you can move the electrode more slowly, achieving good heating. If this does not help, change the type of movement of the electrode - passing through the same place several times. Another way is to put a thinner electrode. By combining all of these methods, a good weld can be achieved even under these conditions.
Now you know how to cook by welding. It remains to work out the skills. Choose a welding machine, buy electrodes and a welding mask and start practice.
To consolidate the information and make fewer mistakes, watch the video tutorial on welding.


The author of the article is a very clever girl! It's so easy and accessible to tell about a complex process! This is talent!
Thank you! for me with zero experience, the article answered all the questions
Everything is clear, everything is fine, but I just took the holder in my hands, everything is wrong and all that, then the electrode does not light up, then it sticks, then I burn the hole.
The author writes: - “An electric arc can be formed by both direct and alternating current. Welding transformers are cooked with alternating current, inverters with direct current. "
I will bring clarity to the readers: the type of welding current is alternating and constant. Alternating and direct current, created by a welding machine based on a transformer, is usually heavy and cumbersome. A welding machine of this type, which welds with direct current, is commonly called a WELDING RECTIFIER. Welding machines, alternating current, today are found less and less, because the quality of the arc burning and the quality of the welded seam are significantly worse than with direct current.
A new type of welding machines are inverter devices that create a welding, direct current. They are distinguished by their compactness, lightness, electric shock protection system and have excellent indicators in terms of current quality and seam formation of the welded elements.
Pluses: Swar. rectifier - reliability, durability, easy to repair, even by a non-specialized specialist. Inverter - compact, many settings and protection.
Disadvantages: Swar. rectifier - size, weight, lack of protection against electric shock (most often), current quality is slightly lower than in inverters. Inverter - the relative unreliability of the device, repair is possible only in specialized places, or by a specialist in the field of radio electronics.
So everything is clear and sensibly told that you can immediately go and start practicing! Author SUPER !!!
Class. Everything is quite clear. Thank you, I will study
Before that, I tried cooking with alternating current a couple of times and was not happy with my work, now I know where my mistake was 🙂
thanks to the Author! :)
Thanks for a lot of useful information! Which I hope will help me learn
I went to become a welder and I like the profession, the more this profession will be needed in the future
So it is, but in my opinion the minus clem goes to mass, i.e. to the part itself and plus to the clamp with an electric drive !!!! ?????