Metal shed (corrugated board): manufacturing process with photo
A barn is a necessary building on a private courtyard in the city and in the village. You can't do without it even in the country. Gradually, more and more tools, equipment, building materials are accumulating that need to be stored somewhere. A safe haven for all of these things is a metal shed. If you know how cook metal - it will not be difficult for you to do it yourself. It turns out at a cost approximately equal to wood, and much cheaper than brick.
The content of the article
Iron shed construction technologies
There are capital metal sheds, and there are prefabricated ones. A capital shed made of iron can have a concrete floor, which is poured onto a prepared base, or maybe a wooden one. If a floor is planned from boards, the upper strapping on which it will rest is made of a thick-walled profile pipe with a section of 60 * 60 mm or 60 * 40 mm or a corner with a wall thickness of 4-5 mm or more. Floor joists are attached to the harness. They can also be metal, or they can be wooden.
In a small shed of metal, you can make a floor without logs. To do this, the strapping can be made from a corner with a thickness of about 4-6 mm and a side of at least 10 cm. Use the shelf of the corner as a support for the boards. Only the board should be at least 40 mm thick. Additional support may be required for long spans. It can be made from a profile pipe of the corresponding section.
Metal barn with wood floor
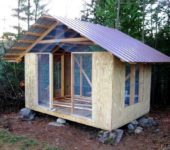
The prefabricated / collapsible metal shed consists of separately welded wall frames, which are bolted together. Sheathing - most often a profiled sheet, which is quickly mounted and removed. The roof is made of the same material. You can install such a structure in the country in a couple of hours as well as dismantle it. They are placed during the season in unguarded summer cottages, and then either hidden under lock and key, or taken to winter apartments.
There is another version of the prefabricated shed (they are also called "hozblok") - for those who do not want to mess with manufacturing. The industry produces ready-made kits that are assembled as a designer. There are variants of Chinese production, there are domestic ones. The price difference is not catastrophic 20-30%. And what you trust more, then choose. The assembly of one of the Russian collapsible iron sheds is shown in the video.
How to make a fence from corrugated board read here, and the installation of a fence from a chain-link mesh is described in this article.
Do-it-yourself metal shed from a profiled sheet: photo
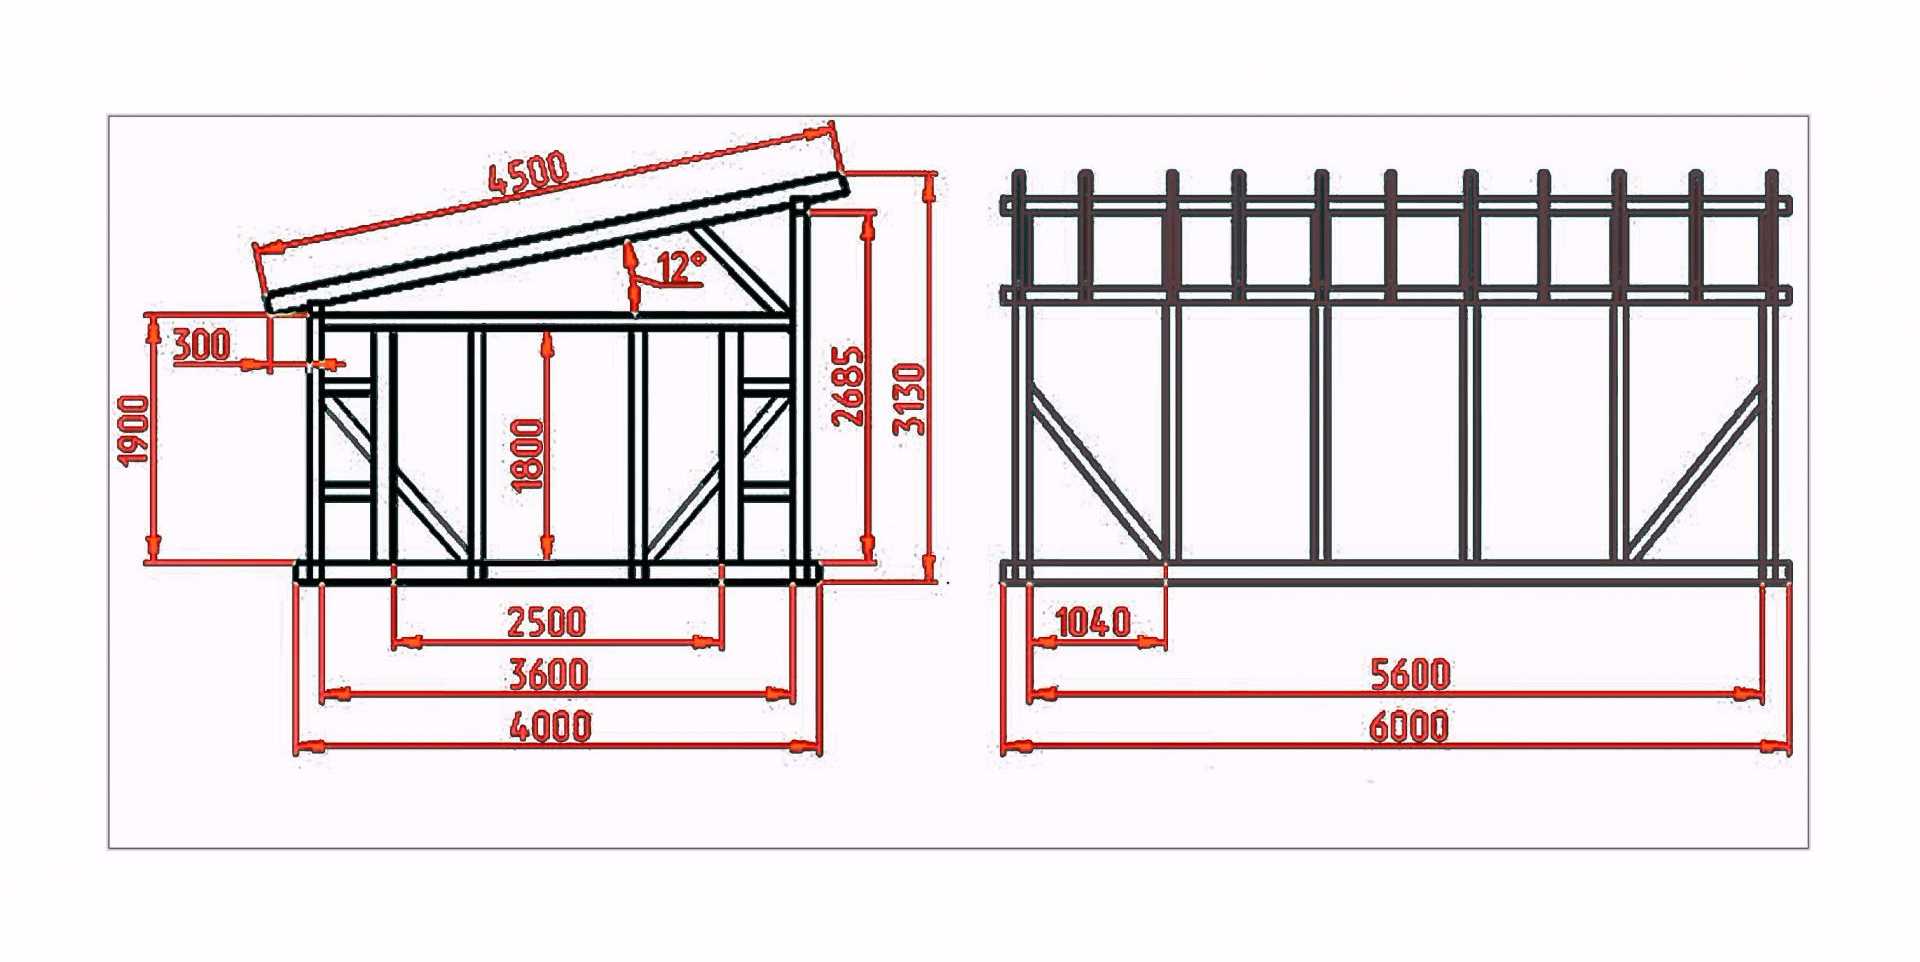
They were built from pipes of different sections and corrugated board, with a lean-to roof. The dimensions of the barn are 6.5 * 4 meters, the height of the front wall is 2.5 m, the rear wall is 2.15 m. The floor is made of concrete: in winter there will be nothing but a tool and a warm floor is useless.
Materials
Racks made of round pipes with a diameter of 61 mm. They were chosen because they were on the farm. Strapping and intermediate posts made of rectangular pipe - profile (60-40 mm and 40 * 20 mm). Wall thickness everywhere - 2 mm.
Consumption for pipes: round 32 m, profile larger section - 21 m, smaller - 156 m. Roofing corrugated board MP-20 took 4 sheets 3.5 m long, and 4 - 4 m each, galvanized intake C8 - on the walls - 4 sheets 2.15 m each, 16 sheets of 2.5 m. This is a list of materials for the frame. And also fasteners and consumables for concreting:
- 16 bags of cement;
- 7 tons of gravel;
- waterproofing (1 roll);
- self-tapping screws, rivets, welding electrodes;
- Wooden slats for the crate: 50 * 25 mm - 3 pcs. 6 meters each.
The list of building materials turned out to be impressive. But at the price, such a barn is still cheaper than a brick one.
Step by step construction
Start of work - marking the site. Pegs are driven in at the corners, diagonals are checked.If they are even, the twine is pulled, the places for installing the racks are marked on it. In the marked places, shafts with a depth of 60 cm were made with a drill. Pipes are placed in them and poured with concrete mortar (M200).
First, we set up and filled the racks in the corners. When the concrete grabbed a little, fishing lines were tied to them - above and below. The rest were leveled by them.
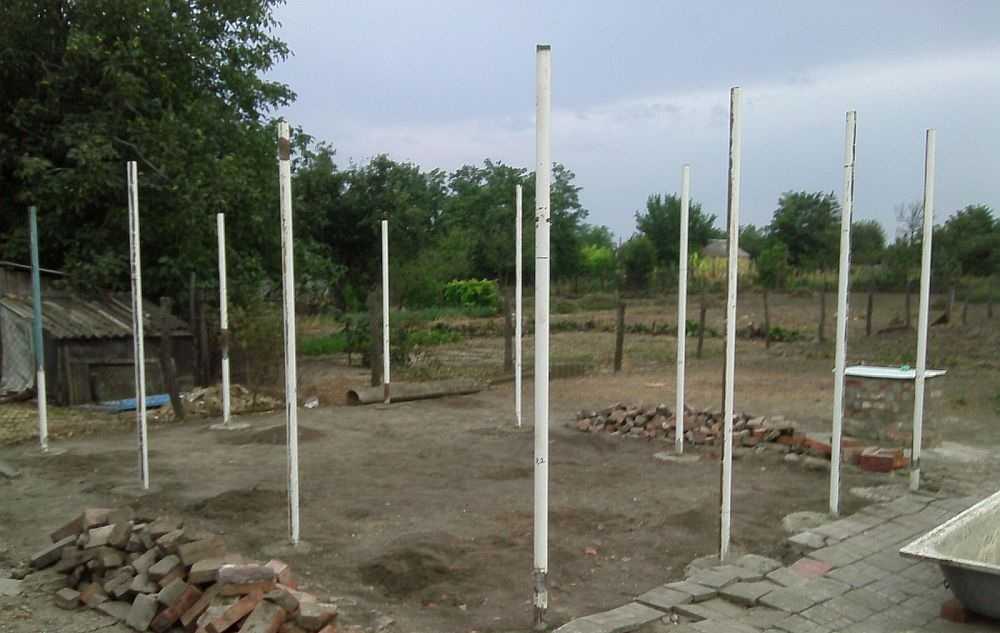
Pipes exposed and concreted
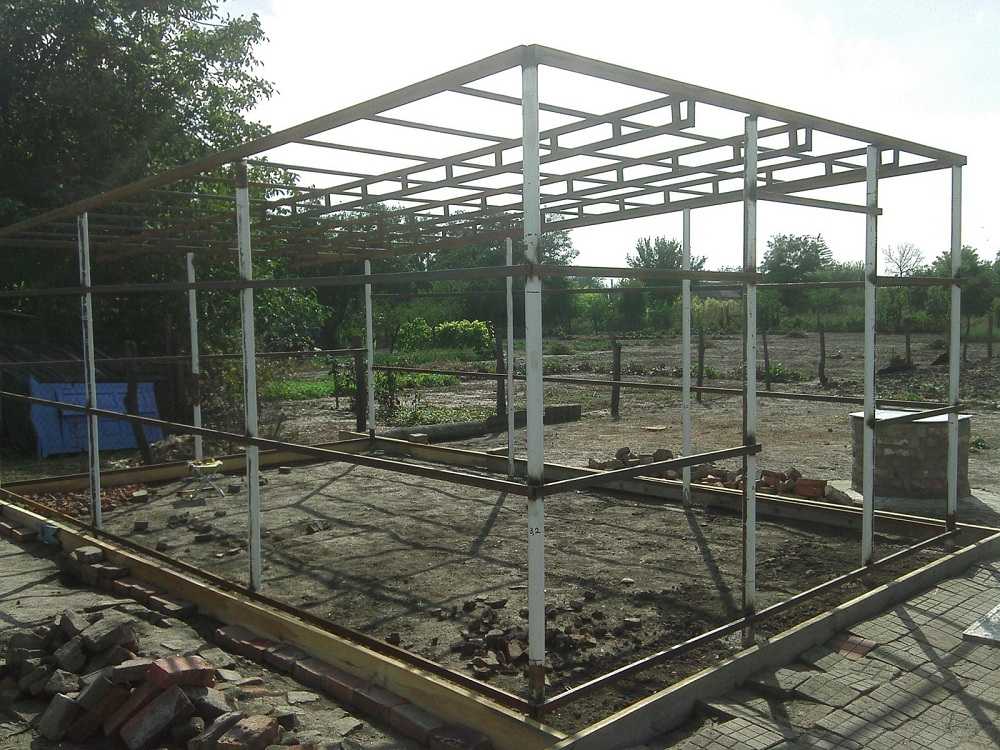
The next step is welding the frame. A 60 * 40 mm pipe with a wall thickness of 2 mm is welded along the top of the pipes. Next, on one of the pipes in the corners, mark the floor level. Using the hydraulic level, we transfer it to the other corner posts. At these marks we tie the twine and transfer them to all racks. According to the markings, we weld a 40 * 20 mm pipe around the perimeter. By the same principle, we weld the crossbars in the middle: two are definitely needed. So that a walk-behind tractor or a wheelbarrow can freely enter the door, they are made wide and high - 1.2 * 2 meters. The base of the metal shed has already been assembled by hand.

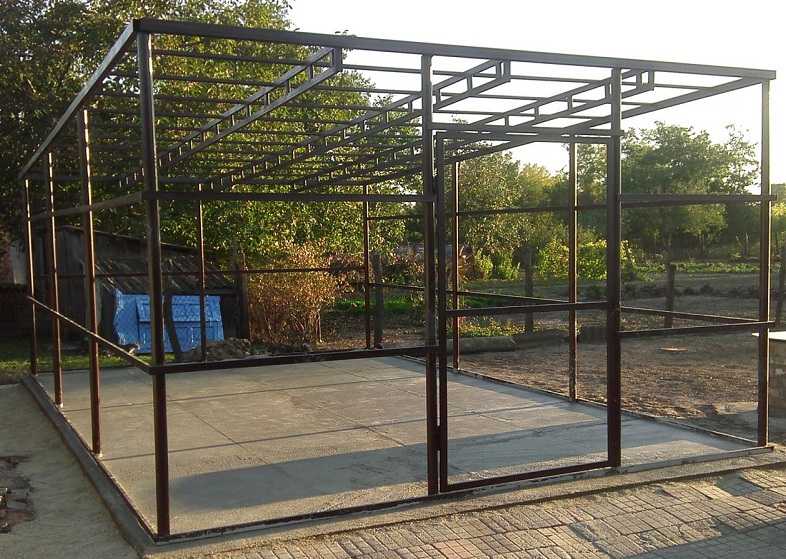
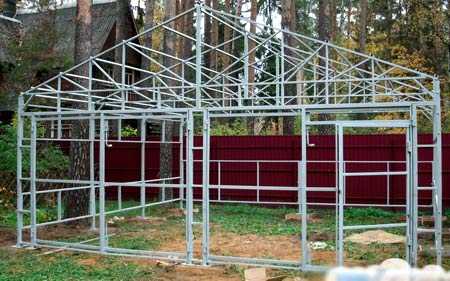
Frame for a metal shed
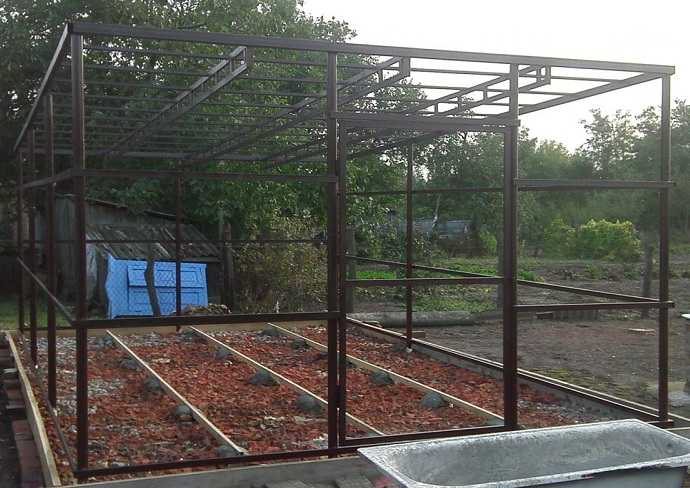
This is followed by the assembly of the roof guides. We needed three trusses with a length of 6.5 meters. They were welded on the ground, then welded to opposite beams. After that, transverse pipe sections of 40 * 20 mm (10 pieces) were welded on. The frame of the metal shed is completely ready. The next step is a primer so that it doesn't rust.
Next, we started making the concrete floor. First, the formwork was installed. It was placed outside the frame, stepping back 10 cm. We fixed the boards with pegs, propped up with bricks so that the concrete would not move apart. Then the foundation was prepared. Rubble and broken brick were driven into the ground. They drove in literally - with a rubber mallet. A piece of brick is placed on the ground, knocked until it is almost completely hidden. This makes the base more rigid and the uneven surface adheres better to the ground.
Installed formwork
After that, lighthouses were set up on a thick solution - even slats (board 25 * 50 mm), they were leveled along the fishing line: we marked points at opposite ends of the lower harness and stretched the fishing line between them. Having checked its horizontalness, beacons-strips were set along it.
Beacons were placed on the broken brick driven into the ground with a hammer
After the mortar on the lighthouses set, they poured concrete M-250 (about concrete grades and their composition read here). They were leveled by the rule on the exposed beacons and pipes of the lower piping, which were set at the same level.
This is what the concrete floor looks like in the barn after the mortar has set.
Further, the installation of the sheathing - profiled sheet began. We started from the roof. To prevent condensation that will form on the metal from dripping onto the head, a waterproofing film was first spread on the frame. It is laid with an overlap of one panel on another by about 10 centimeters, gluing them together with a special double-sided tape (sold in the same place as the waterproofing). It is better not to use ordinary plastic wrap: it lasts no longer than several years - maximum -3-5.
They begin to lay the waterproofing from the bottom, moving up, gluing the panels. It so happens that a drop falling from above flows down to the very bottom. The strips were cut off longer than necessary and hung a little at the edges (30 cm each) - so that water would drain from them and snow would not fall into small gaps with a crosswind.
Then the installation of the profiled sheet began. When laying any sheet material on the roof, it is important to align the first sheet correctly. Then everything will go easily. Therefore, we carefully measure all the protrusions with squares, rulers, etc. When the sheet is exposed, it is screwed on with self-tapping screws. They are placed in a wave - in a ledge. So there is less chance of water getting into the hole.
With the side sheathing, everything is about the same, only you will have to cut the top sheets because of the slope. Expose the first exactly, then everything is like clockwork. The new sheet is leveled along the wave and fixed. It took about 20 self-tapping screws to fasten one profiled sheet.
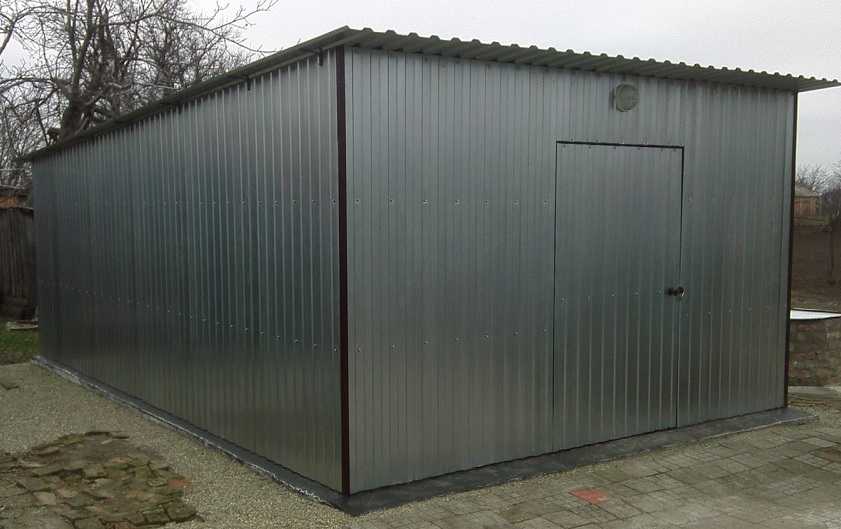
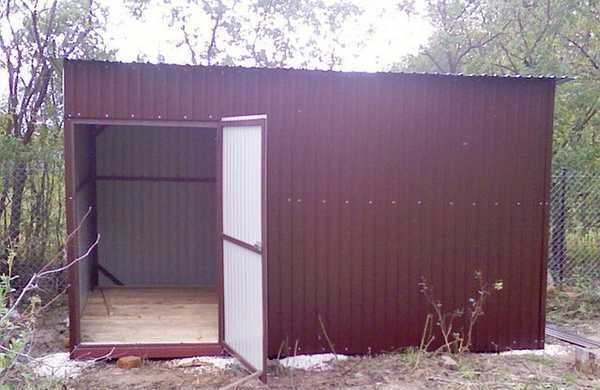
Do-it-yourself ready-made shed made of metal (corrugated board)
The door frame was welded from the same 40 * 20 mm profile pipe, hinges were welded on. When the door was trimmed, it was removed and sewn up on a flat surface, hanging already ready-made.
You can read about the device of sliding gates here.
The metal shed was sheathed in the corners with a metal corner. It is riveted. Serves for decoration, and also closes small gaps that were formed when joining at the corners.
It turned out to be more than a spacious structure - 26 squares. It can be used to store inventory, building materials, setting aside a part for a workshop. This is if he stands on the site near the house.
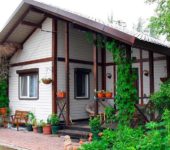
For a summer cottage without security, a metal shed is a risky business, unless sheathe it with wood on top. Then you will have to attach the wooden sheathing to the frame (pictured below).
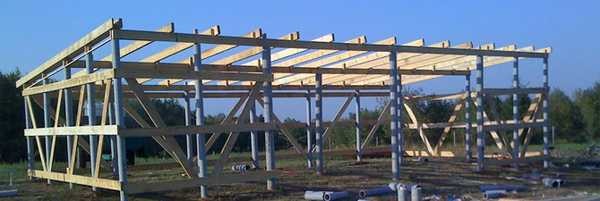
A shed with wooden sheathing on a metal frame is built like this
You can read about the construction of a wooden shed here.
We build an iron frame shed without welding: video
Not everyone can use weldingbut it is much easier to drill holes and bolt the two elements together. The video shows the entire process of assembling a decent-sized shed from a shaped pipe on bolted joints. Welding is used once: the hinges are welded. You can't do with bolts.


Hello! Give advice. I just welded a frame from a professional pipe 40 * 20, dimensions 6 * 4, the step of the racks is 1m with the narrow side outward. Now I think about the reliability of the structure. Amplifiers and ramps with farms have not yet been made. I wanted to ask (plagued by doubts): will the profile bend outward, like an egg. People say they did the same and everything is fine.
Do you doubt whether the pipe will withstand 40 * 20? In theory, its rigidity should be enough. What, by the way, will you sheathe the frame of the barn? Hardly something very heavy. Are you talking about amplifiers ... are they probably cuttings? They will increase lateral stability, although simple struts sheathed with sheet material will suffice. You will need to properly make farms and choose a roof slope so that the snow melts quickly (this is if the winters are snowy). I will attach a couple of photos, but those in the article are also from real objects.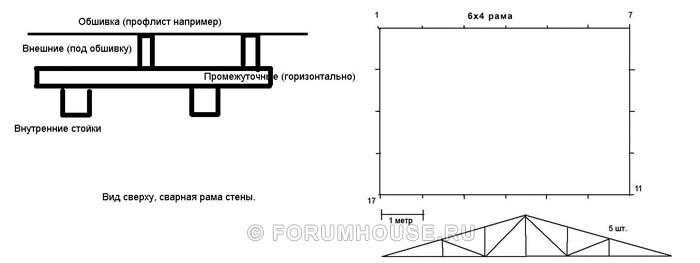
Maybe there are some drawings or photos on this topic. I’m tired of looking in the net, how bad he is ...
Tell me how much did all the material cost? Thank you!