How to fill a garage floor with concrete
The comfort of being in the garage largely depends on whether the floor is properly made. It must be durable, reliable, moisture resistant. Not many materials meet these requirements. One of the most common is the concrete floor in the garage. For it to perform its functions, it must be done correctly. How - in detail, step by step, we will describe in this article.
The content of the article
Foundation preparation
The concrete floor in the garage is made on the ground. But most often the soil itself is not a reliable and dense base, therefore a base device is required - cushions of rubble and sand. Preliminary and obligatory work - removal of the fertile layer, up to clean soil. With a fertile layer, organic matter and most of the microorganisms are removed, and in a clean soil they contain a minimum amount.
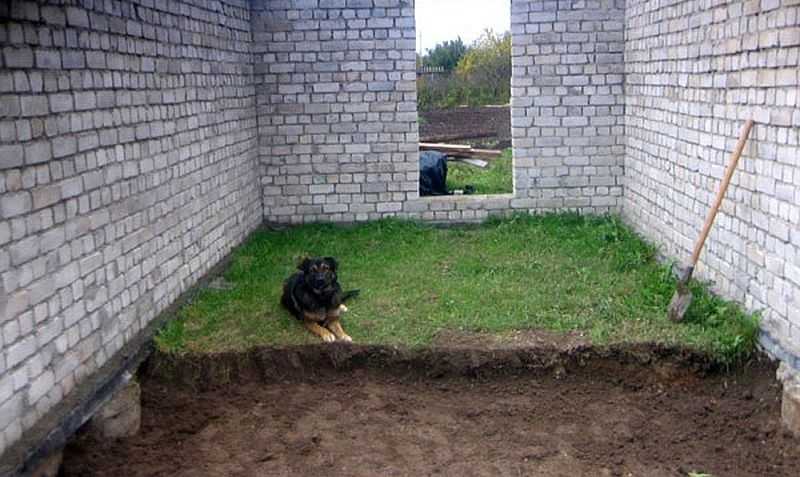
The first stage in the construction of the concrete floor in the garage is the removal of the fertile layer
Zero level mark
As a result, you get a foundation pit of some depth. Crushed stone and sand will be poured into it, but in order to understand whether its depth is sufficient or excessive, it is necessary to determine the "zero" level of the floor. Convenient if the floor is flush with the threshold of the gate. Often they do it just below the threshold, but then you will have to somehow drain the water, and it will certainly be, if not in spring-autumn, in winter, from the melted snow, for sure.
Mark the zero floor level along the perimeter of the walls. The most convenient way to do this is with plane builder (electronic level or level)... Turn on the device to display a horizontal plane, set it at the desired level and draw along the beam.
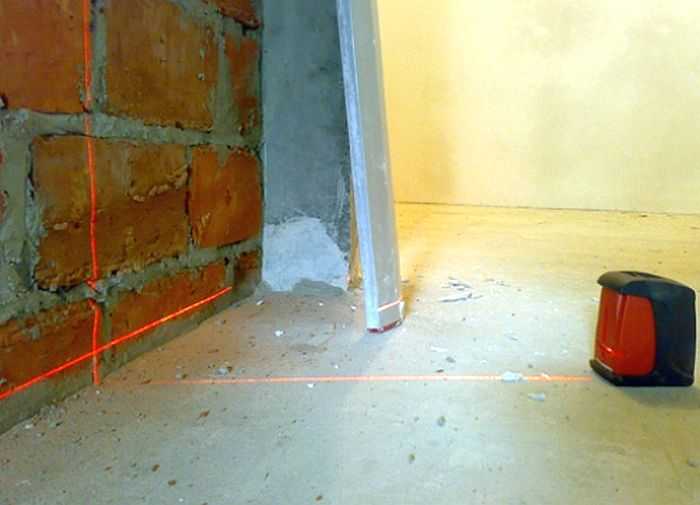
The laser level is easier to work with
If there is no laser level, use a water level. It is not so convenient with it: you have to transfer the mark many times along all four walls. These marks are connected by a straight line, instead of a ruler, you can use a bubble level, at the same time you can check if you have put all the marks correctly.
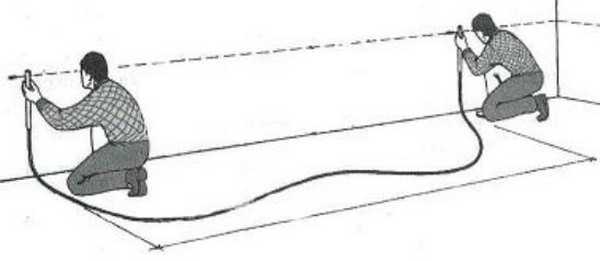
The water level will have to transfer marks to all walls
Calculation of the thickness of the ASG layers
As a result of these works, we have a foundation pit and a ground level. Now you can calculate how thick the layers are needed to reach the desired height. It is necessary to proceed from the following dimensions:
- the optimal thickness of the concrete floor in the garage (if there is a car or a lighter vehicle) - 10 cm;
- minimum crushed stone layer thickness - 10 cm;
- sand - at least 5 cm;
In total, it turns out that the pit should be no shallower than 25 cm deep. And this is without taking into account the flooring. If you simply treat the concrete floor with impregnation or paint, then no additional centimeters are required, for any other coating you add the required thickness.
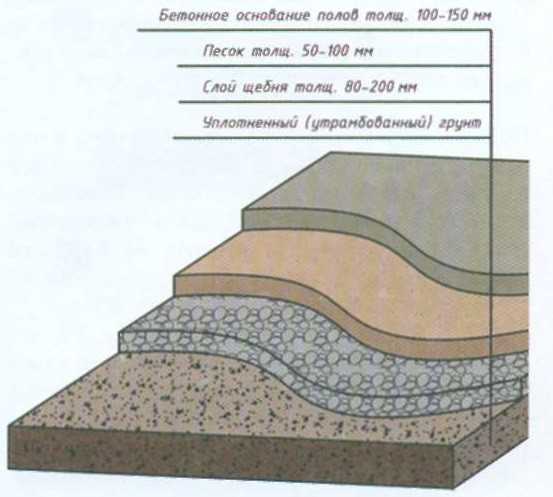
Structure of a concrete floor in a garage
Having received a specific figure, you can plan the amount of sand and gravel. If the layers are very large, you can fill up and tamp the soil (but not the fertile layer) to the bottom. If the depth of the pit is not enough, we take out some more rock.
Marks can be made on the walls of the garage by which it will be possible to control the thickness of the layers. With a small garage width of 2 meters or so, these marks are sufficient. If the garage is wider, put a few more stakes in the middle and mark them as well. It is clear that all the marks must lie in the same plane. This is again convenient to do with a level. Another way is to take a flat bar or board and attach it to the marked marks. Put a level on top of the plank / board.If everything is set correctly, the bubble will be in the middle.
If you plan to make a hole in the garage, it's time to dig a pit for it. If the pit is with brick walls, you can immediately fill it with a concrete floor. While you are filling under concrete in the garage, it will gain the required margin of safety and it will be possible to lay out the walls. They can be driven out after filling the cushion of rubble and sand on the floor.
Backfill materials
For a normal concrete floor in the garage, it is better to take not gravel, but crushed stone. Gravel, with its rounded edges, will never be compacted to the extent required. And if the base under the concrete is unstable, even a thick reinforced slab will burst. Therefore, we import crushed stone, medium and fine fractions. Average 60-70%, the rest is small.
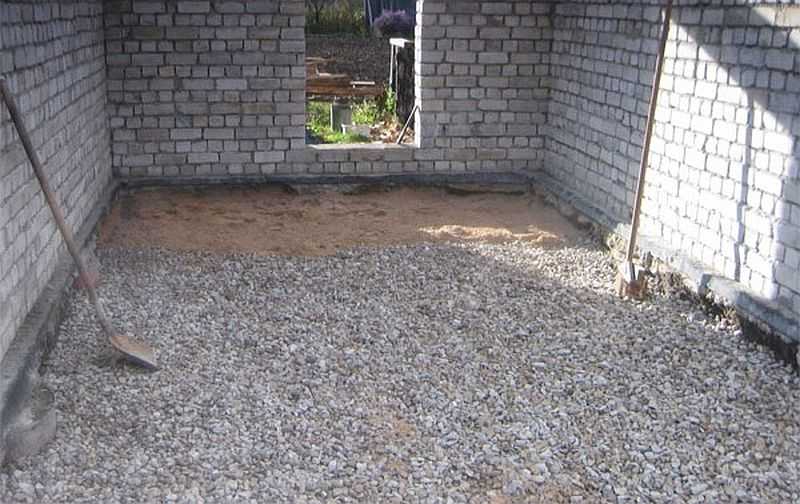
The pillow consists of compacted rubble and sand
There are no special requirements for the quality of the sand for the pillow. It is important that it is free of clay inclusions, but it can (and should) be sieved before laying.
Making a pillow under the concrete floor
The first step is to level the bottom of the pit. We remove the irregularities, fill up the depressions, bring the level to the horizon. Do not think that the concrete floor in the garage can be made with violations. You can do it, but then the stove will crack, you will have to redo it.
Now we take a vibrating platform (you can rent it) or a manual rammer and compact the soil. Along the way, leveling the plane again. When the soil is compacted, rubble can be poured. They do not fill up the entire volume at once - it is not normal to tamp 10 cm. The maximum layer is 5 cm, but 3-4 is better. We fill in the necessary part, distribute, level (with a rake), achieving approximately the same thickness. We take a rammer or vibrating plate and ram.

Better to ram with a vibrating plate
This tamping of rubble is very important when installing a concrete floor in a garage - a certain amount of rubble is driven into the ground. As a result, it becomes even more dense, the bearing capacity increases, and the possibility of subsidence is excluded. Tamping is sufficient if you leave no marks when you step on the surface. In the same way, all portions of crushed stone are compacted, bringing to the required thickness.
Sand is poured onto the compacted rubble. It is also divided into parts of 2-3 cm. The peculiarity of tamping sand: it must be moistened, they also say - spill. Wet sand is compacted, again focusing on the layers.
Now you can start forcing the walls of the pit, if any. They are taken to a level with a clean floor or even a little higher so that you can wash the car right in the garage without fear of water getting into it.
Damper clearance
Concrete flooring on the ground is often called "floating". This is because it is made disconnected from the walls of the building. In this case, the walls and floor can sink or rise independently of each other, maintaining integrity.
So that the concrete floor in the garage is not connected to the walls, a damper tape (sold in hardware stores) is laid around the perimeter or thin sheets of foam (10 mm thick) are cut into strips. The width of the strips is 12-15 cm - they should protrude slightly above the floor finish. The excess damper height is then cut flush with the floor.
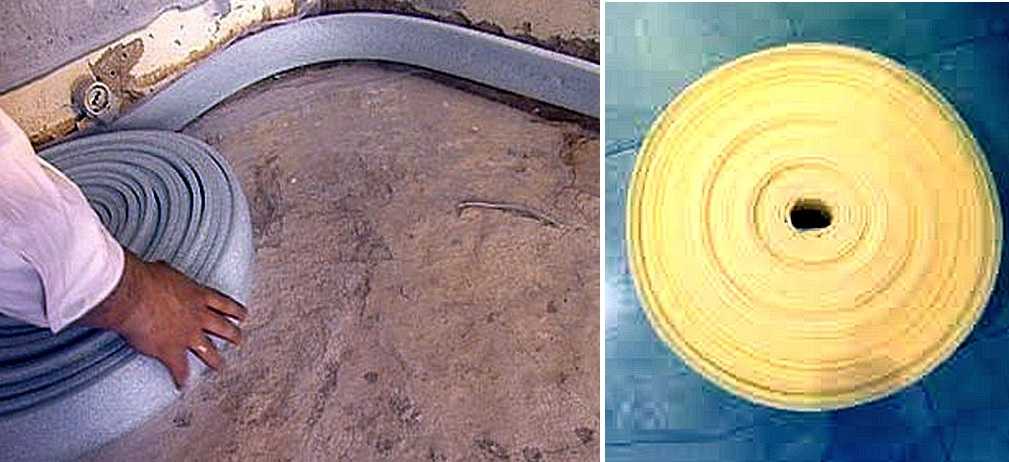
Damper tape
Waterproofing concrete floor in a garage
The concrete itself is not afraid of moisture, high humidity is harmful to the body of the car, as well as to things and equipment, of which there are a lot of things in the garage. The choice of materials for waterproofing depends on how close the groundwater is and how high it can rise in the season.
If the groundwater is high, no special waterproofing measures can be taken, but a dense polyethylene film should be laid on the sand (with a density of 250 microns, reinforced, or not). in this case, the film is more needed so that moisture from the concrete does not go into the sand, which cannot be allowed. With a lack of moisture, concrete will not gain the required strength and will crumble.
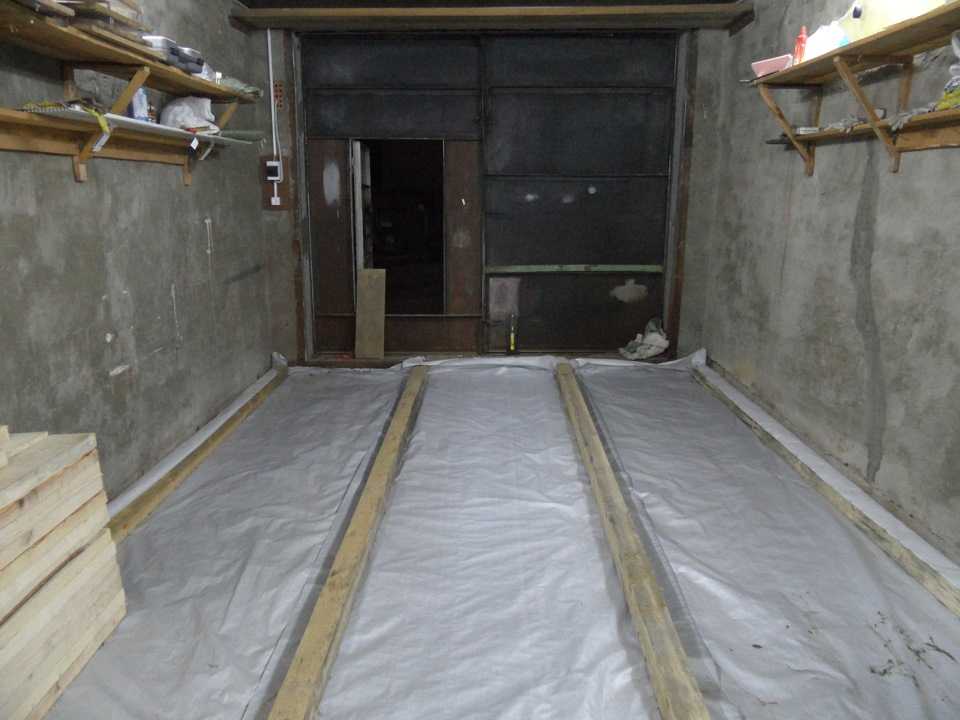
Waterproofing foil spread
With a high level of groundwater, it is better to take a waterproofing that is denser and more reliable - waterproofing or its analogues. In any case, the sheets of the film are spread overlapping - they overlap each other by 10-15 cm. To minimize the possibility of water penetration, the joints are glued with double-sided tape, it is possible twice (at the beginning of the joint and at the end).
Waterproofing is installed on the walls, above the damper tape. There she is temporarily fixed. Once the concrete has been poured and set, it can be trimmed.
Reinforcement
Since the loads are supposed to be serious, the concrete floor in the garage is reinforced. For cars, you can use a ready-made mesh made of wire 7-8 mm in diameter, the size of the cage is 15 cm. To obtain a single reinforcing system, the pieces of mesh are stacked overlapping each other on one cage. The two nets are tied to one another with plastic ties or special knitting wire.

Waterproofing of the garage floor is made of waterproofing, the reinforcing mesh is installed on bricks
One more point - the mesh should be located in the thickness of the concrete, approximately in the middle. It would be wrong to just lay it on the film - the metal does not corrode inside the concrete only if it is at a depth of at least 3 cm.In order for the concrete floor in the garage to serve for a long time and not crack, the mesh is raised above the waterproofing by 3-6 cm. For this, there are special stands, but more often they use halves of bricks. They are just 6 cm thick. Place them under the reinforcing mesh so that it does not bend too much.
Installation of beacons
To keep the garage floor level, it must be leveled. It is more convenient to do this using a special long bar, which is called the "rule" (the stress on the letter "I" - from the word edit). This bar is supported on level bars set at the desired level. They are called lighthouses.
Any long and even objects can be used as beacons. These can be pipes, bars, special beacons that are sold in hardware stores. They must be aligned with the concrete slab level mark on the walls.
Beacons are placed from the far wall, towards the one in which the doors are arranged (most often it turns out that along the long wall). The installation step is 25-30 cm narrower than the length of the rule. If the rule is 150 cm long, the distance between the beacons should be 120-125 cm. About 30 cm retreat from the wall, put the first beacon, then others with a given distance.
So they pour the concrete floor in the garage along the lighthouses
They are usually installed on islands of a densely mixed solution. The slide is laid out a little higher than necessary, the lighthouse is pressed into it so that it is at the desired level.
When installing beacons, you can make a slight slope of the concrete floor towards the doors (0.5-1 cm per meter). In this case, the water will flow by gravity from the floor to the street. Just note that in this case more concrete is required - you have to lift up the edge of the floor farthest from the entrance, but this is compensated by the ease of use.
The next day after pouring, the lighthouses are removed, the voids are filled with a solution and leveled at the same level with the previously filled floor.
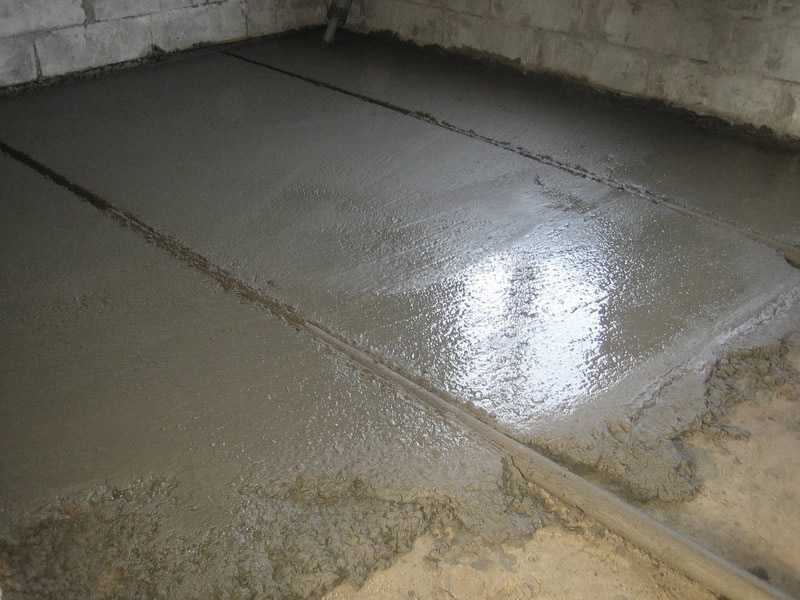
Pouring the concrete floor in the garage
The concrete grade for the garage floor is M250. Its characteristics are more than sufficient in terms of strength and frost resistance. Due to the fact that the thickness of the slab is large, even a small garage requires a large volume of mortar. Let's estimate: a small garage measuring 4 * 6 m with a concrete floor thickness will require 4 m * 6 m * 0.1 m = 2.4 cubic meters. Taking into account that you need a slope, this will be all 3 cubes. If you do it with your own hands in one day, you need to use two concrete mixers - one cannot cope. You need a decent team to work.
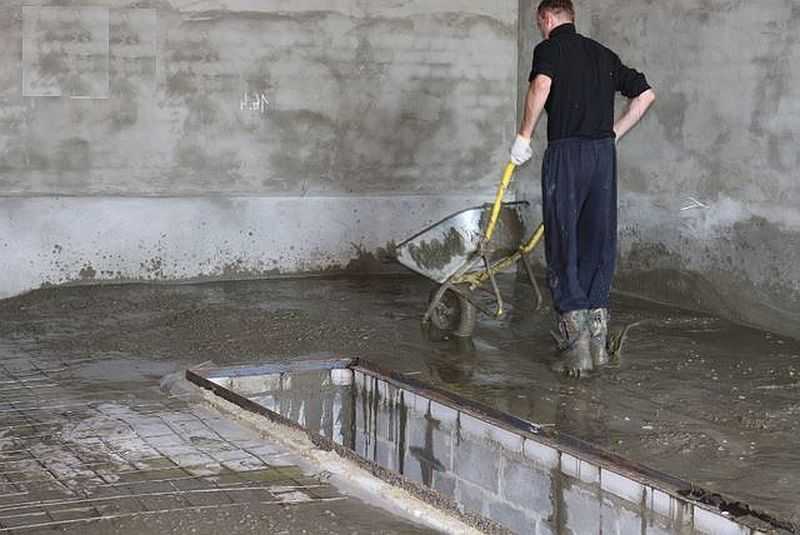
It takes a big team to mix concrete in a concrete mixer
There should be one person on each mixer. This is provided that all the components are right there and they will also load them into the pear.If the components need to be brought up, that's two more people. Plus two people have to carry concrete to the place of its laying and one - to level it. It turns out a big team. This composition will have to work all day. Even if the assistants are free, they need to be fed and watered. It is unlikely that this alignment will help save a significant amount of money compared to ordering ready-made concrete from the factory. Unless you will work with one hand, filling the floor in parts. This is also possible, but it can threaten with cracks at the joints of the floor sections filled in one day. You can reduce the chance of such cracks if you remove the cement laitance that forms on the surface with a metal brush.
If you decide to order concrete from a mixer, it is worth installing a receiving chute that will direct the flow of concrete to the center of the garage. From the center it is already easy to distribute it in all corners, and then stretch it with the rule. To facilitate the leveling of concrete and increase its grade, immediately after preliminary distribution, the concrete is treated with a submersible concrete vibrator. At the same time, air bubbles immediately come out, the concrete becomes more fluid and fills all cavities by itself. Beacons will be needed only for orientation, and, perhaps, partial alignment.
Curing
After pouring the concrete, if it is not very hot outside, you can simply close the garage doors. If there is a window, it must be covered so that the sun's rays do not fall on the concrete. If it is too dry and hot outside, the concrete is covered with plastic wrap or damp burlap.
The stove should be watered daily for a week. It is more convenient to do this on sackcloth - you can water the sacking without much suffering in relatively small streams, and it will give moisture to the concrete. If the concrete floor in the garage is covered with a film, it is removed before watering, then stretched again. When watering, in this case, you need to make sure that the drops are small - you need a nozzle with a large number of holes. In any case, the degree of watering is to a uniformly wet state (determined by the dark gray color of the surface), but without large puddles.
Insulated concrete floor in the garage
There are two options - to insulate the already poured plate, fill the screed from above (the structure in the figure below) or to make the insulation immediately, laying it under the main plate.
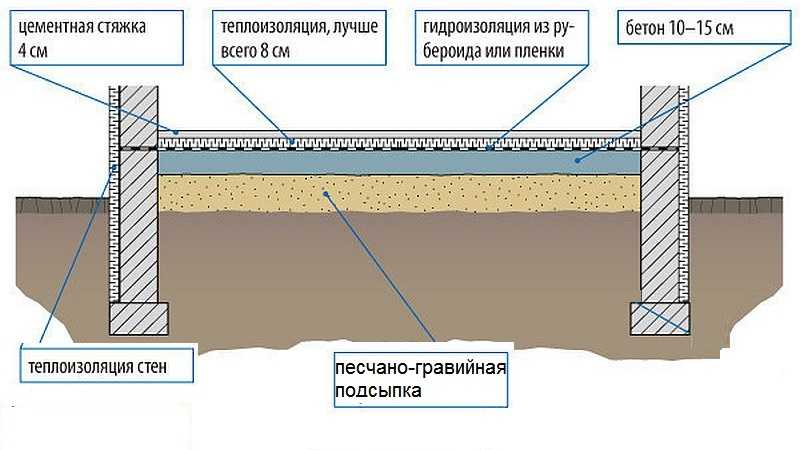
Insulated floor in the garage
When choosing the second option, the insulation is laid on top of the waterproofing layer, a reinforcing mesh is placed on it. The rest of the process of pouring the concrete floor in the garage is similar, only it is necessary to take into account the thickness of the insulation when calculating the depth of the pit.
As a heater for this case, it is recommended to use extruded polystyrene foam (EPS) with a density of at least 35 kg / m3... It has very good characteristics, can withstand heavy loads, does not absorb and does not allow water or steam to pass through. So it is also an additional vapor barrier.
To be sure that the insulation does not sell under the wheels, it makes sense to lay a layer on top of it geotextile... This is a non-woven membrane that is used in road construction. Its function is load balancing, just what we need.
The minimum thickness of EPS is at least 5 cm, better - 8 cm. It is better to lay in two layers, displacing the seams when laying - in order to isolate the floor from the ground as best as possible.