Make the floor in the garage: what and how
It only seems at first that it doesn't matter what the floor is in the garage. As you begin to understand, a sea of nuances immediately arises. In the article we will talk about the advantages and disadvantages of possible options and how to make a floor in a garage with your own hands.
You can make a concrete floor in the garage with your own hands. It is important to know how
The content of the article
What are the best garage floors
In general, three types of floors are made in garages:
- Earthlings. The cheapest option, but with a lot of disadvantages. It is simply compacted soil - "native" or imported - it does not matter. There is no other cover.
- Concrete. It is very durable and reliable, but it requires substantial costs and a significant amount of time for its arrangement: sand and gravel bedding, waterproofing, if desired, insulation, reinforcement, a rough screed, on top of which a finishing coating is made. It can be different:
- finishing screed;
- floor tiles or porcelain stoneware;
- self-leveling floors, including polymer;
- rubber floors (roll, slabs or crumb);
- wooden (stationary or ladders).
These are concrete-based jellied floors, but there are also polymer
- Wooden. This option is good because it regulates humidity, in a garage with wooden floors it is warmer than with concrete or earthen floors. Cons - fragility, rotting tendency, high absorbency.
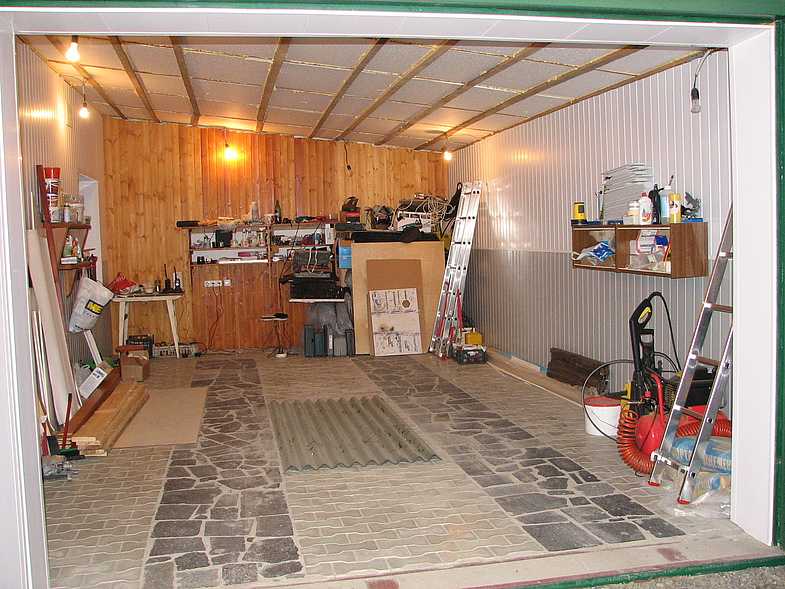
- Paving slabs. As one of the options for "cold" floor. The paving slab floor in the garage is durable, easy to repair, neat and practical.

As you can see, there are not so many options. Let's take a closer look at their advantages and disadvantages.
Advantages and disadvantages
Earthen floors in the garage are very simple in design, practically do not require material investments, you can replace a spoiled section of the earthen floor at any time. These are, perhaps, all the advantages. The cons are more serious:
- in dry weather they get dusty, in rains they get wet;
- spills can only be removed by replacing part of the coating;
- cold, there is no possibility of insulation;
The earthen floor in the garage can be made as a temporary option or as a base for wood. Such floors can be found in garages in summer cottages, where the car is located for a very short period of time. In capital garages, they still make a more solid foundation.

Paving slabs in the garage
A floor in a garage made of paving slabs can be considered as one of the options for earthen. Only it is more practical. There are more layers during its construction, as well as more money is required for its construction - crushed stone and sand are poured onto the ground, in which tiles are laid. But the functionality of this option is much higher. Cons - possible high humidity, and if the sand and gravel cushion is insufficiently compacted, the floor may "sink" in the places of the greatest load, and if the tile quality is low, it can collapse under the influence of aggressive substances, which are more than enough in the garage. Another minus - dirt gets clogged into the seams, it is not easy to clean, and the problem of absorption remains: the paving slabs are hygroscopic.
The wooden floor in the garage is not suitable for everyone due to the fact that it is fire hazardous and prone to rotting. Although, if the groundwater is low, and the floor is made correctly, it will not rot. The fire hazard can be fought by impregnating the boards with fire retardants - media that reduce the flammability of wood. But these are not all disadvantages. It is also not very pleasing that dirt, spilled liquids, which have far from the most pleasant smell, are absorbed into the boards. A wooden garage floor looks very untidy, and there is no way to remove all this from the wood fibers.

Wooden floor with expanded clay backfill
The advantages of wood floors include the fact that they are warmer than the other two options. In addition, when installing a floor from planks in a garage on logs, the gap between them can be filled / laid with heat-insulating materials, which will make it even warmer. It's difficult to talk about the price: in some regions the boards, even thick ones, are inexpensive, in some they cost a lot of money.
Concrete flooring in a garage is the most common and popular. It is durable and can be insulated. Moreover, in recent years, just a concrete coating has not been left so often - many materials have appeared for finishing the floor in the garage, which make its operation much more comfortable.
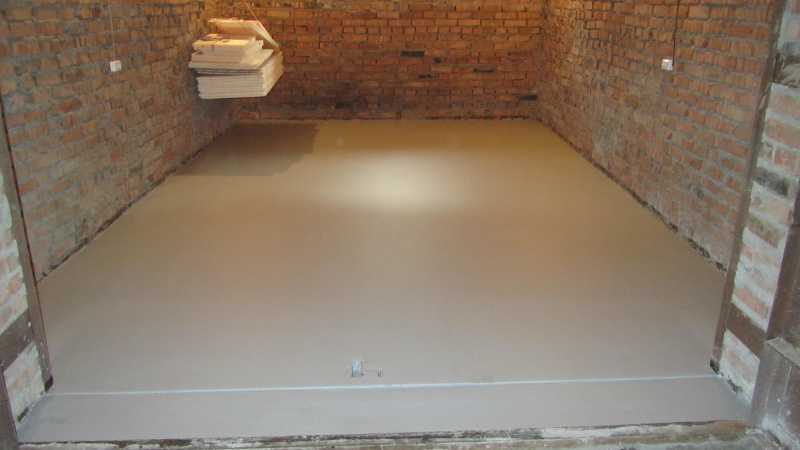
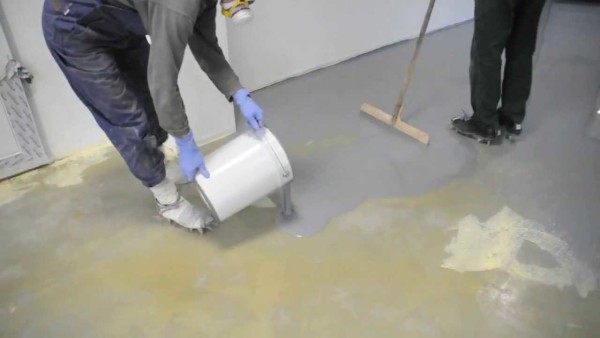
A topcoat can then be laid on the concrete floor
The disadvantages of a concrete floor in the garage have already been mentioned: this is a large amount of work, a long period of time required for its device, a rather high price, even if you make a concrete floor in the garage with your own hands. If the finishing coating is the same concrete, then the absorbency of liquids and odors that cannot be removed are also added. An unpleasant moment - concrete absorbs moisture from both the soil and the air. For concrete, this is bad - it only gets stronger, but for a car - not good. So, with a high level of groundwater, it is necessary to make good waterproofing, and, possibly, a finishing coating that does not allow moisture to pass through. An excellent option is polymer Self-leveling floors or a rubber covering for the garage.
How to make an earthen floor
First, all debris that may accumulate there during construction is removed from the garage. Further, the entire fertile layer is removed. Completely all, to "clean" soil without vegetation and roots. The thickness of the layer can be different - somewhere between 10-15 cm, and somewhere between 50-60 cm. Regardless of this, the entire fertile layer must be removed. It contains a lot of organic matter, microorganisms, insects. Organic matter will rot, spreading the appropriate odors, and microorganisms - contribute to the appearance of mold, fungi, insects - are also not the best neighbors.
Remove all fertile layer
Having reached the clean soil, it is leveled, the same clean soil is poured in layers of about 5 cm in layers (you can dig a hole somewhere nearby or bring it in). Each layer is well compacted. It is good if there is a vibrating platform, a roller or some other similar device. If not, you can do manual ramming yourself. There are two options:
- thick steel plate with T-handle welded in the center:
- trimming a log of solid diameter in a crossbar-handle nailed at the top.
Each layer is compacted with this rammer. So, ramming in layers, fill the pit to the ground level, it can even be a little higher. The upper layers are molded, creating a slight slope towards the door, so that water that gets into the garage can drain.

Earthen floor with gravel
To create a more serviceable floor, the upper layers are replaced with clay, but it is very difficult to tamp it, but a high density must be achieved. Another option is to pour some gravel onto the rammed earth floor and drive it into the ground by ramming. Here, most likely, you will need a vibration platform. But it turns out a solid foundation in which even the wheels do not leave marks. The advantages of this option also include the fact that there will be much less dirt in the garage.
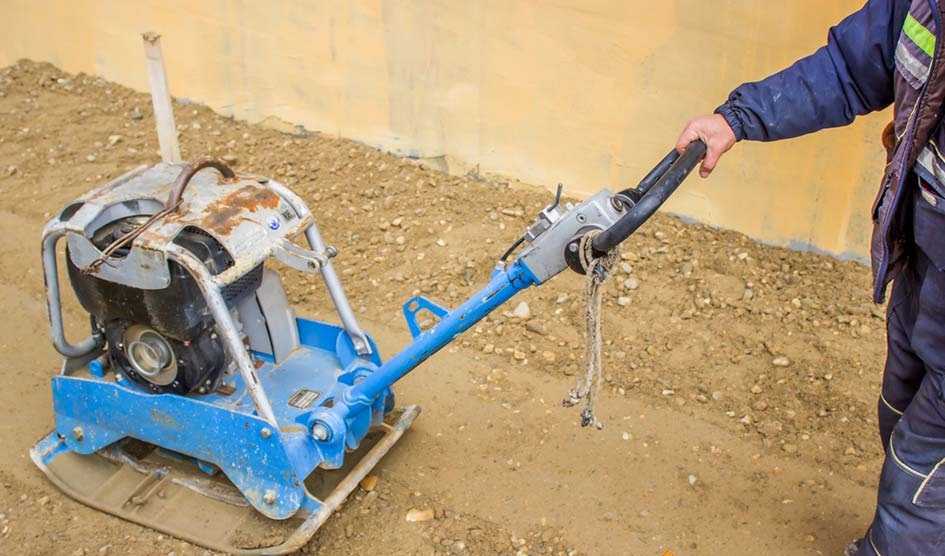
This is how the vibropoatform looks like. It can be rented
On this we can assume that the earthen floor in the garage is made by hand. Not the best option, but definitely the cheapest.
Paving slabs in the garage
The beginning of work is exactly the same: we remove the fertile layer, level and ram the soil. Next, add gravel. The minimum layer is 10 cm, and what you get depends on the depth of the resulting pit. Just keep in mind that there will still be a layer of sand of 7-10 cm on top, and paving slabs, the thickness of which should be more than 6 cm.This is so that you can correctly calculate the height of all layers and bring the floor level to the required level.
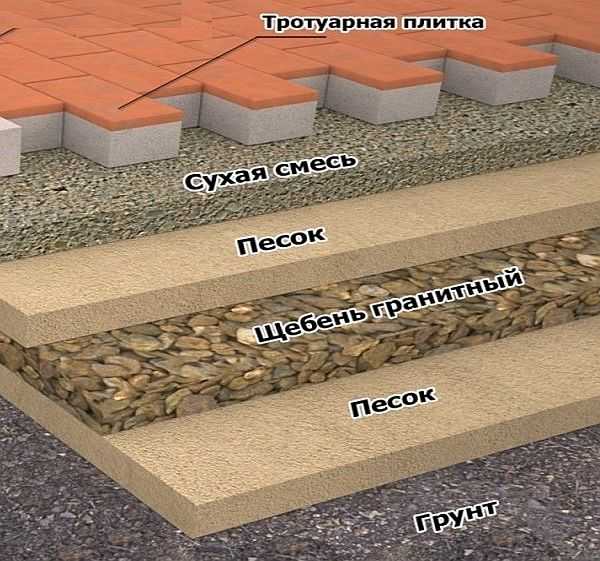
Sample pie of paving slabs
Sand, crushed stone and all other materials are poured in layers no more than 5 cm thick, leveled, then rammed to high density. A layer is considered tamped if no footprints remain on it.
To exclude or reduce the intake of moisture from the soil, a layer or, preferably two, waterproofing must be added to this sequence. It can be roofing material, another roll waterproofing material, a dense polyethylene film (density not less than 250-300 microns), a hydro-vapor-insulating membrane. The material is spread so that one canvas goes over another. The strips are glued together. If it is a film, you can use double-sided tape, if roofing material or other similar material, the edges can be coated with bitumen mastic. Where to locate the waterproofing? Better, probably, between soil and sand, and also between sand and dry mix for laying paving slabs.
Generally, for a garage, you can use a layer geotextile... It is a non-woven material that is used in road construction in Europe. It perfectly redistributes the load, and the floor in your garage will never sag under the wheels if there is geotextile in the cake. In this case, it is better to lay it between the second layer of sand and the dry mixture.
The floor in the garage is made of paving slabs, natural granite slabs are laid under the wheels
Paving slabs are laid both on the concrete screed and on the asphalt, which is also sometimes laid in the garage. Then stand dry backfill or sand 5 cm thick is poured, leveled, slightly tamped, and tiles are laid in it.
To make it easier to navigate with the thickness of the existing layer when arranging floor layers in the garage, their sizes can be beaten off on the walls of the garage. If the distance from wall to wall is small, these marks will suffice. If the area is solid, in some places you can drive in pegs, on which you can also apply markings with the thickness of each layer. This simplifies the process a lot. After all the layers are covered, the pegs are pulled out, the holes are covered with sand and tamped with at least the same peg.
Another trick: so that less dirt is clogged into the seams between the tiles, the sand is mixed with cement, the gaps between the tiles are filled with this mixture, the remains are thoroughly swept away. Then you need to take a spray bottle and moisten the surface well, leave it for a day or two. If you see that somewhere there is cement on the surface of the tile, it is better to wipe it off immediately with a rag. If he "grabbed" you will suffer for a long time. Why not hose down the floor? Because the drops are too large and will leave potholes. From the spray gun, mist is flying rather than drops.
Do-it-yourself wooden floor in the garage
And in the case of a wooden floor in the garage, there will be no differences at the first stage: it is necessary to remove the fertile soil, level and compact the bottom of the resulting excavation. Then it is fashionable to lay a layer of waterproofing (roofing felt, waterproofing, film, membrane) on the bottom, on it a layer of sand or gravel. Sand and gravel must be tamped, but the density is no longer so critical, but it is important to bring the filling “to the horizon” - check how even the “pillow” lies with the help of a level, but not small, but not less than a meter.
With insulation
Logs are installed on this bedding - a bar of a large section. A step is no more than a meter. It is advisable to guess so that the wheels of the car stand above the log or not far from it, and the rest can be distributed as it turns out.
Before laying, the logs are impregnated with a protective impregnation against decay (for wood directly in contact with the ground), and then treated with fire retardants (reducing flammability). From rotting, logs can be impregnated with working off, but their flammability will only increase. So this is not a very good option, albeit cheap. You can also use sleepers. They are already impregnated, but they have a persistent characteristic odor.
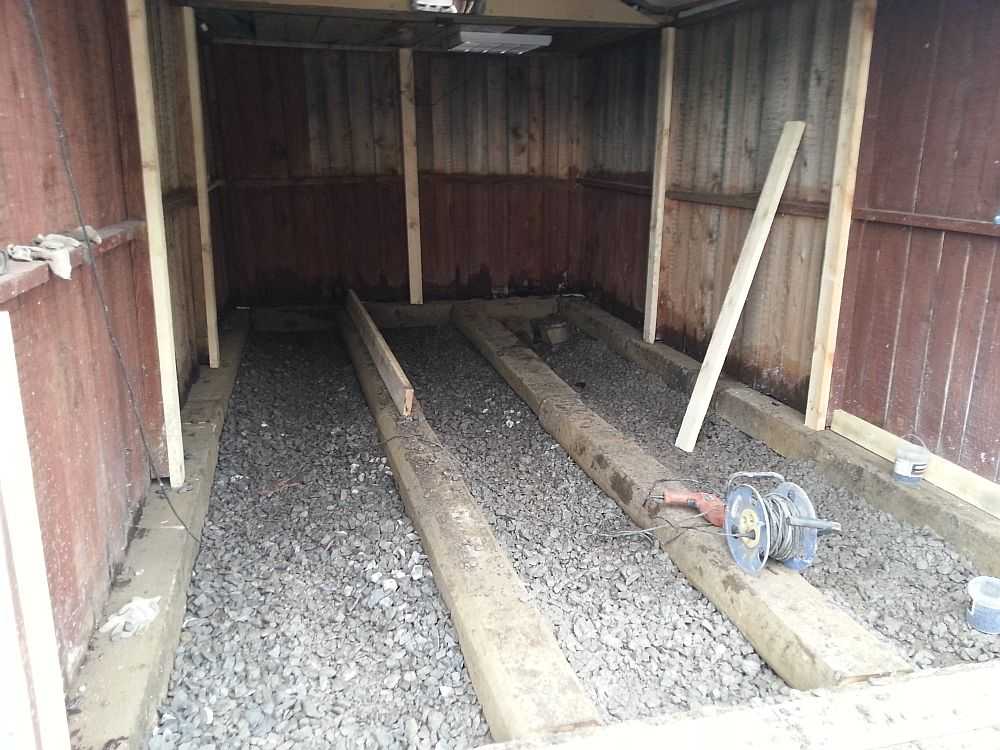
Logs are laid on the tamped crushed stone. In this case, they were laid along, but more often they are laid across
Further, the space between the lags can be filled with insulation. The best option is expanded polystyrene. If the budget allows, take extruded with a density of 35 kg / m3. It does not rot, fungi and microorganisms do not multiply on it, and mice do not eat it. In addition, it does not leak or absorb water. In one fell swoop and insulation and waterproofing. Layer thickness - at least 5 cm, but preferably 10 or more. If there is still room, you can fill in broken brick, expanded clay. These materials are not the best solution, as they are hygroscopic (absorb moisture). Instead, you can use a new material - granular foam glass. It is several times warmer than expanded clay, does not absorb water, and has a low cost. In principle, only foam glass (in granules or battle) can be covered between the lags. It will be nice too. Only in any case, you do not need to fill up the entire space, under the very boards. A ventilation gap of at least 5 cm is required. Then the boards will not rot.
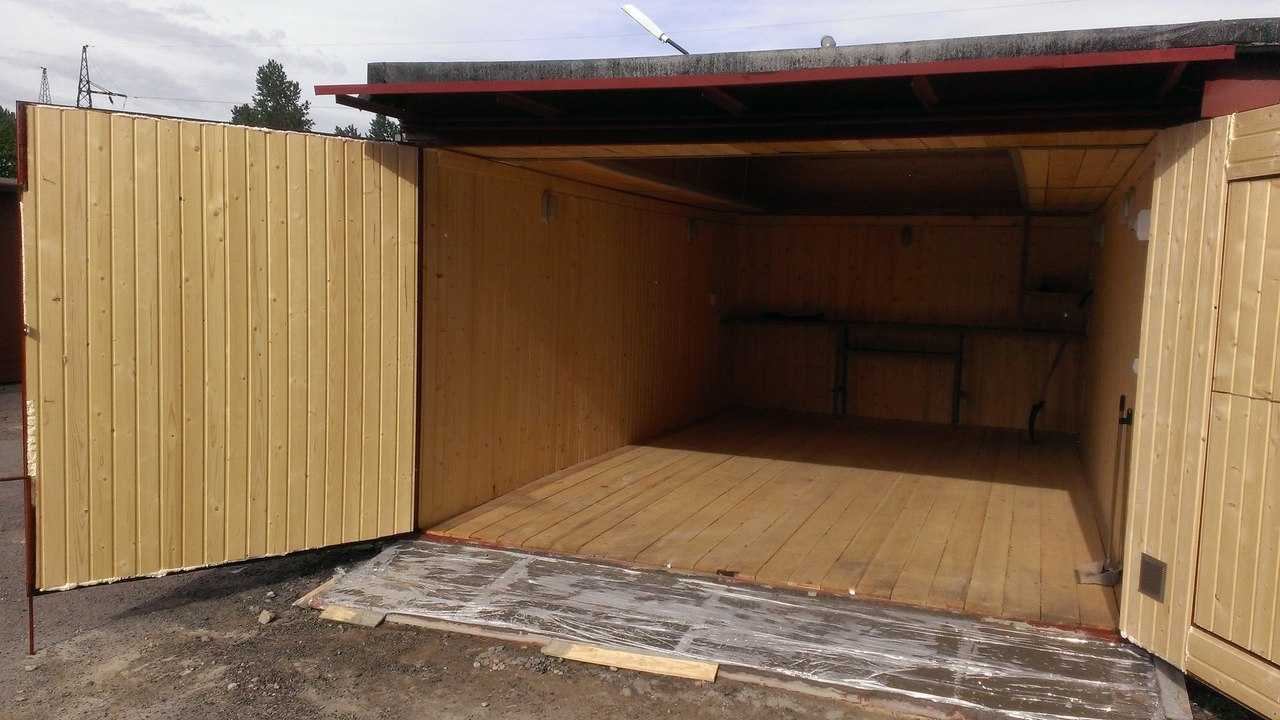
Finished wood floor
Planks are laid across the installed logs. This is a common edged board with a thickness of 40-50 mm. When stacking, do not try to stack them very tightly. Better if there is a gap of 3-5 mm between the boards. That's all, the insulated wooden floor in the garage is finished with your own hands.
Lags on posts
There is a variant of the "cold" wooden floor in the garage - on the posts. A layer of gravel is poured onto the leveled soil, compacted. They put on gravelposts made of bricks with the same calculation, so that lags can then be laid on them. The distance between the posts is about 1 m. That is, if the width of the garage is 4 m, then there are two posts at the edges and two in the middle. Since the distance between the lags is also 1 m, then such rows of columns are located every meter. After two weeks, the solution grasps and logs can be laid on the posts.

One of the options for the device of posts
Roofing material is laid on each column in two layers. It can be replaced with bituminous mastic (twice). If the height of the posts is not the same, pieces of wood, plywood and other similar materials can be laid between the logs and posts. It is important that they hold tightly, and the lags are level. Next is the flooring of the floorboards.
Concrete floor in the garage
The most versatile floor is concrete. And it's not only about finishing it, but also about how it can be done. If we talk specifically about how to make a concrete floor in a garage with your own hands, you must first of all start from what kind of foundation you have. If it's a monolithic slab, there isn't much work to do. If the surface is not even enough, it remains to fill in the leveling screed, and then proceed with the installation of the topcoat. If the differences do not exceed 1 cm per square meter, you can immediately install any of the suitable finishing materials.
Layer order
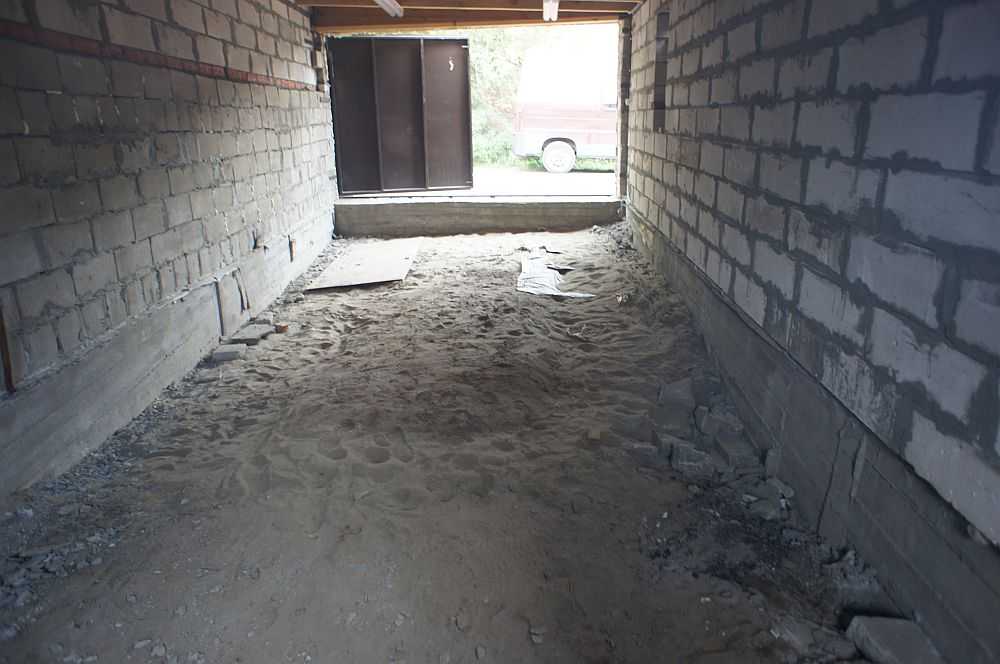
With any other foundation, the start of work coincides with all those described above: we take out the fertile layer, level it, ram it. Further, also without news: we pour crushed stone in layers, ram, the total thickness of crushed stone is from 10 cm. The next layer is sand.
But further - there may be options. If you want an insulated floor in your garage, you can use insulation material. Better - extruded polystyrene foam with a density of 35 kg / m3. It will support the weight of the screed and the machine. This cannot be said about all the others. You can use a bulk heat insulator such as expanded clay, but it is ineffective, and even absorbs moisture. Then a layer of waterproofing must be laid under it. Better - granulated foam glass. It has low thermal conductivity and does not absorb water. It is problematic to use ordinary expanded polystyrene (foam) and mineral wool - under weight they can crumple, which will lead to a loss of thermal insulation efficiency.
A film is spread on the layer of thermal insulation, a reinforcing belt is laid on it.There are again two options: tie it from reinforcement (8-10 mm in diameter with a step of 20 cm) or lay a finished metal mesh (wire from 6 mm with a cage size of 10 cm). If you choose a mesh, lay it with an overlap with at least one cell and tie it together (with knitting wire or plastic ties). Pour everything with concrete (brand M 250 more than enough), align well.
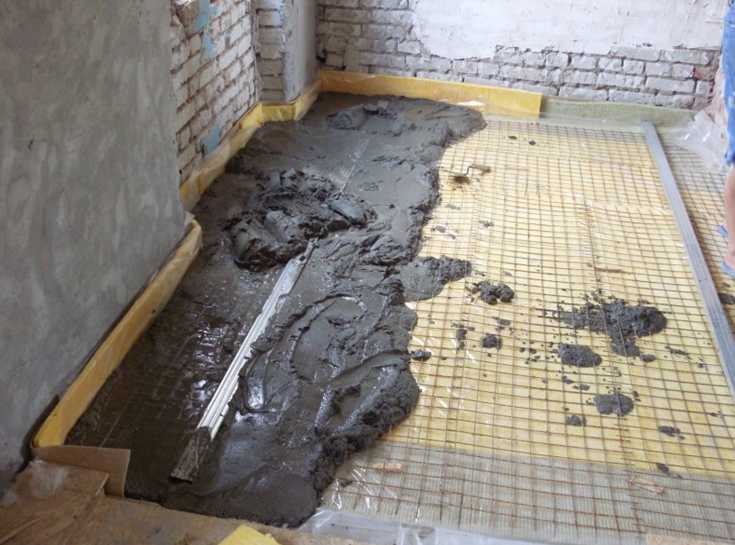
After the reinforcing frame, concrete can be laid
To make it easier to level the concrete in the garage, beacons are set at the right level. These are flat strips - special metal, metal pipes, in extreme cases - wooden strips (they are far from always even, and even from moisture they can lead). They are exposed so that their top edge is on the same level. The distance between the planks is 40-60 cm less than the length of the rule. The solution is poured in portions. Based on the rule on the beacons, it is stretched, leveling the surface. The entire perimeter is gradually filled. Please note that for the concrete to set properly, it needs a temperature of about + 20 ° C and sufficient humidity. That is, it is better to fill the floor in the garage with concrete in summer. But if it is too dry during this period, you will have to water the screed - it is also important to have a sufficient amount of moisture. To make it evaporate less, the screed is covered with foil or burlap. If with film, each time pouring the screed, it must be removed and spread. If burlap is laid, you can water from above. Under these conditions, the screed will gain design strength in about 28 days. After that, you can already move on - to lay the topcoat.
Another option in the video.