How to make a metal roof
Choosing a roofing material is not an easy task. The roof must be reliable, beautiful, durable, and, preferably, inexpensive. All these requests are met by a roof made of metal tiles. To the pluses it must be added, not the most difficult installation, which even a person without experience in roofing can handle with his own hands.
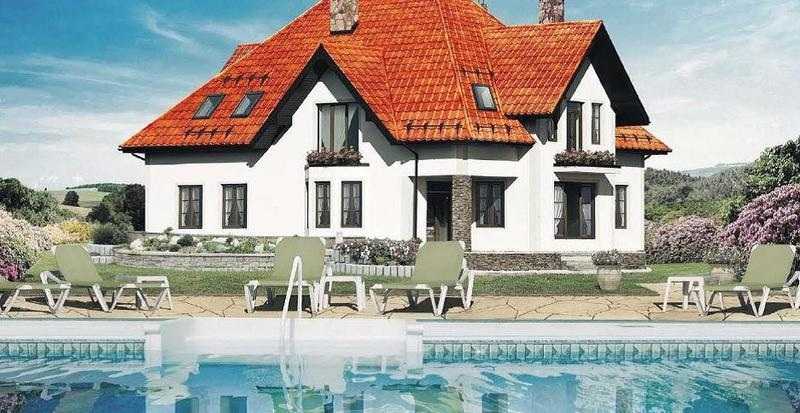
Metal roofing - beautiful, reliable, durable and inexpensive
The content of the article
Types of metal tiles
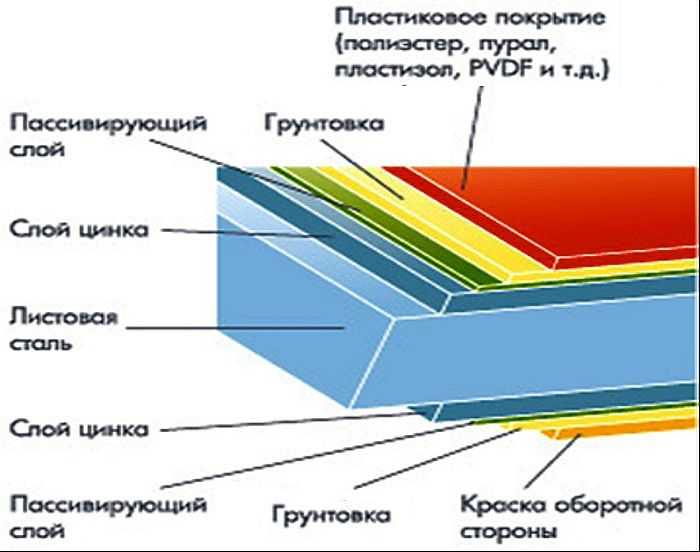
The metal tile is formed from sheet metal with a thickness of 0.35-0.7 mm, on which protective and decorative compounds are applied. It turns out a multi-layered cake. The base of this building material is most often steel, but there are options in copper and aluminum. Since aluminum and copper are much more expensive than steel, products made from them have a high price. For this reason, copper or aluminum metal tiles are practically not found, but if desired, they can be delivered to order.
There are both imported and domestic metal tiles on sale. The European version is strictly made of steel 0.5 mm thick - this is spelled out in the standard. In our GOST, it is allowed from 0.45 to 0.5 mm.
The composition of the metal tile
In addition to different base materials, a different protective coating is applied. First of all, there are two types of steel protection against oxidation - zinc and alumina. The second option appeared not so long ago, but it is he who provides better protection, although such processing costs a little more.
There are more different compositions for the topcoat, one that, along with protection against weathering, gives the material one color or another.
Types of protective and decorative external coatings
The outer covering of the metal tile performs two functions simultaneously. It protects the base metal from corrosion and makes the material look attractive. There are the following types of this coverage:
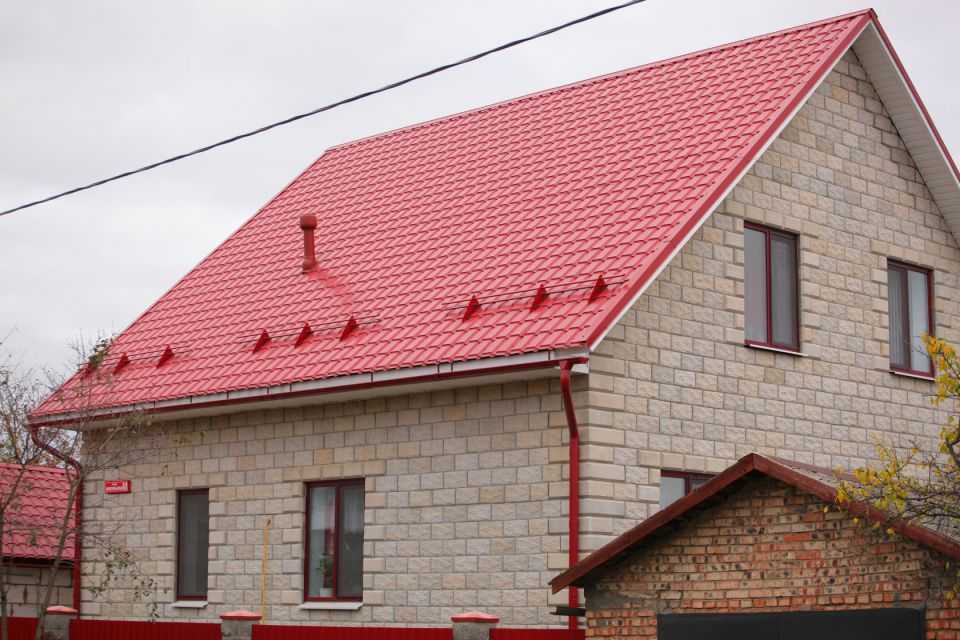
- The most common metal roofing has a glossy polyester (PE) coating - about 70% of the total roofs are covered with this type of material. This is because it has an average price and good characteristics. Layer thickness 25-30 microns, service life 5-10 years. This coating is resistant to UV and corrosion, but it is easily damaged mechanically - scratches appear even when a lot of snow melts. Therefore, polyester metal tiles are not recommended for use in regions with heavy snowfall. In other areas, it is desirable to install a snow retention system to prevent massive snow melt. If you cover the roof with such material, you need to be careful during installation.

Polyester (PE) coated metal roof
- Matt polyester (MPE) is made by adding Teflon. As a result, the film is more durable - the service life is 10-15 years, it can also be used in snowy regions. This composition is applied with a thickness of at least 35 microns. The disadvantage of tiles with a matte polyester coating is a smaller range of colors (about 20 shades compared to 40 glossy).
Matte polyester is anti-glare and lasts longer
- Plastisol (PVC) is a PVC-based compound. It has a beautiful structured surface, is applied in a layer of 200 microns, due to which the coating is resistant to damage. The disadvantage is low UV resistance, which significantly narrows the range of use.In addition, in some countries, due to the presence of polyvinyl chloride, this coating is prohibited.
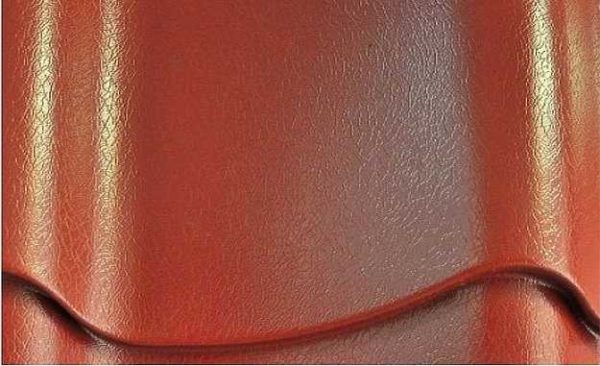
Plastisol coating has an interesting structure
- Pural is a polyurethane-based coating with polymer additives. Available in glossy (PUR) and matt (MatPUR) versions. Layer thickness - 50 microns, service life - up to 30 years. This is one of the best options: resistant to mechanical damage (worse than palstisol, but better than all others), it tolerates ultraviolet light and aggressive environments, and can be used for roofing on the seaside.
Pural is one of the most durable coatings
- Polydifluoride (PVF or PVDF) - a composition based on polyvinyl fluoride with the addition of acrylic (20%). The main plus is the high elasticity of the coating, due to which, with a small thickness (30 microns), the film is very durable to mechanical damage. Other advantages are a wide range of colors, resistance to fading, long service life - up to 30 years. The disadvantage is the highest price.
The most expensive and durable coating is polydifluoride


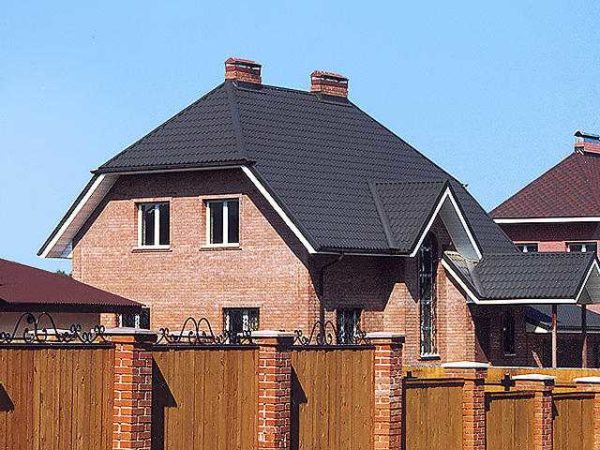
It is clear that when building a house you don't want to spend extra money. Probably for this reason, most developers choose the cheapest option - polyester coated metal tiles. But this is not the best solution. Let's estimate. The service life of metal tiles with polyester is no more than 5-10 years, the average cost - with a metal thickness of 0.45 mm - about 260 rubles / m2, with a steel thickness of 0.5 mm - 440 rubles / m2... Even if the roofing material will last 10 years, the price of a square for a year will be 26 rubles and 44 rubles. Now let's take a very good option - with a pural coating. With a metal thickness of 0.5 mm, the cost is from 510 rubles / m2 up to 635 rub / m2 (depending on the manufacturer). Service life - 30 years. For a year of service it will be 12-17 rubles / m2... The difference is obvious. And this is without taking into account the work on roofing, which is also time and money.
Profile types
When laying metal tiles, its geometric dimensions and wave parameters are important - the crate is calculated and mounted for them. Also, the wave height determines the degree of stiffness of the sheet - at high wind loads, a material with a high wave (more than 50 mm) is required - the toughest, under normal conditions a metal tile with a low wave (less than 50 mm) is suitable.
The waveform can be symmetrical or asymmetrical, more rounded or with straight lines. There are quite a few different profiles. The table shows the geometric dimensions (useful width of a sheet of metal, overlap size, wave parameters), which will be useful when calculating the quantity.
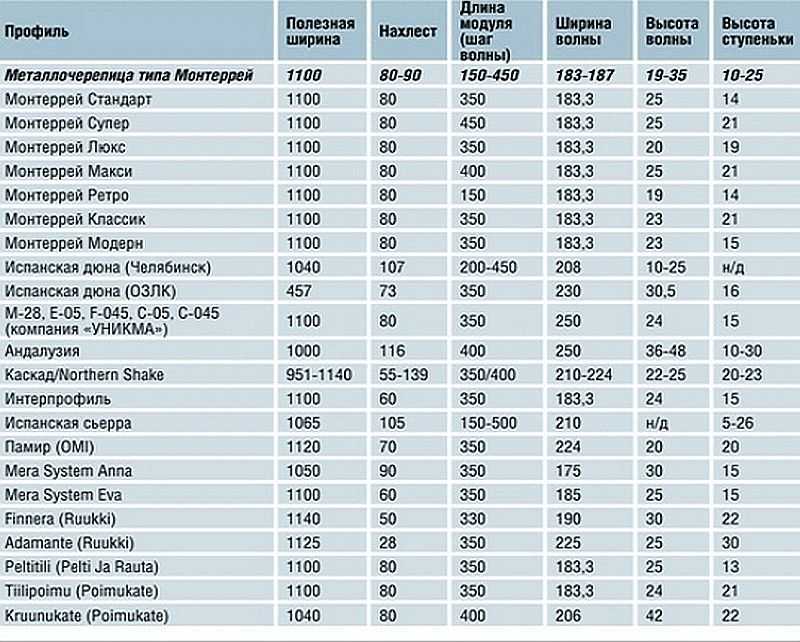
Sizes of metal tiles of various profiles
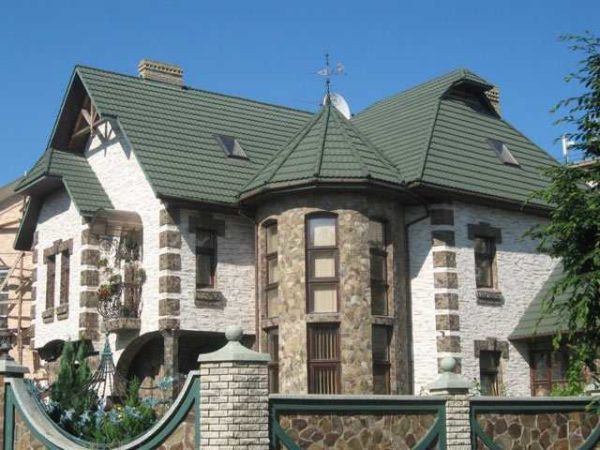
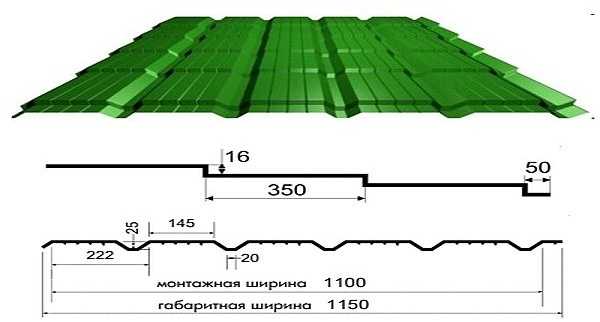
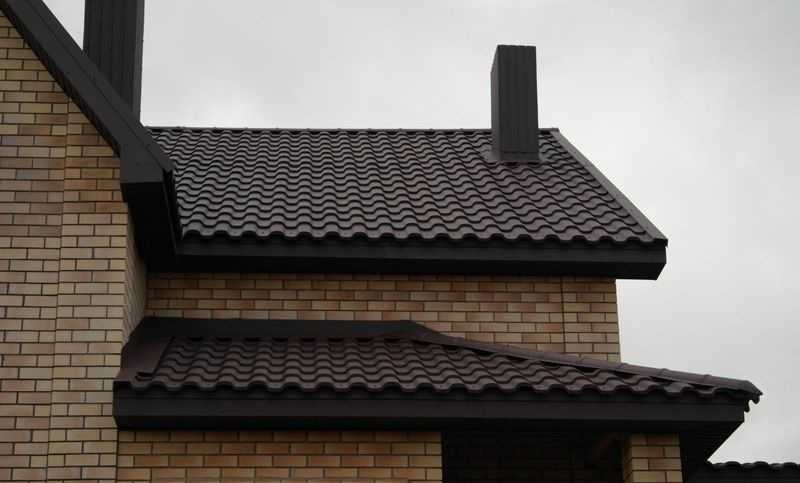
Metal roofing in 70% of cases is made from the Monterrey profile. It has a rounded, slightly asymmetrical waveform. There are 7 subspecies with different wave parameters.

It looks like Monterrey on the roof
The next most popular profile is Cascade. About 15% of metal roofs are made of it. It is formed by straight lines and has a clear geometry. It looks very interesting on the roofs of complex shapes with a lot of broken lines.

This is how the metal tile Cascade on the roof of the house looks
This profile is used more in regions with average wind and snow loads - the wave height is low, the loads can withstand medium.
Profile dimensions Cascade
About 10% of the market is occupied by Andalusia metal tiles. It resembles the classic semicircular shingles more than anyone else. The profile is symmetrical, with pronounced drops.
Exterior view of the roof with Andalusia metal tiles
The profile is designed so that the joint is on the wave wall, it is practically invisible. The impression of a monolithic roof covering is created.
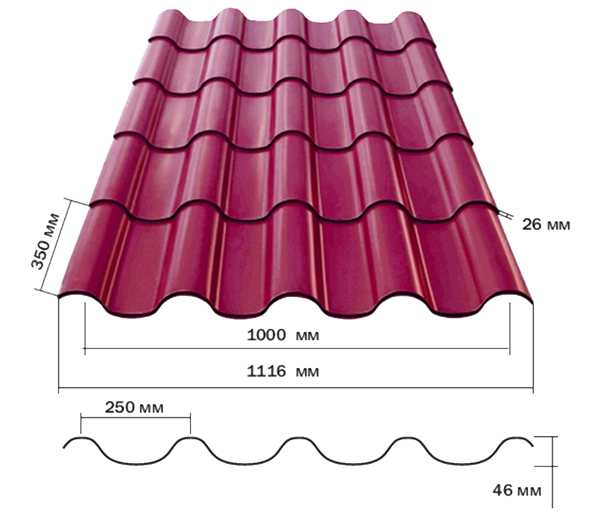
Sheet sizes and wave parameters of Andalusia metal tiles
If we talk about color, then, depending on the type of coating, shades are usually from 20 to 40 pieces. Choose the one that suits your taste best.The service life or other characteristics do not depend on the color, although it is believed that dark colors fade faster. In fact, the rate of fading depends on the quality of the coating and pigment, but not on the color.
Calculation of the amount of metal tiles
To calculate the required number of sheets of material, you first need to determine the type of profile and the manufacturer of the metal tile - the exact dimensions of the material itself will be needed, and each profile has its own. Then you need to make accurate measurements of the slopes - length, height, if any, you need to measure all the ledges or other decorative elements, which will need to be sheathed with roofing material. If the roof is of a complex shape, it is better to draw its plan, put down all the dimensions and then sit down for the calculations.
Number of rows
It is best not to look for metal tiles in shops or markets. It is advisable to go directly to the manufacturer. It's not just the price - it may not be very different, but the fact that many workshops / factories offer to cut sheets of the required sizes. The minimum sheet height is 0.7 m, the maximum is 8 m. That is, you can order the required number of sheets covering the roof slope from the ridge to the overhang (taking into account the eaves).
This option is good because the metal roofing will not have horizontal joints, which means there will be less chances for a leak. The second plus is the minimum amount of waste and less material itself (due to the absence of horizontal overlaps, several square meters are saved). Cons - difficulties with delivery, lifting long sheets upward, inconvenient stacking.
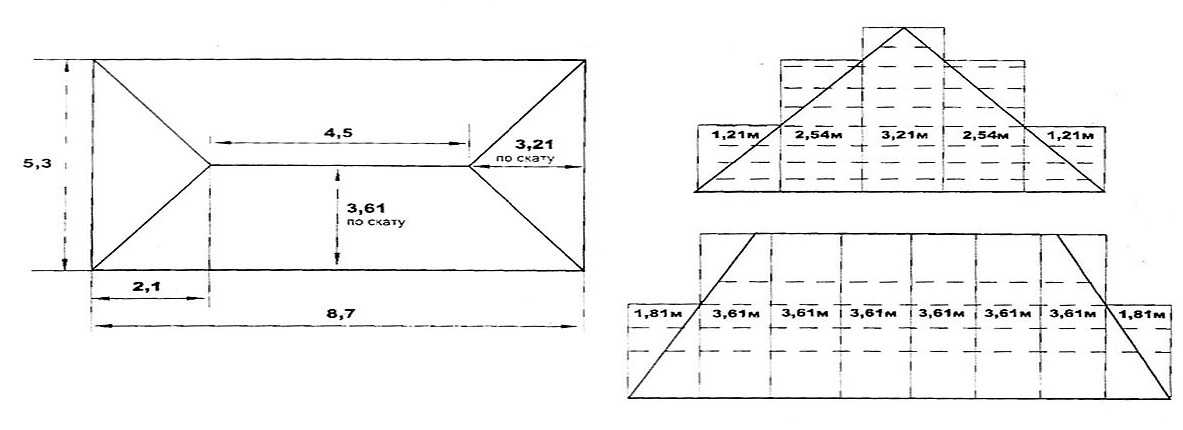
Calculation of a rectangular roof slope
When using sheets of standard sizes, the height of the roof slope is divided by the useful length of the sheet. The resulting figure is always rounded up. The useful length is obtained after the horizontal overlap value has been subtracted from the total length - from 100 to 200 mm. The flatter the slope, the greater the overlap of the sheets is needed so that precipitation cannot get into the under-roof space. On roofs with an angle of inclination up to 12 °, one sheet overlaps the other by at least 200 mm, with a slope from 12 ° to 30 °, the overlap is 150-200 mm, more than 30 ° - 100-150 mm. A given amount of overlap is subtracted from the total length of the sheet, this will be the "useful length".
An example of calculating the number of rows of metal tiles on the roof... Let the length of the slope be 4.5 m, the useful length of the sheet - 2.3 m. Divide 4.5 by 2.3, we get 1.95, round up to an integer - we get 2 rows. In this case, only a small part of one sheet will go to waste, but there are times when more than half is cut off. This is very unprofitable, since this piece cannot be used anywhere else.
Number of sheets in a row
Take the length of the slope and divide by the useful width of the sheet. This parameter is indicated in the technical specifications for the metal tile. Most often it is 110 cm (1.1 m). The resulting number is rounded up, we get the number of sheets in a row.
An example of calculating metal sheets in a row. Suppose the length of the overhang is 8 m, the useful width of the sheet is 1.1 m.When dividing, we get 7.27 pieces, but round to a larger integer and get 8 pieces in one row. Moreover, more than 2/3 of one sheet will go to waste.
Features of hip roofs
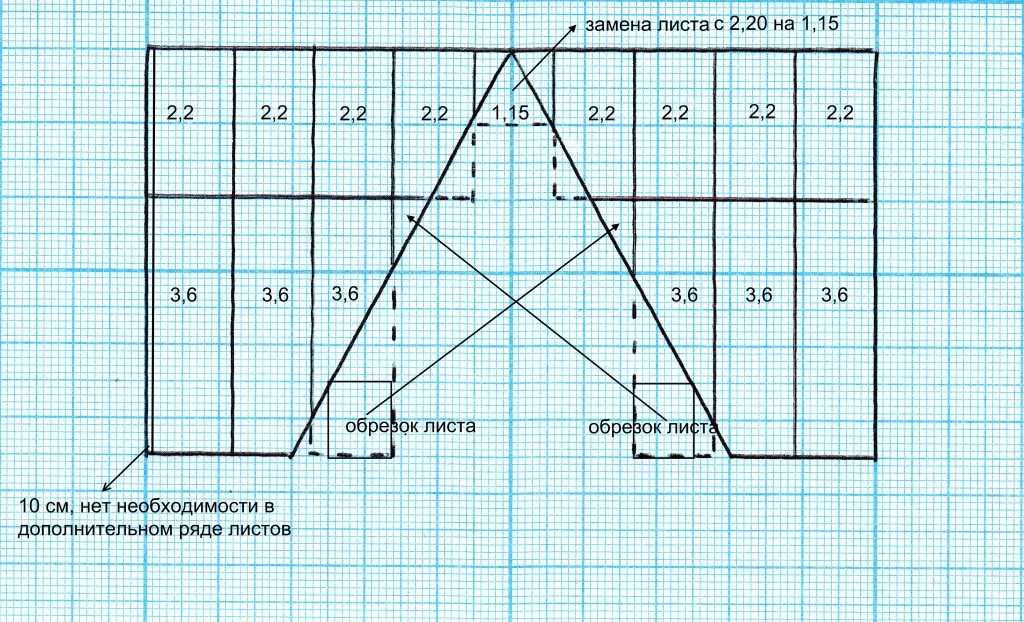
Hip roof slopes have a triangular or trapezoidal shape. Here it is necessary to select the length of the sheet - to minimize the amount of waste.
An example of the layout of sheets of metal on a hip roof
The height is selected so that no more than half of it goes to waste. It is quite difficult to do it manually, and there is still a significant error - there will be 20-25% more waste than when calculated using programs. They are usually available from vendors and manufacturers. It is better to provide them with an accurate calculation, and at home to first measure the parameters of the roof (or call a measurer), and then try to choose the dimensions yourself.Then you can compare the amount of material required, calculated by you and proposed.
Determination of the number of additional elements
A roof made of metal tiles requires a large number of various additional elements (extras) that shape the ridge, the edge of the overhang, the sides of the slope, the passage of the pipe, the valley (the junction of two adjoining roof slopes). The more complex the shape of the roof, the more voluntarily required. With a simple gable roof, ridge elements and plugs, cornice and pediment strips will be needed. That's all.
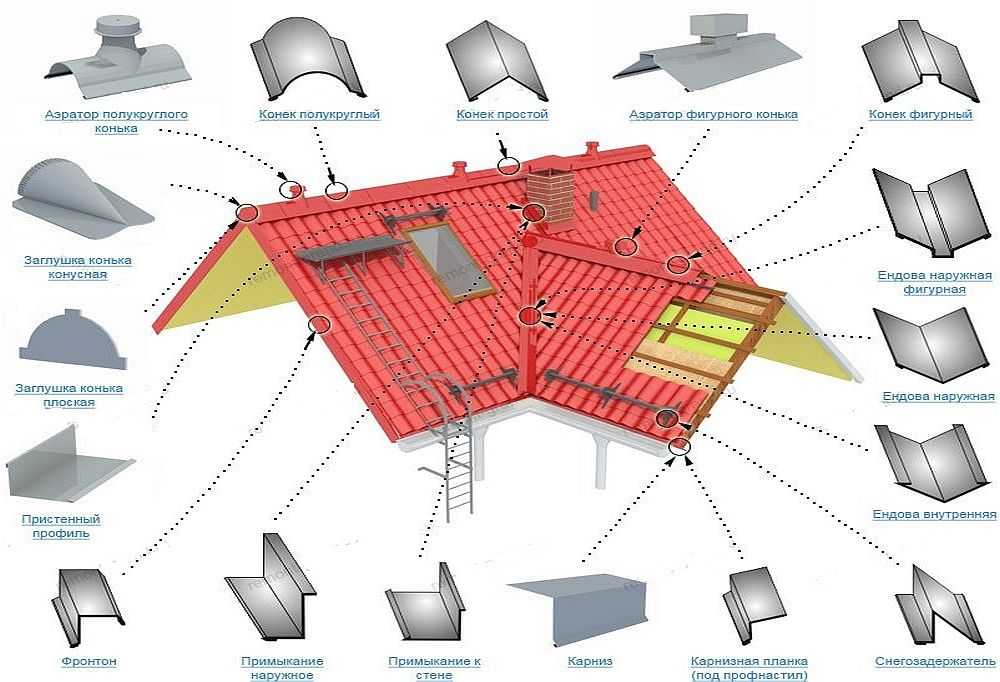
What are the additional elements for metal roofing and why are they needed?
Despite the wide variety of addons, they are all considered the same. Take the length of the surface to be mounted on and divide by the useful length of the element. It is usually standard and is 1.9 m (total length 2 m). The result is rounded up.
What and how to attach
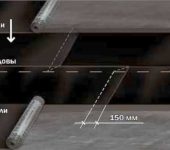
The metal tile is fixed with special self-tapping screws with rubber washers. As well as the main material, they are made of galvanized steel, and on top are painted to match the coating. When installing, the self-tapping screw must be screwed strictly perpendicular to the roof surface, its inclination is not allowed.
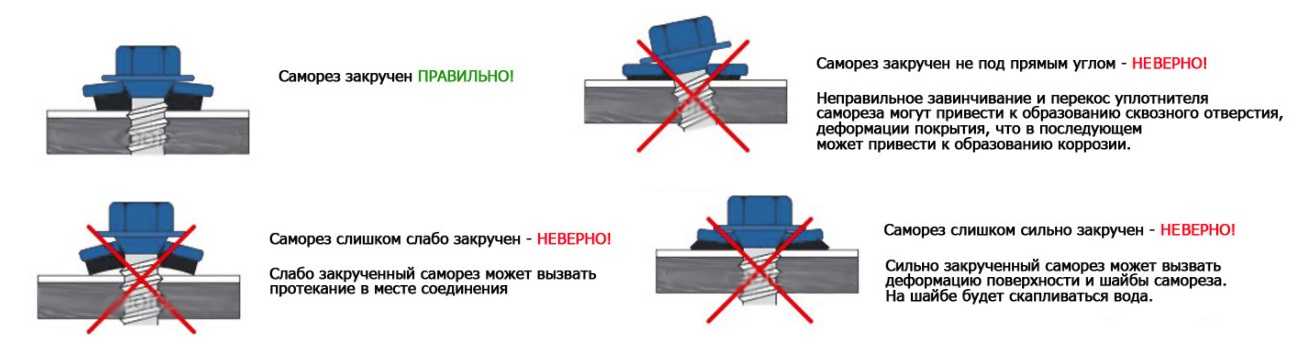
How to properly screw the screws into the metal tile
When fixing metal tiles, you must also pay attention to how tightly the fasteners adhere to the surface. It is impossible to tighten too much, bending the metal, but also a loose fit must not be allowed - the connection will not be airtight.
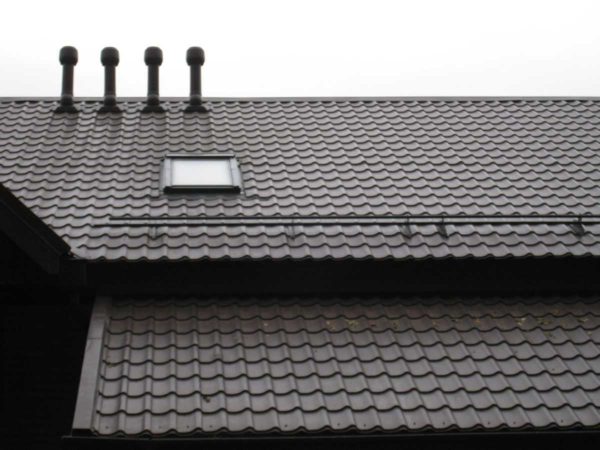
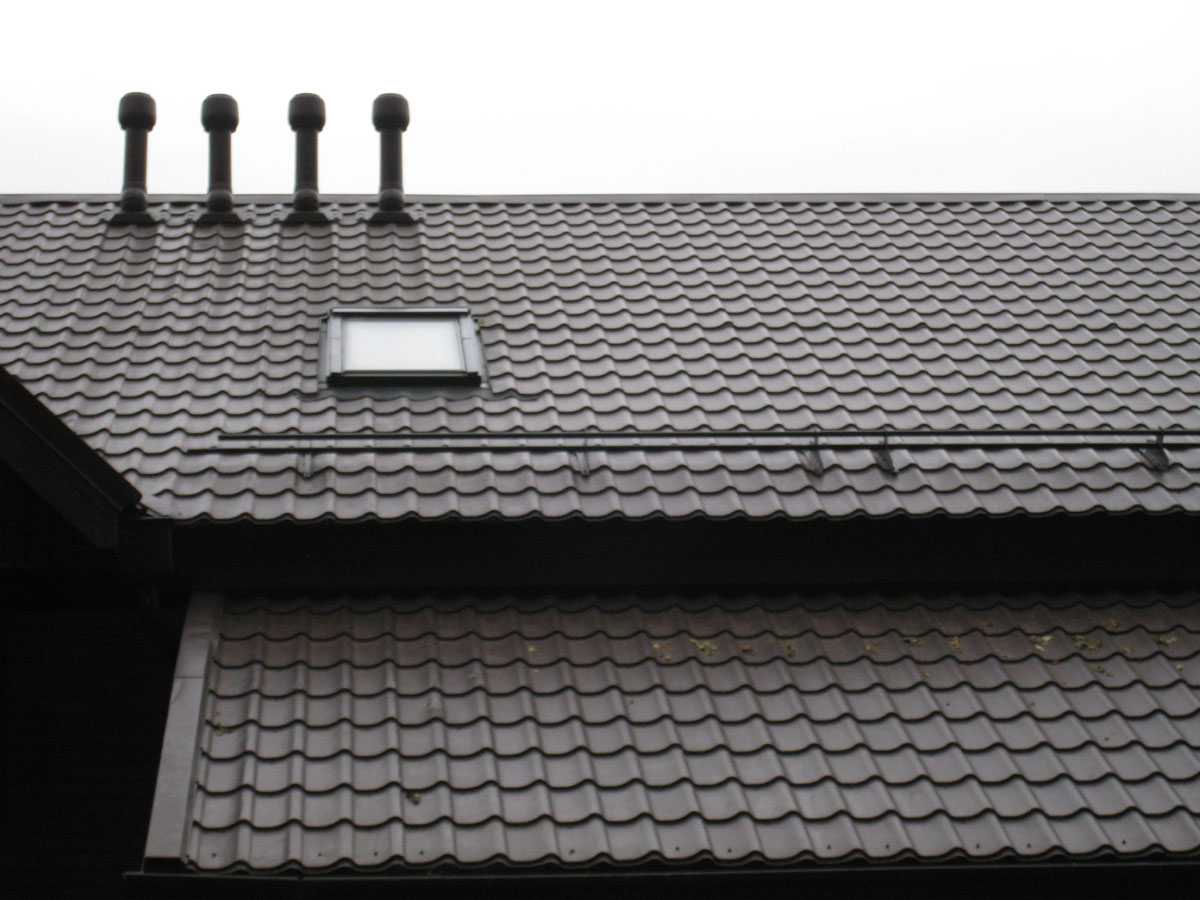
Lathing for metal tiles
Metal tile is a rather rigid material, therefore, a sparse crate is made for it, which consists of slats that are located along the eaves of the roof.
What material
If the roof made of metal tiles has a simple structure, an inch edged board (24-25 mm thick) with a width of 100 mm goes to the crate. On a roof with a complex shape or in regions with heavy snow loads, it is better to use a plank of 32 mm thickness or a beam of 50-50 mm. The beam is also used with a large distance between the rafters (more than 80 cm).
Sheathing step
Installation of metal tiles on the roof has one important feature. The profile has the strongest place - under the step of the wave in the hollow. It is here that the screw must be tightened. The lathing must be made so that the middle of the plank is just under this place. This is what causes difficulties: the profiles have different sizes, therefore, each of them requires its own step of installing the battens. This value can be determined by measuring the already available material, but, usually, this parameter is indicated in the instructions for the metal tile.
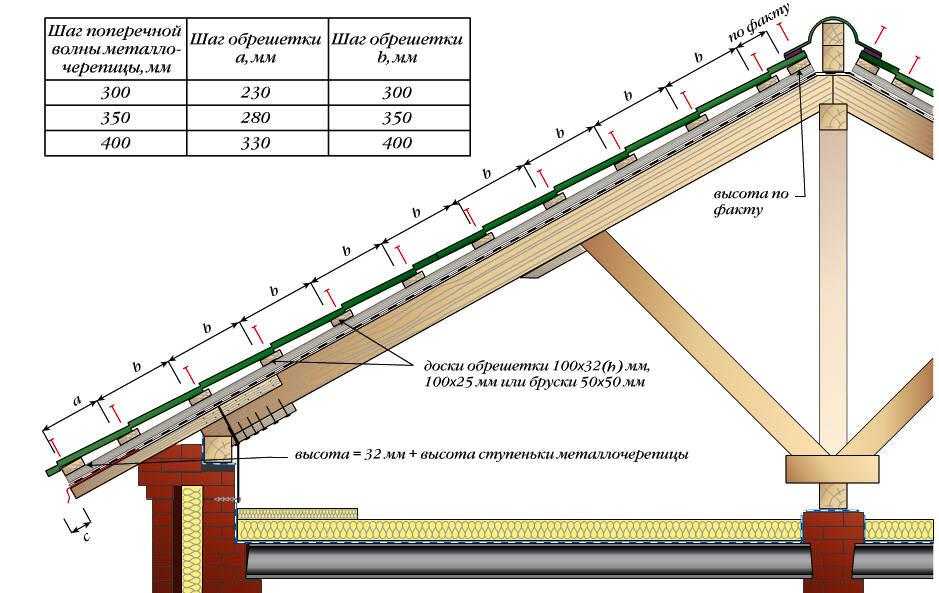
An example of a lathing for metal tiles
There are several important points in the construction of the sheathing for metal tiles. Please note that the first plank along the overhang is thicker than all the others - the step height for this profile is added to the selected plank thickness. In addition, this bar is made wider than all the others - a drip will be attached to it, which closes the cut, protecting the wood from precipitation.
Also note that the second plank is not packed with a standard, but with a shortened step, otherwise you will not get further into the wave. The step when installing the last plank near the ridge also differs - it is obtained in fact, as well as the height of the plank. We remind you that there should be large enough gaps in the ridge area - and the crate and roofing material should not be joined. This is necessary for proper ventilation of the attic.
Installation procedure and features
Before you cover the roof with metal tiles with your own hands, you need to familiarize yourself with the rules for working with the material:
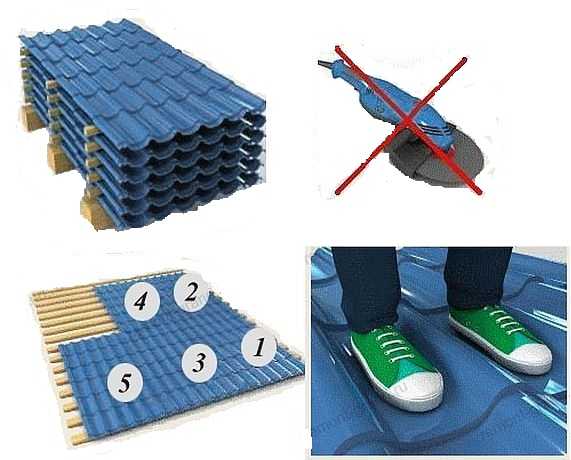
- First of all, you need to take care of proper storage - in ventilated stacks, arranged in bars.
- When cutting, do not use an angle grinder (grinder), but only cut with a jigsaw or metal scissors.The grinder overheats the metal, which causes the zinc to evaporate, and the material will begin to rust at the cut points.
- Begin laying the sheets from the lower right corner (the installation diagram of the metal tile sheets is in the photo below).
- When installing, wear soft, well-fitting shoes, step only on the lower part of the wave.
How to cover a roof with metal tiles: rules
Next, we will talk about the device. Metal roofing comes in two versions: with a cold or insulated attic. Depending on the type chosen, the order of work changes - when arranging a warm attic, two more layers are added - insulation and a vapor barrier membrane from the side of the room.
Cold metal roofing
This type of roof is suitable if the attic is planned to be non-residential. Then all the insulation is concentrated in the ceiling, and the function of the roof is only to protect from precipitation and wind. The order of work is as follows:
- The first lathing bar (higher) is installed along the overhang.
- A drip bar is attached to it.
- A waterproofing membrane is spread over the rafter legs. Installation starts from the bottom, the film is rolled along the overhang. The bottom edge of the film extends over the drip bar, ending after the fold line. Fasten the film with strips 30-35 mm thick to each rafter leg, not in a stretch, but with a mandatory sagging of 2-2.5 cm.The second row of the film overlaps the first by at least 15 cm, the joint is glued with a special adhesive tape (sold in the same place where and membrane). The membrane is attached to the drip bar with self-tapping screws (galvanized or stainless).

Cold metal roofing: layers
- To the strips that hold the film, boards (bars) of the sheathing are attached with the selected step. Use galvanized or stainless self-tapping screws, the same nails with a large flat head. The length of the screw and nails is three times the thickness of the battens.
- Sheets of metal tiles are laid on the crate, placing them strictly along the overhang (if it goes horizontally for you). Neighboring sheets overlap by one wave, installation is carried out from bottom to top, with a mandatory horizontal overlap by the required amount (see above).
- Ridge elements, end strips are mounted. They are fastened with the same self-tapping screws as metal tiles, with a step of 10 cm.
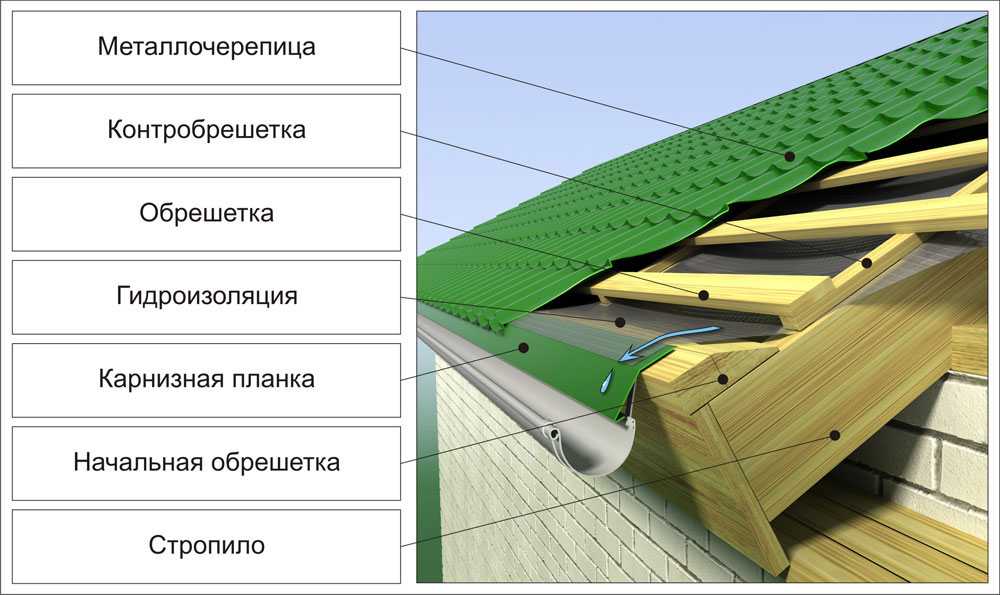
On this we can assume that the cold metal roof is ready.
Warm roof
When installing an insulated roof made of metal tiles, an insulating material is added in the roofing pie, which is attached between the rafters, and a vapor barrier film, which is stuffed onto the rafters from the attic side. Further, the entire installation process is similar.
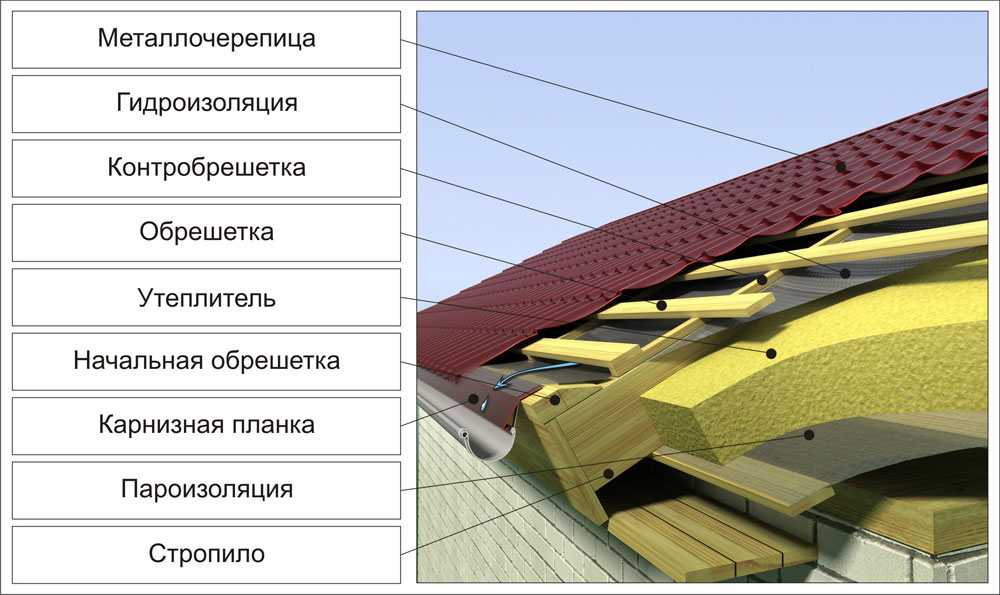
Diagram of the device of a warm roof made of metal tiles
How to attach sheets
When we cover the roof with metal tiles, the screws must be correctly positioned. There are several rules to follow:
- Self-tapping screws are installed in the lower part of the wave, 2 cm below the step.
- The bottom row, along the overhang, is attached to each wave. Fasteners are also installed in the places of horizontal and vertical joints.
- The waves between the horizontal joints are fastened through one in a checkerboard pattern.
These rules are clearly shown in the diagram. In a graphic representation, some things are easier to understand.
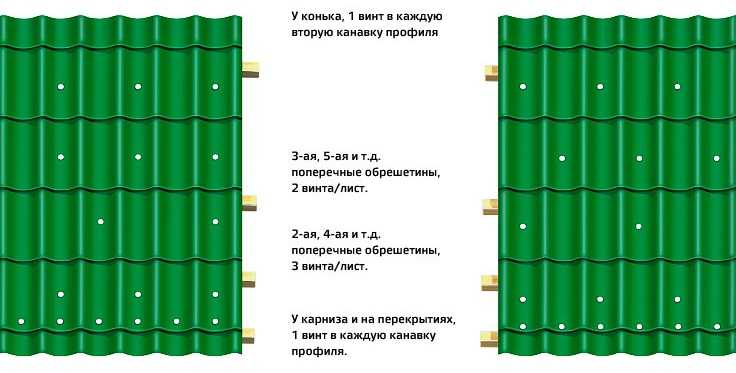
Scheme of fastening metal tiles with self-tapping screws


Yeah .. metal tiles are relevant in our time, although there are many innovations coming from us, however, it remains in the first positions. because of this, knowledge of the installation and their features would be mandatory. Helpful article. thanks.
The metal tile is gorgeous)). My tower was building a house with such a roof. The house has experienced many weather events and at least she had henna).