How to build a barn: detailed step-by-step instructions with a photo
Whatever the area of the house, you cannot do without a barn on the site. Not everything can and should be brought into the house, even if there is a place, and if there is not, then even more so - farm buildings are necessary. This, by the way, may be the first experience in self-construction: you can build a shed with your own hands without skills. The main thing is that the arms grow from the right place.
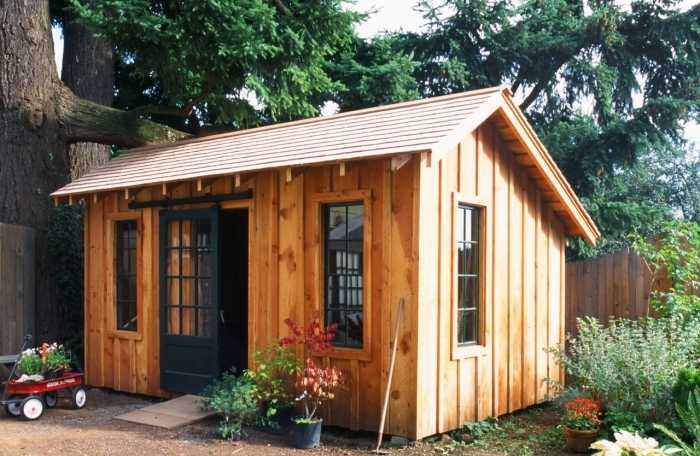
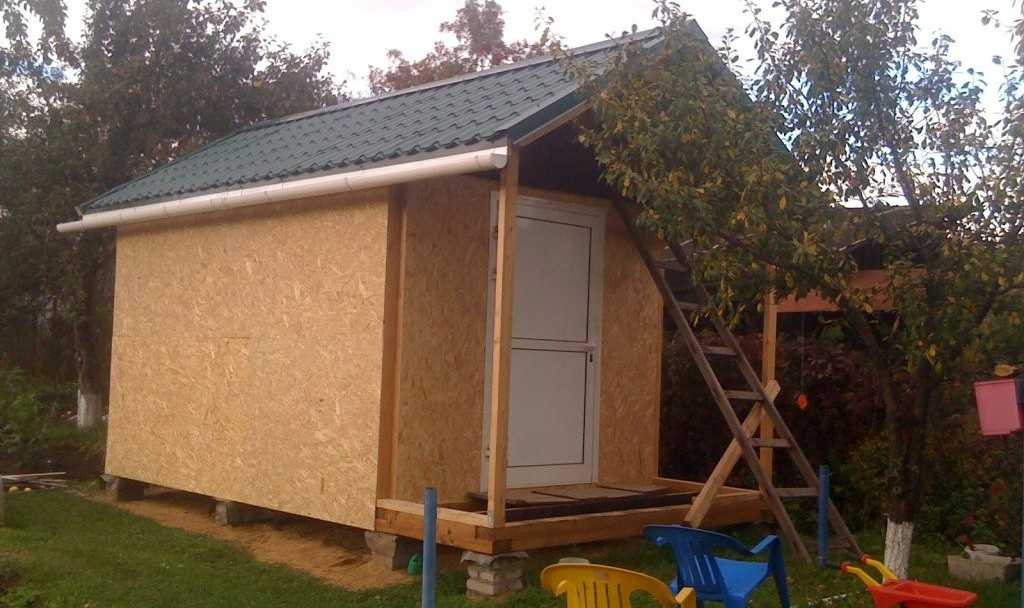
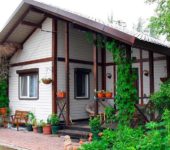
If desired, the barn can be made like a small house
The content of the article
What materials are they built from?
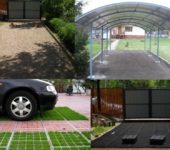
If the barn is located near the house and you care about its appearance, it makes sense to use the same material as when building the house. If you do not want to spend a large amount on a household building, you can choose the finish so that you cannot tell from a distance. In most cases, this is not very difficult: there are many technologies and many materials very accurately reproduce the appearance of expensive finishing materials. A striking example of this is siding... It is available under a log, timber, brick, stone with different texture. So you don't have to use expensive materials to build a barn. It is more practical to use an inexpensive construction technology, and then sheathe it with material with a texture similar to the finishing of the main structure.
How to build a barn quickly and cheaply
The fastest and at the same time inexpensive option for building a barn is by frame technology... The frame can be wooden or metal, it is sheathed on the outside with trim, put the roof and that's it, the barn is ready. If the shed is planned to be wooden, it is assembled from timber and boards. A metal shed can be made more conveniently from a profiled pipe: a square section and it is easier to cook and join at times. There is also a special metal frame. It is assembled on self-tapping screws, and the entire structure is ordered and manufactured at the factory. Such houses are considered to be the cheapest; sheds are unlikely to be expensive. The assembly of both a metal and a wooden shed takes several days: it has been tested more than once.
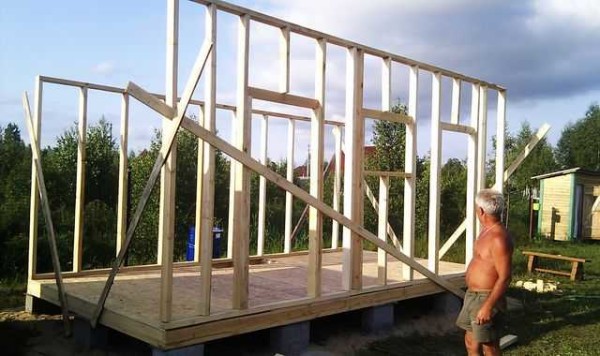
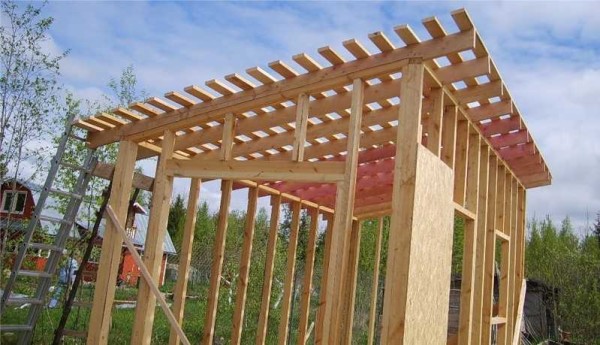
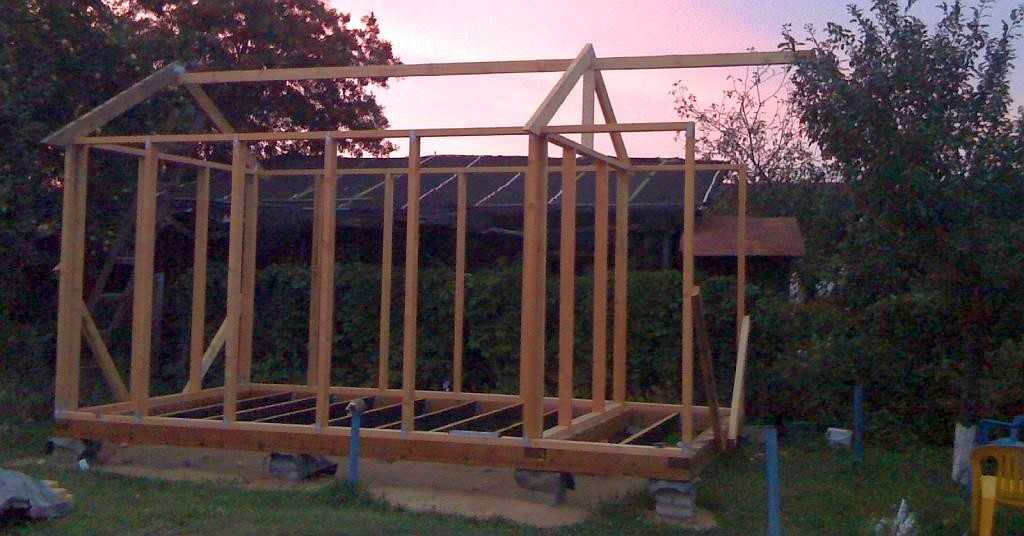
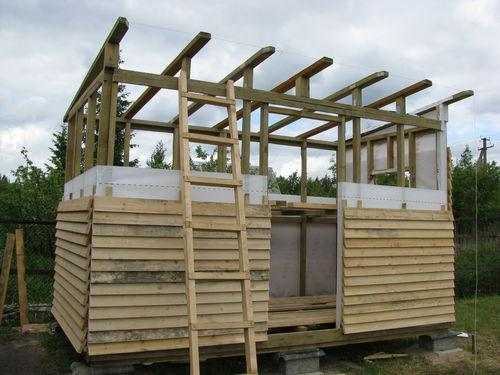
Half-built barn: the floor and two long walls are standing, it remains to install short ones and make a rafter system
The frame construction turns out to be light, therefore the foundation for the shed needs a lightweight one. In most cases, pillars, concrete blocks are enough, sometimes screw piles are installed or bored. On more difficult soils and for those who like reliability, you can build a monolithic or prefabricated (from foundation blocks) shallow strip foundation.
On reinforced strip foundation you can even build a shed made of building blocks or bricks. In this case, even on heaving soils, the building will stand normally. If it moves, it will move with the foundation, so the risk of cracks is minimal.
A frame shed can be built without a foundation. Then the racks (processed against rotting) will need to be deepened by 60-80 cm, concreted, and then the lower strapping will be attached to them, but which the floor logs will rest on. But you can't build a big building that way. Maximum - a small closet and woodcutter nearby.
Another option. It is suitable for soils from which water flows well, and the subsoil waters are deep. Then they mark out a site that is 50 cm larger than the planned barn in each direction, remove the sod and make sand and gravel bedding. A strapping bar is laid on the tamped crushed stone and the floor logs are attached to them (treated with an antiseptic for direct contact of wood with the ground). That's all. No complications.
Barn without foundation
This is far from the best option: even with a low groundwater level and careful processing of wood, the shed will not last long. If that suits you, you can do it.
TOHow to build a toilet in the country, read here (diagrams and drawings).
Foundation for frame shed
All types of pile or columnar foundations assume the location of single supports along the perimeter: necessarily at the corners of the structure and at the junction of the lintels (partitions), if any. The step of installing the supports depends on the size of the shed and on what logs you plan to use. The larger the span, the larger the section required for the logs.
For example, for a shed width of 2 meters, you can put only two rows of posts and the logs will be 150 * 50 mm (in the extreme case, 150 * 40 mm). If the width of the shed is 3 meters, then either put intermediate supports (posts, piles), or take a board 150 * 70 mm. Consider what will be cheaper in your region, and choose.
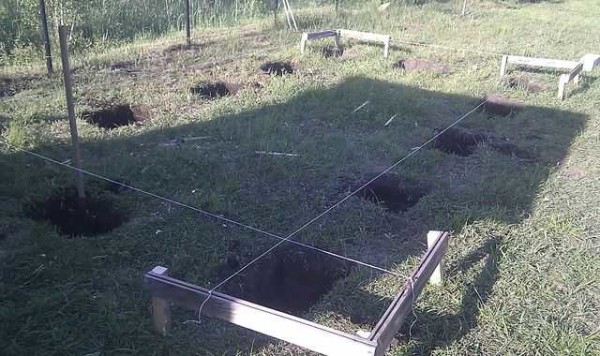
Dug pits for pillars
With a board width of 100 mm, the floor flexes noticeably under your feet. So it is necessary to make the installation step of the lag about 30 cm. Then there is no deflection at all, or it is insignificant (depends on the weight).
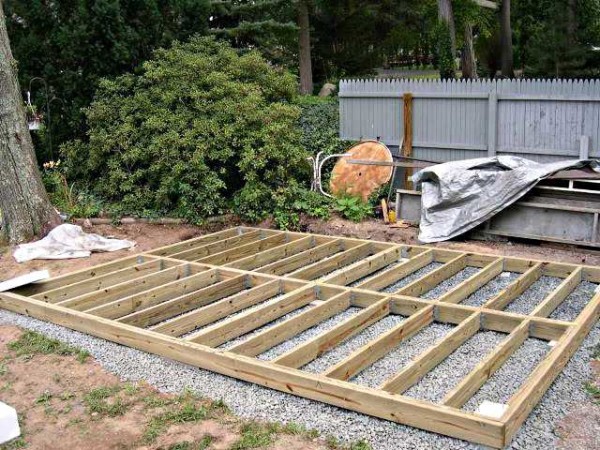
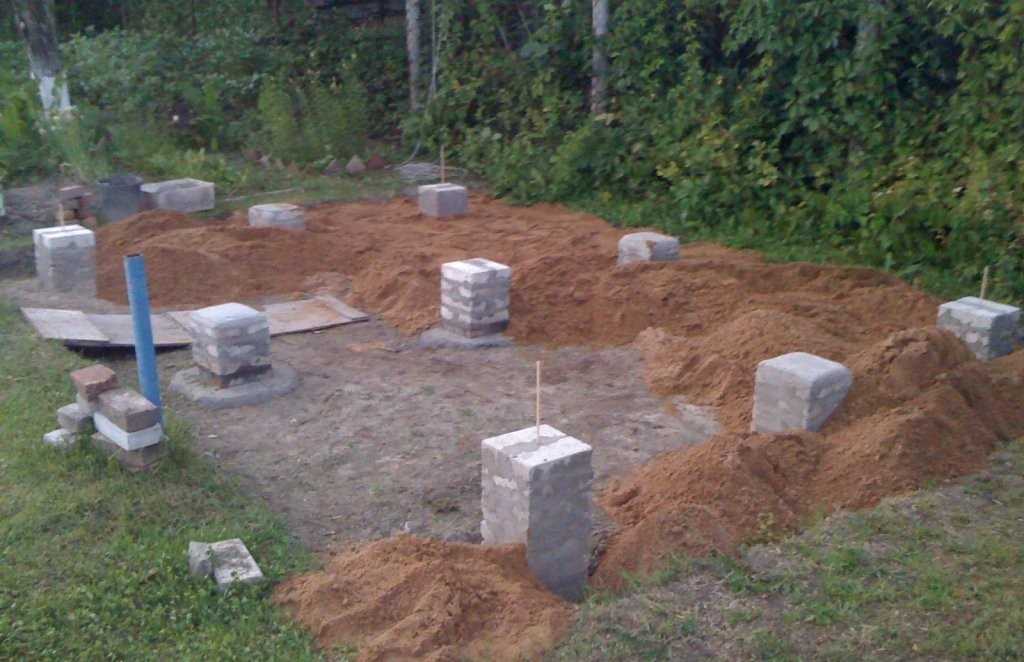
The fastest way is to make a foundation on ready-made blocks: you can buy them or make them yourself. Pits are dug under them a little larger than blocks. Sand is poured at the bottom, rammed, then gravel, it is also rammed. The thickness of the bedding in compacted form is 20-30 cm. Blocks are installed on it, and the lower strapping is already mounted on the blocks.
After the blocks are laid out, the lower strapping is attached to them
If we are talking about a shallow strip foundation, then the trench is dug 40-60 cm deep relative to the ground level, the width of the tape is about 25 cm, and the trench itself should be wider by at least half a meter or more: it is installed in it formwork. The bottom is leveled, rammed. Crushed stone is poured at the bottom and rammed again.
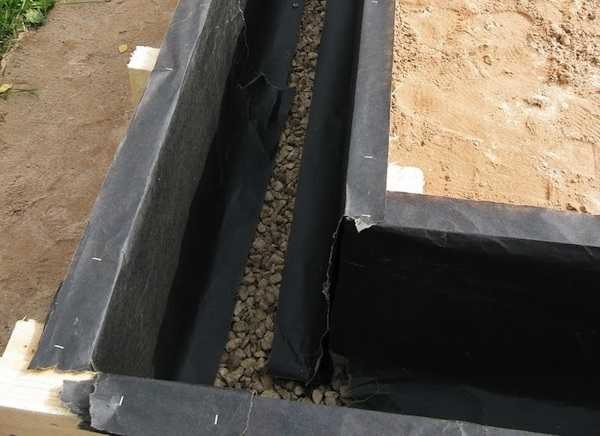
For the formwork, boards of 150 * 50 mm were used, so that they could be used in the future, they were punched with glassine. After dismantling the formwork (as the concrete grabbed), they were disassembled and placed like floor logs
A frame is knitted from a rod of 12-14 mm. Four ribbed longitudinal rods are tied using frames made from a smooth rod of 6-8 mm. The dimensions of the frames should be such that all the reinforcement is at least 5 cm from the edges of the tape.For example, if the foundation is 40 * 25 cm, then the rods are tied into a structure with a rectangular section of 30 * 15 cm.
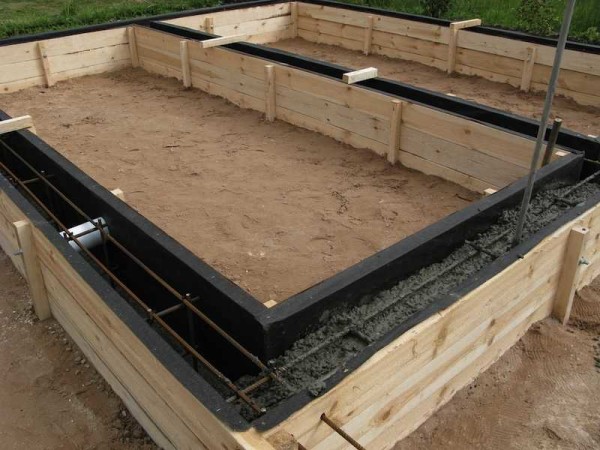
A connected frame is installed in the formwork, which is then poured concrete grade not lower than M-200
More details read about the frame for the strip foundation here.
DIY wooden frame shed: step by step with a photo
A 6 * 3 meter frame shed was built. The roof is pitched, covered with ondulin. The height of the front wall is 3 meters, and the rear wall is 2.4 m. Operation has shown that with such a difference in heights, snow does not accumulate much (Leningrad region).
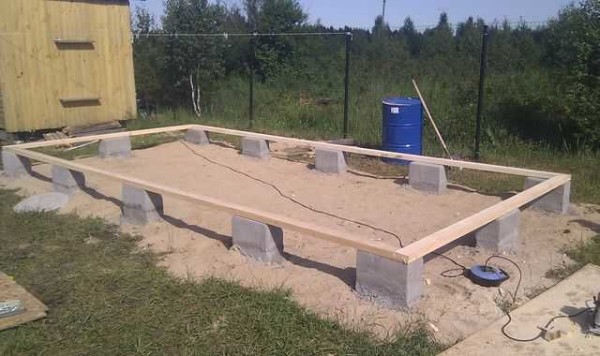
Standard blocks FBS 600 * 300 * 200 were used as the foundation for the shed. They are laid on a sand and gravel bedding 25 cm thick. A cut-off waterproofing is laid on top of the blocks - a layer of roofing material, on bitumen mastic. Above, a layer of "hydrotex" is still glued to the same mastic. Such a cake was made because the water table is high, it was necessary to guarantee the structure to be protected from moisture.
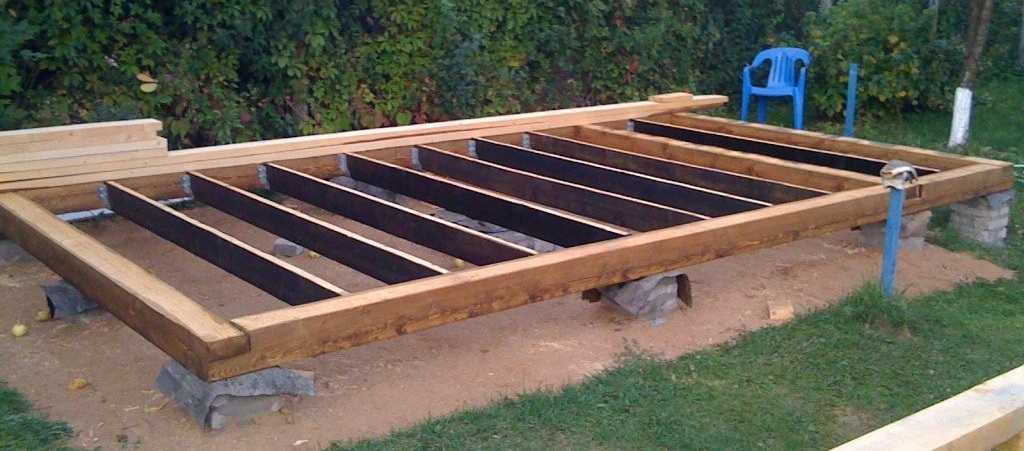
Construction of the barn begins. Waterproofing was laid on the foundation, a strapping was laid on it, and a bar was attached to the strapping
A bar with a section of 150 * 150 mm was laid on the waterproofing (all sawn timber was processed). It was connected in half a tree, hit with nails - 100 * 4 mm. For those who are unfamiliar with carpentry, you can join the beams end-to-end, nail reinforced corners to the joints from the inside, and a mounting plate from the outside.
In this version, the frame was not attached to the blocks. In regions with increased wind loads, this is unjustified.You can fix it with pins: under them, through and through, through the beam, into the block, a hole of the same diameter is drilled (12-14 mm). A hairpin is driven into it, the bolt is then tightened with a key. To hide the hat, you can drill a hole under it.
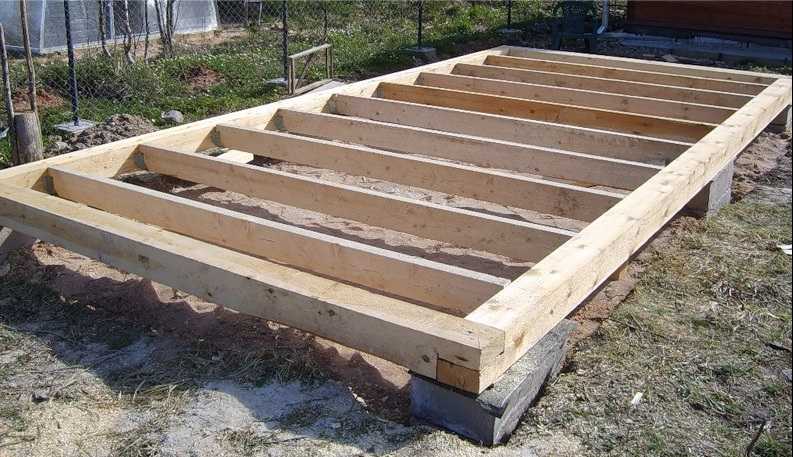
The next step is to fix the floor log. Installed on the edge of a board 150 * 60 mm. Attached to the harness with special brackets of the appropriate size. Attached to nails 100 * 4 mm.
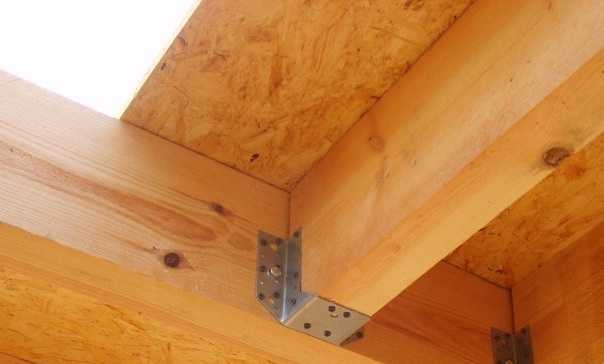
Floor lags are attached to the harness with such brackets
The logs were aligned with the upper edge of the strapping bar. Everything should be level, otherwise the floor will be difficult to lay. You may need to level it with a plane or remodel.
The frame was assembled using the "platform" technology: first, the floor was laid, and the walls were mounted on it. The wall frame or part of it is assembled on the floor. In some cases, they are immediately sheathed from the outside, if panel material is selected for sheathing. And already in this form (with or without sheathing) they are lifted, set up vertically and fixed.
There is a second technology called "balloon". The frame is mounted along it gradually: corner posts of the frame are mounted on the strapping or even immediately on the blocks. They are leveled in all planes. A rope is pulled between them, along which the remaining racks are then exposed. They are also nailed one at a time, fastening together with bevels and temporary crossbars.
You may be interested in the article “We make woodpiles and woodpiles with our own hands "
In this case, the "platform" technology was chosen and OSB of 18 mm thickness was laid on the logs. In general, the floor can be made from planks, plywood (moisture resistant), OSB, etc. The board will need 20, plywood - 13-15 mm, but moisture resistant (OSB moisture resistant by default) is needed.
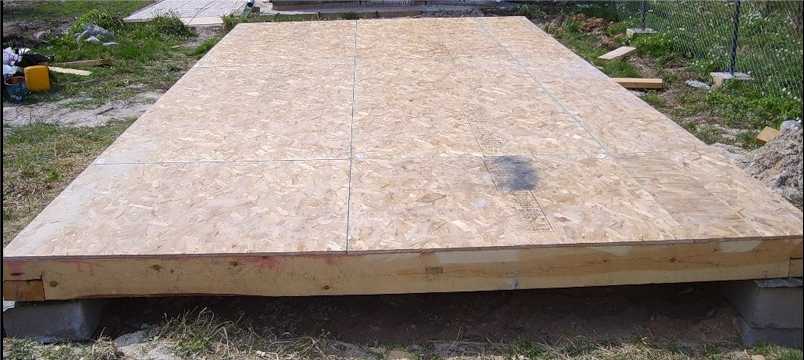
The floor is laid in the barn
Then the assembly of the walls began. The frame is completely knocked down: lower harness, racks, upper harness. In this form, it is installed exactly along the edge of the strapping beam, exposed, reinforced with safety struts, stops, slopes. Nailed through the flooring to the harness. The nails were taken 200 * 4 mm.
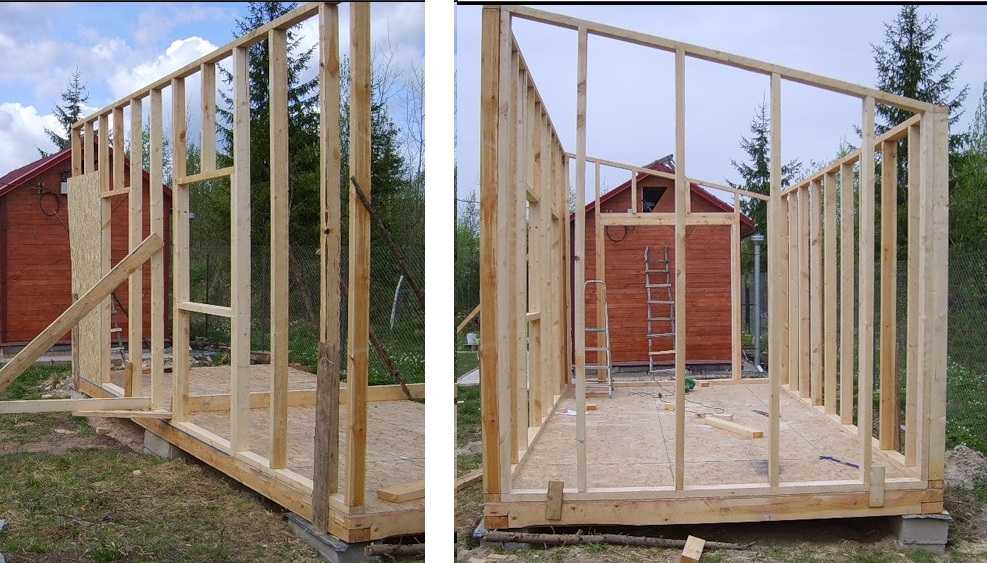
Collected walls. The upper harness will immediately support the rafters
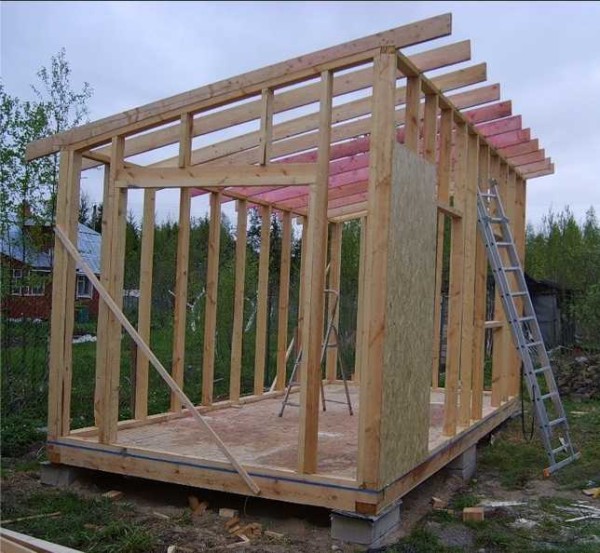
For the assembly of the frame, boards of 100 * 50 mm were used, the distance between the posts was 600 mm, the rafters were installed with the same pitch. The rafter system was assembled from 150 * 40 mm.
Window and door openings are reinforced - two boards are nailed, which are knocked together with nails in a checkerboard pattern after 20 cm. The load is greater here, therefore reinforcement is required. A gate is provided at one of the ends - for loading / unloading bulky items. Therefore, in this wall (in the photo you can see) only corner posts and reinforced ones - for fastening the sashes.
View of the end, which will have wide double doors
Since the roof is single-pitched, the rafter system is simple: they are laid on the edge of the boards, which are selected for the rafters. Their length is longer, since the overhang of the roof is necessary. It is usually 30-50 cm on each side. In this version, with a barn width of 3 meters, the length of the rafter legs (taking into account the slope) was 3840 mm.
They were nailed obliquely with nails - two on each side. It can be strengthened by installing corners: this way it can withstand even significant wind and snow loads.
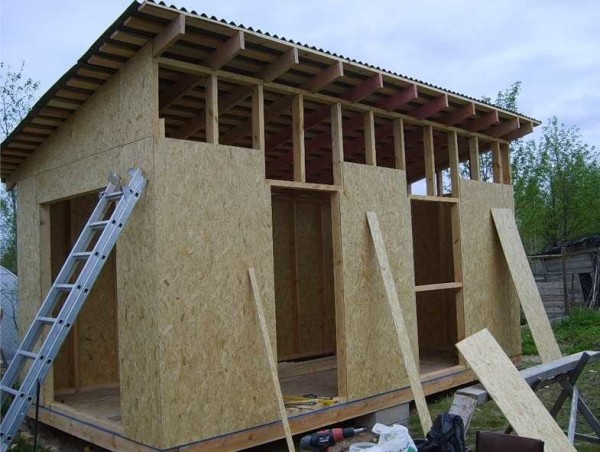
Lathing for ondulin
Further - a lathing (100 * 25 mm) is mounted on the roof. The step of its installation - according to the recommendations of the manufacturer "ondulin" - 40 cm. And the roofing material was laid (the nails were bought together with the coating).
The outside walls were sewn up with OSB 9.5 mm thick.
Barn siding process
We installed doors and made small steps.
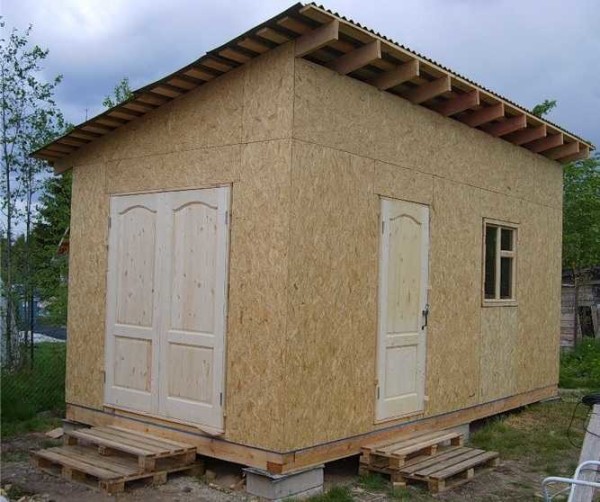
The doors are installed old, tidy
The wind board was installed with the final touches. Then the shed was sheathed with clapboard and painted with paint to match the rest of the buildings on the site. A do-it-yourself shed on a finished foundation was built in two days off. The clapboarding and painting were much later - almost a month later.
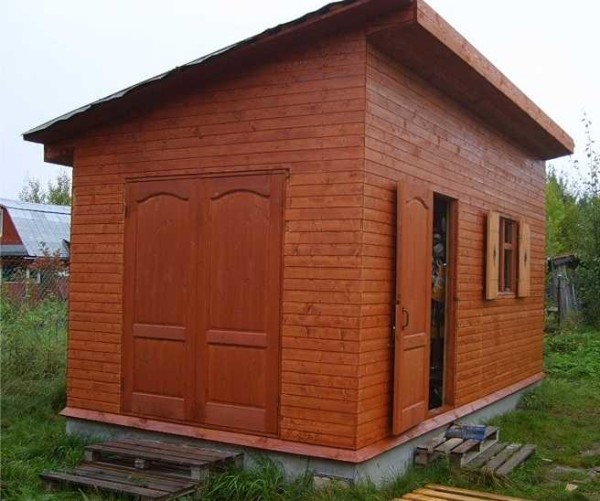
The final barn ... beautiful
The unattractive foundation is sewn up with cut-to-size asbestos sheet. It is a beautiful shed.
In details read about the principles of timber frame construction here.
Shed with a gable roof made of metal tiles
This shed was built alone. The construction is also frame: the cheapest way. In this case, the assembly method is "ballun" - gradual exposing of racks. It all starts the same way: first, we made columns for the foundation. Only this time brick.
The foundation for a barn made of brick posts
As you can see, studs are mounted in the corner posts. Holes are drilled in the strapping bar and it is put on the studs. They can be done not only in the corners, but also on intermediate posts too: it will hold on more tightly.
This barn has a small porch-veranda, therefore, a cross bar is installed at the required distance. And the wall will rest on it. The columns are also pre-made for it.
The lags were also attached to plates
Lags can also be attached with a cut. Then a log-shaped notch is cut out in the strapping bar. In depth, it should not exceed 30% of the thickness of the timber, because the log is trimmed so that it stands on the same level with the strapping. This method is more time consuming.
Next, the frame was assembled: corner posts 100 * 100 mm, intermediate - 50 * 100 mm, the upper strapping and rafter system were assembled from the same board. The top triangles are reinforced with overhead metal plates. Smaller plates were also attached at the joints of the upper strapping beam and racks. They were connected end-to-end without a cut, nailed from above and obliquely with nails. The plates have reduced the likelihood of folding under lateral loads.
Frame assembled
Next, the rafter system was assembled - a board of 150 * 50 mm, on it - a crate for metal tiles. It was chosen because the dacha was covered with the same material.
Assembled rafter system with crate
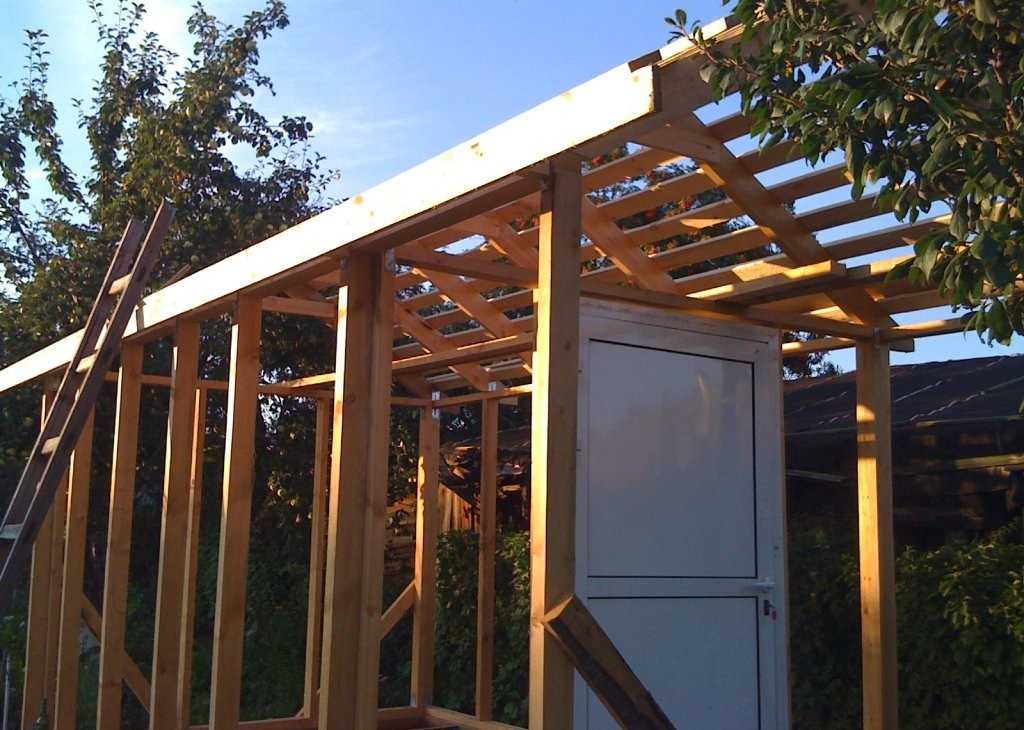
The frame was sheathed with OSB sheets - the most convenient size for construction. Subsequently, the walls will be finished with wood-like siding.
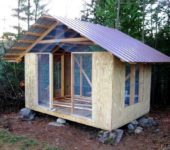
This is an almost finished shed with a gable roof. Wall decoration left
By the way, sheathing does not have to be made of plywood or OSB. You can fix the lining or board immediately to the racks. But then, when assembling the frame, you need to set slopes: without the rigidity of the slab material, the building will be flimsy. If you do not set cuttings, you can swing by hand.

Such braces will give sufficient rigidity to the walls of the frame shed.
After installing the braces, you can stuff a board, lining, block house, imitation of a bar, siding - the choice is yours.
Frame shed sheathed with a board
Similar frame sheds can be made from a profile pipe. For strapping and corner posts, a section of 60 * 60 mm or 60 * 40 mm is enough, for intermediate ones and even less - 20 * 40 will be fine. Only for attaching the outer sheathing will you need to assemble and fasten the crate. More aboutconstruction of a barn from pipes and metal profiles, read here.
For those who care about the appearance of a building, here are some ideas on how to make a beautiful barn in video format.
You can read about site planning and the basics of landscape design here.
Video about building wood sheds
The shed is beautiful, but not cheap. But decent in size, strong and in appearance does not differ from the house - it fits into the composition. Everything is shown / painted in detail, there is one violation: the waterproofing under the metal tile is laid vertically. Even with good gluing of the strips, sooner or later the water will make a path for itself. Otherwise, everything is correct.
In this case, the do-it-yourself shed is built on the cheapest, probably, foundation: concrete is poured into the old tires. On these "posts" there is a frame. Naturally, you need to put them on a flat, reliable surface and they themselves should be on the same level. In terms of strength, the base will not be inferior to the best concrete blocks, and it may even surpass them. The tires protruding from under the structure can be closed by making a step and subsequently placing flowers on it or using for other needs. It will turn out even more practical.
Another video with a step-by-step illustration of the construction of a frame barn from a bar.
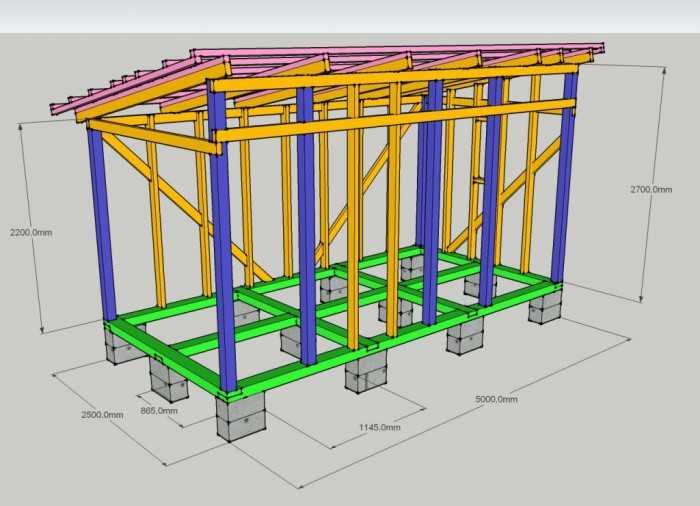
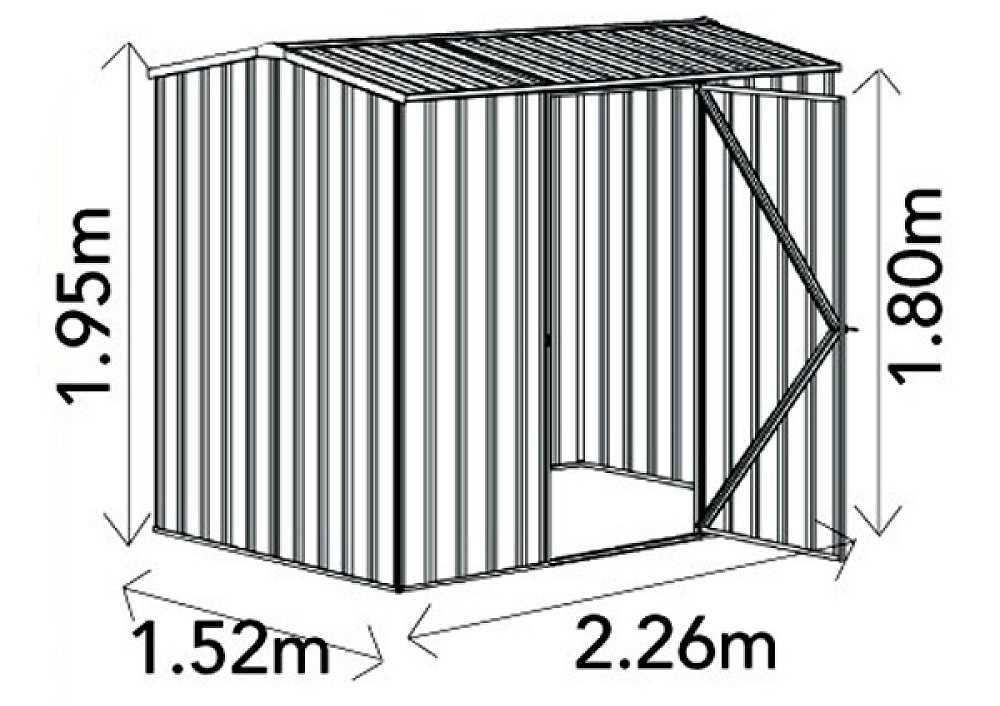
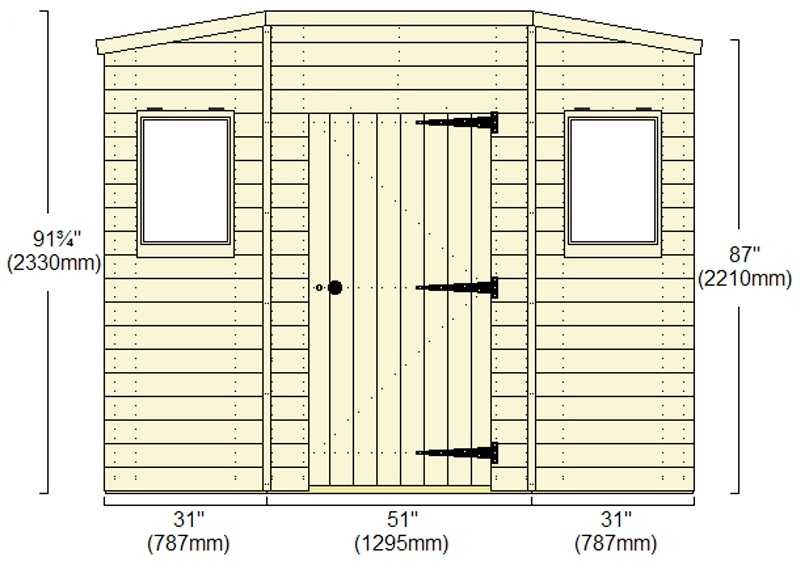
Dimensional Drawings
Several drawings to help you navigate the dimensions of the building. Adjust as needed to suit your site or needs.
Shed with a pitched roof - drawing with the layout of the racks
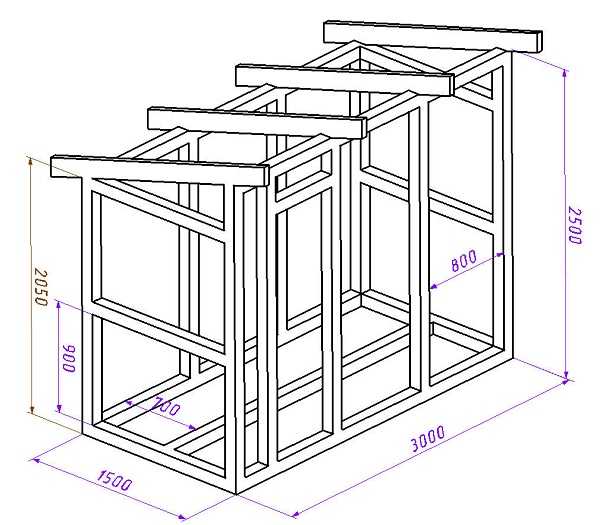
Shed with three compartments under a pitched roof. The dotted line indicates the installation locations of the racks (and supports for them)
Barn design with all required elements
Gable roof on a metal profile barn
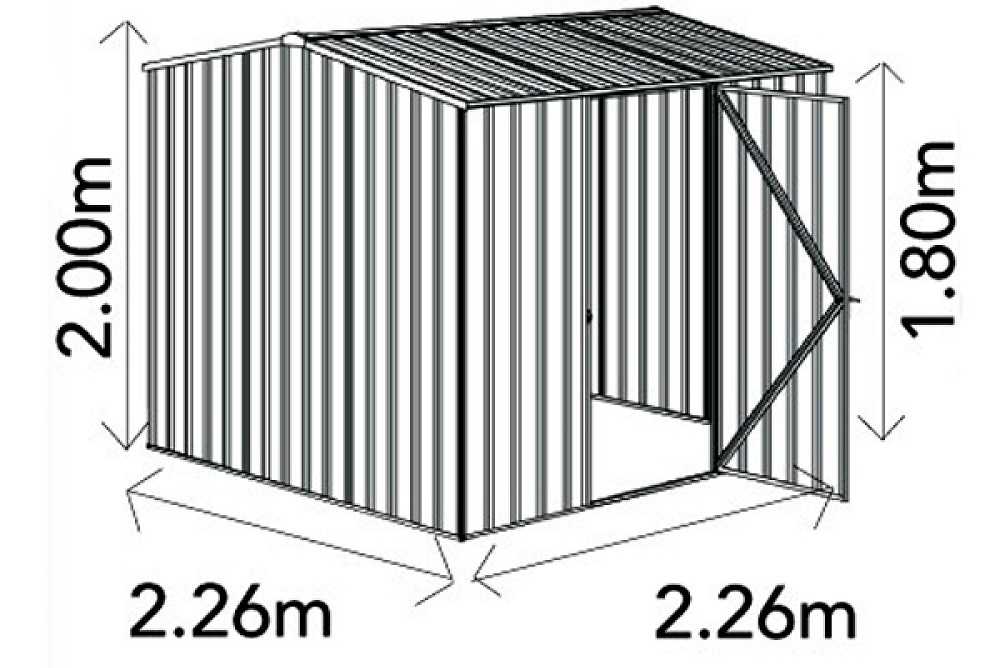
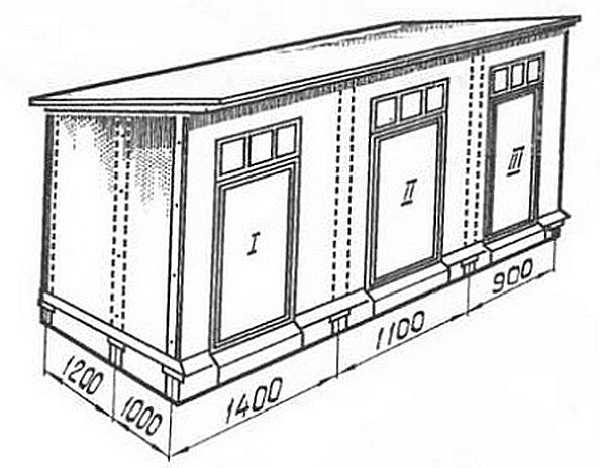
Square Barn - Dimensions
Shed with sloping roof


I liked the article. Everything is clear and understandable. Thank you.
Question.
Can you use curbs instead of blocks under the shed?