How to make a country table
The arrangement of a summer residence is an ongoing process. You build something, then you improve it. Moreover, furniture is constantly required and tables are most in demand in the country. And put in the garden, and near the house, and also in gazebo... We will tell you how to make a table for a summer residence with your own hands in this article using the example of finished projects.
The content of the article
Homemade table from pallet boards
Disassembled pallets served as material for this table. Naturally new boards can be used. There is only one condition - they must be dry. You can buy dry ones (it is more expensive) or buy ordinary ones, put them somewhere in ventilated piles and keep it that way for at least 4 months, or better - six months. In general, any furniture, including garden benchesare made from dry wood.
We assemble the table for the street - put it in the gazebo, therefore we will not glue the boards of the tabletop, but we will fasten them from below, using slats. This is a very simple country table and very cheap.
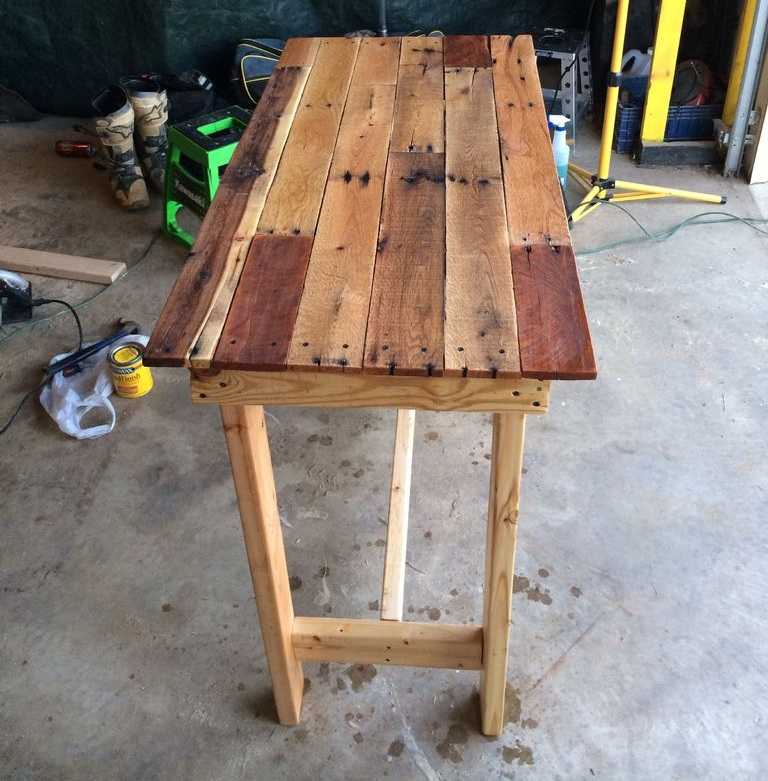
Having disassembled the pallets, we get boards with an individual color and pattern. Having conjured a little, shifting them several dozen times in different manners, we achieve the required result. It turns out quite a pretty tabletop.
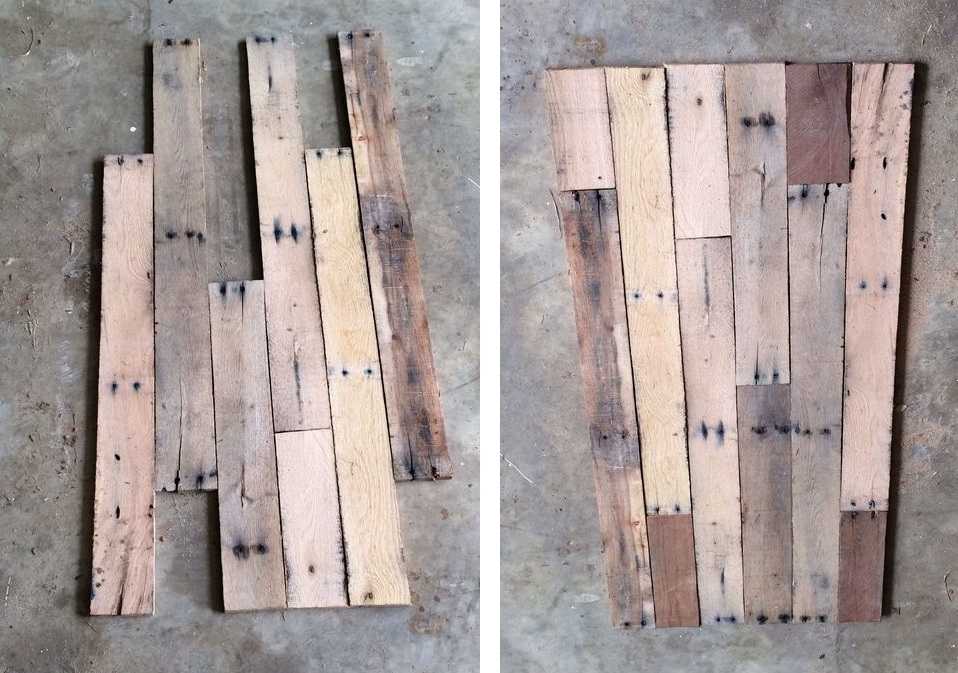
We collect the tabletop from the boards
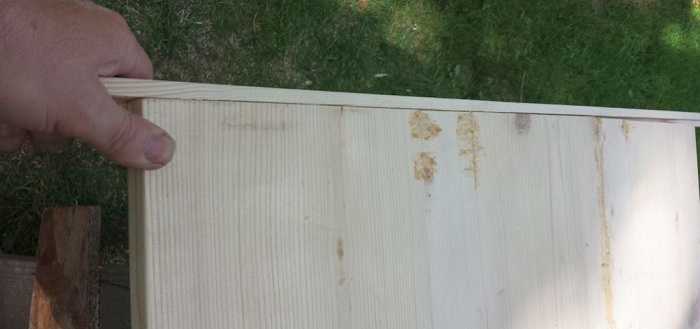
We take the side parts of the pallet. We use them for the table frame. First we grind them with coarse sandpaper, then we bring them to the required smoothness (grain 120 and 220).
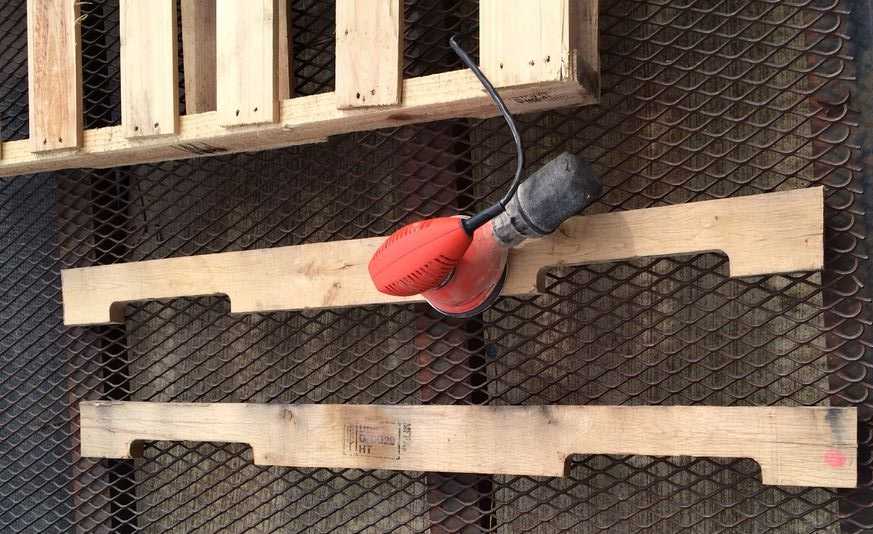
Side slats will go to table sides
We take the strips that remained unused, with their help we fasten the tabletop. We place them in the place where the joints of the boards are. For fastening each board with a joint, we use two self-tapping screws, for a solid one - one.
From the processed sidewalls and two boards (also sanded) we assemble the table frame. We fasten its parts with self-tapping screws to the end (two for each joint). The frame can be glued or also "put" on the screws. Only their length is large. For each, we pre-drill holes with a drill, the diameter of which is slightly less than the diameter of the screws.
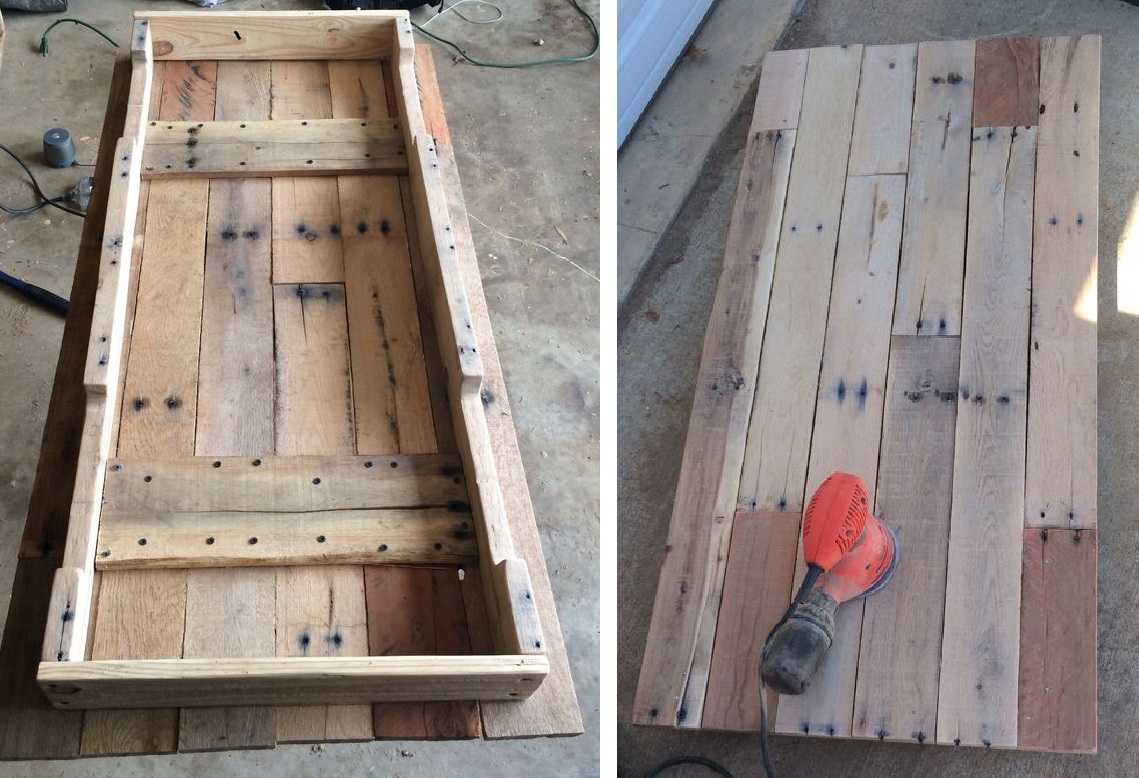
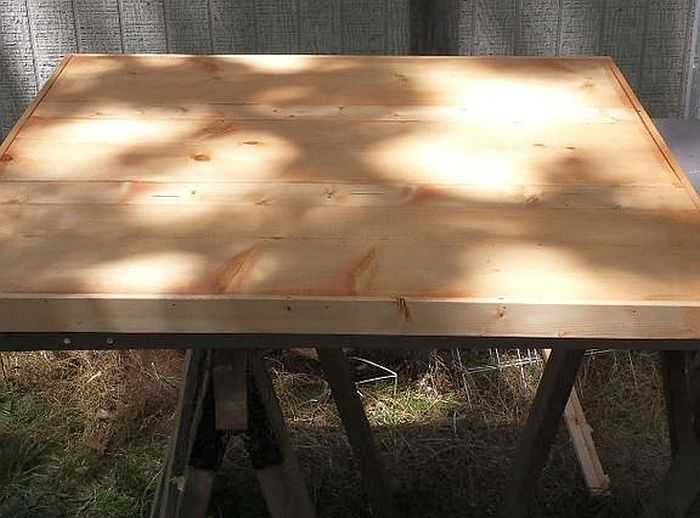
The table top is almost ready
Turn the assembled tabletop over and grind it. The procedure is the same - first with coarse sandpaper, then with fine grain.
Next is the installation of the legs. We select four boards of the same size, check their length, and adjust if necessary. Then - sanding again. It's easier than sanding already screwed legs. We fasten the sanded boards to the frame. These will be the legs. For each one there are two self-tapping screws fixed in a diagonal (look at the photo). For greater stability, we install jumpers at the bottom. From the floor to the jumpers, you can leave about 10 cm. We connect everything with self-tapping screws so that the boards do not crack, we pre-drill holes.

Installing the legs and jumpers
Next, we cover the table for giving with varnish. After the first layer, all the pile will rise. Don't be alarmed, this is normal. Take a fine-grain sandpaper and grind until smooth.
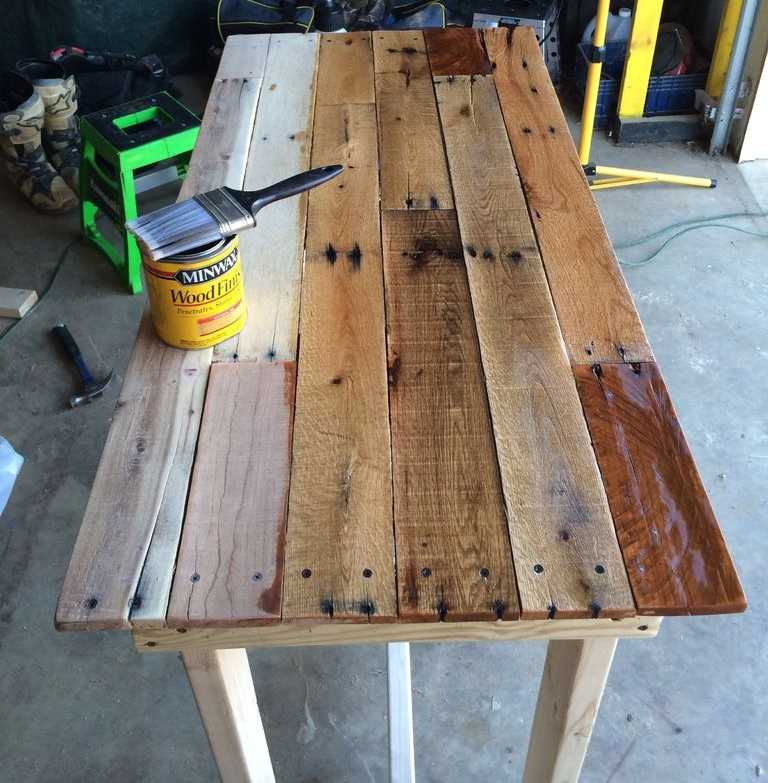
The do-it-yourself table for a summer residence is almost ready. It remains to cover it with varnish
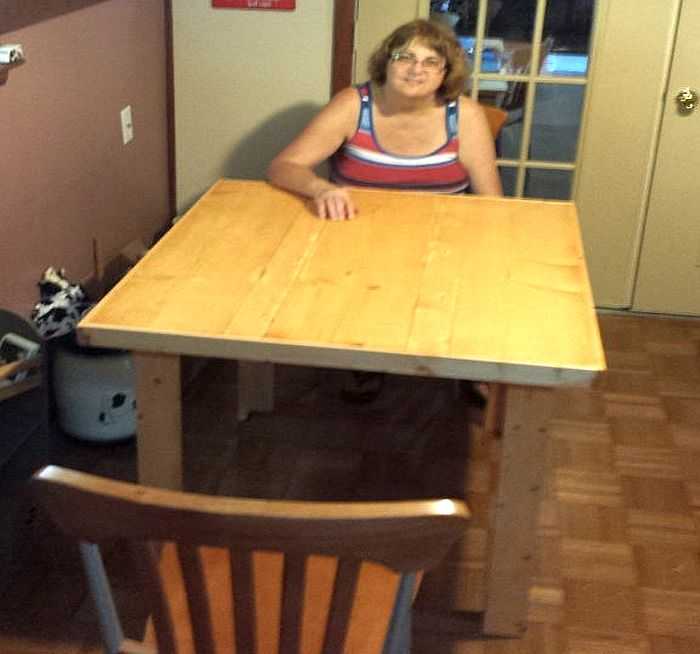
After removing the dust, we again varnish. In theory, the varnish should lie flat, but it depends on the wood, so another sanding / painting cycle may be needed. As a result, we get such a homemade country table.
DIY table for summer cottages is ready to use
If you don't like motley planks and old nail marks, you can make them the same design. This table can be rectangular or square. All sizes are arbitrary - see available space.
Country table from the remains of boards
This table for giving with your own hands is assembled from the remains of boards of different breeds and sizes.Pine boards with a thickness of 25 mm and a width of 50 mm were used for the frame of the countertop, and the remains of 15 * 50 mm for the legs. We make the frame according to the dimensions you need. This table will stand on the veranda, and it has a small width. So we will make it not wide - 60 cm, and the length 140 cm. The height of the legs is 80 cm (everyone in the family is tall).

We assemble the frame, attach the legs to it
Immediately cut off two long boards of 140 cm each.To make the width of the table top 60 cm, we subtract twice the thickness of the board used - this is 5 cm. The short bars should be 60 cm - 5 cm = 55 cm.Fold the frame, following the right angles, twist with self-tapping screws. We check if the bars were folded correctly - we measure the diagonals, they should be the same.
We cut off four boards 80 cm each, fasten them from the inside to the assembled frame. You can have 4 self-tapping screws for each leg.

We make jumpers for the shelf
We attach the crossbars approximately in the middle of the height of the legs. This is the frame for the shelf. The shelf can be used for its intended purpose, and it also increases the rigidity of the structure. We fix it strictly at right angles, checking with a large square.
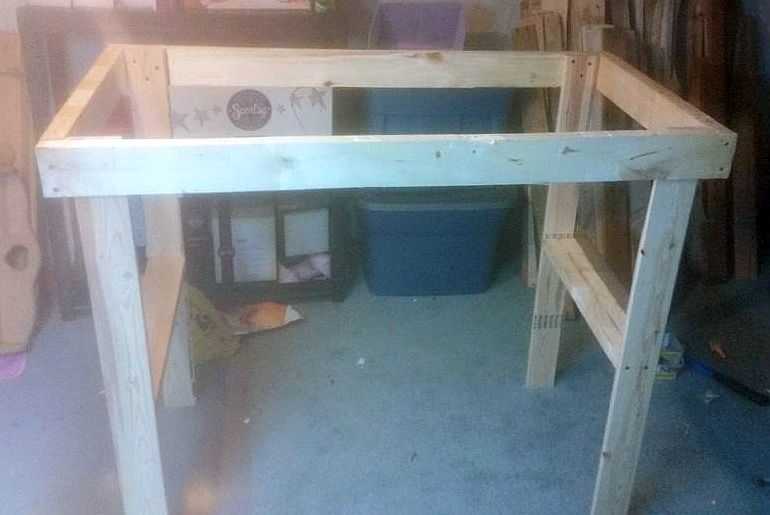
Frame ready
We put the frame on the floor, check if it staggers or not. If done correctly, it should be rigid. Next, we take sandpaper or a sander and grind.
Let's start assembling the countertop. Planks of various types of wood were left from the finishing work, some of them were stained. We alternate boards of different colors.

Making a countertop
We fasten the boards of the countertop with finishing nails, carefully finishing them off with a finishing tool. It can be fixed on the shelf with ordinary nails or self-tapping screws. Then we level with a grinder. The last stage is painting. Very unlucky with the choice of varnish. Bought too dark, did not like the look. We'll have to sand again and paint in a different color.
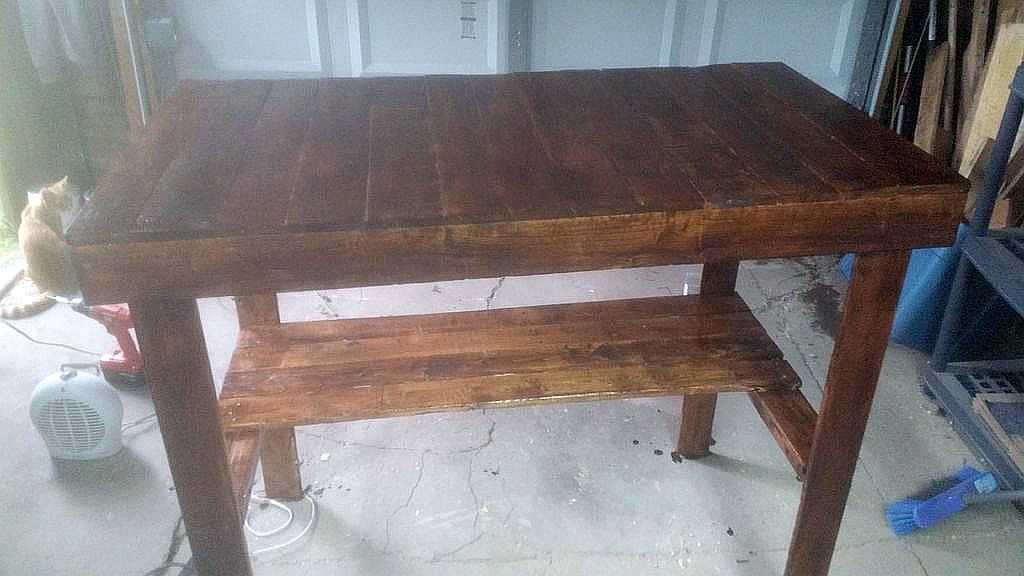
Homemade table for giving is ready
Wooden table with glued top
This design features L-shaped legs. They are assembled from boards of the same thickness. In this case, 20 mm. To keep them well, you need 5 self-tapping screws. Pre-drill holes with a drill with a diameter of 1-2 mm less than the diameter of the screws. Then, with a larger diameter drill, we drill recesses for the caps. The diameter can be matched to furniture plugs of a suitable color or made from a wooden rod. Another option is to use a wood putty, to which add wood dust that remains after sanding. After drying and sanding, the marks will be difficult to find.

Legs with markings for fasteners
When assembling the legs, make sure that the angle is exactly 90 °. You can choose a bar as a pattern. First, we coat the joint of the two parts of the leg with wood glue, then we install the screws in the following sequence: first the two extreme ones, then the middle one, and only then the other two. After the glue dries, the legs are sanded, varnished and dried.

Table legs ready
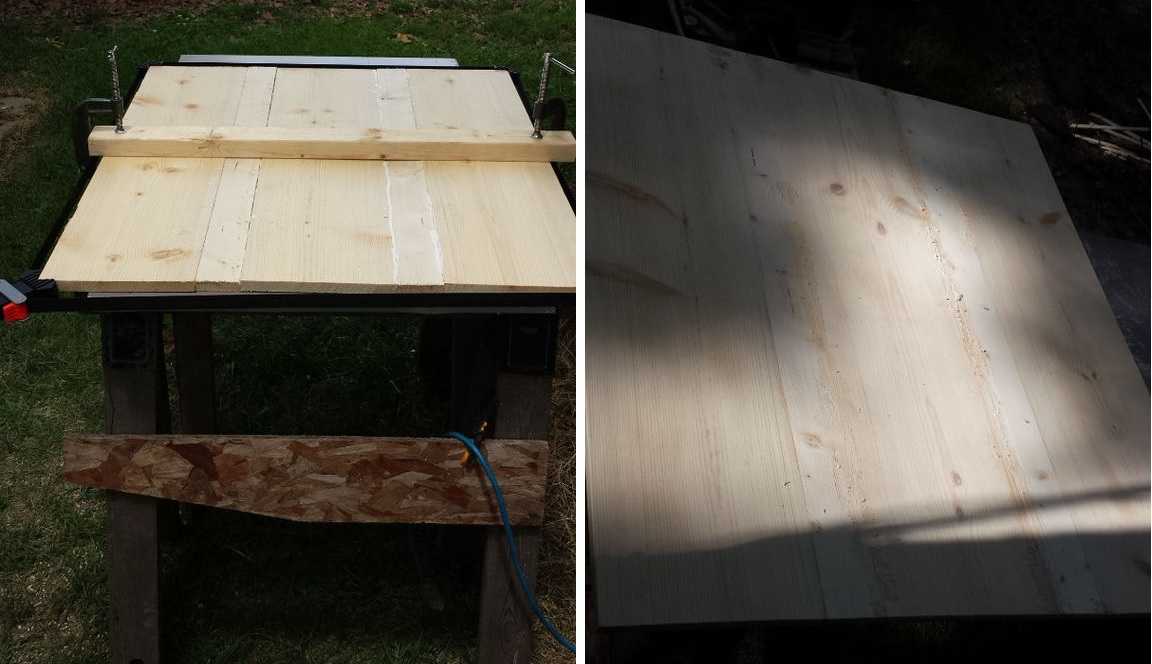
It's time to make the countertop. We collect it from boards of the same thickness. We type in the size you need. You can use slices of different widths. It is only important that everything looks organic, and the sidewalls of the boards are even and docked without gaps.
We coat the sides of the boards selected for the tabletop with glue, lay them on a flat surface (some kind of table) and tighten them with clamps. In this case, they cost one, but preferably - at least three. We tighten it so that there are no cracks in the resulting shield. We leave for a day. Having removed the clamps, we get an almost finished tabletop. It still needs to be ripped off - to align the edges, and then sanded. You can trim with a jigsaw or a conventional hand saw. Using a grinder is difficult to get a straight line, but you can try. After sanding, we get a beautiful tabletop.
We glue the tabletop from the boards
Using the same technique, you can make an oval or round tabletop. It will only be necessary to draw the corresponding line and end the glued boards along it.
To make the table look more attractive, let's make a frame.We take a thin strip, process it with sandpaper and fasten it around the perimeter of the tabletop. You can also use finishing nails. Only the planks are also pre-coated with carpentry glue, and then with nails.
We fix the bar around the perimeter
After the glue dries, we process the joint again with sandpaper.
This is the finished tabletop.
Now you can attach the table legs. We assemble a table frame from four boards (there is no photo, but you can do it as in the previous paragraph). We attach it to the back of the tabletop with glue, then install furniture confirmations through the tabletop. A preliminary hole is drilled for confirmations with an extension for the head. Holes for fasteners are masked in the same way as on the legs.
We attach the legs to the fixed frame. We put them inside the frame. You can attach it with ordinary screws. That's it, we made a table for giving with our own hands.
The board is ready
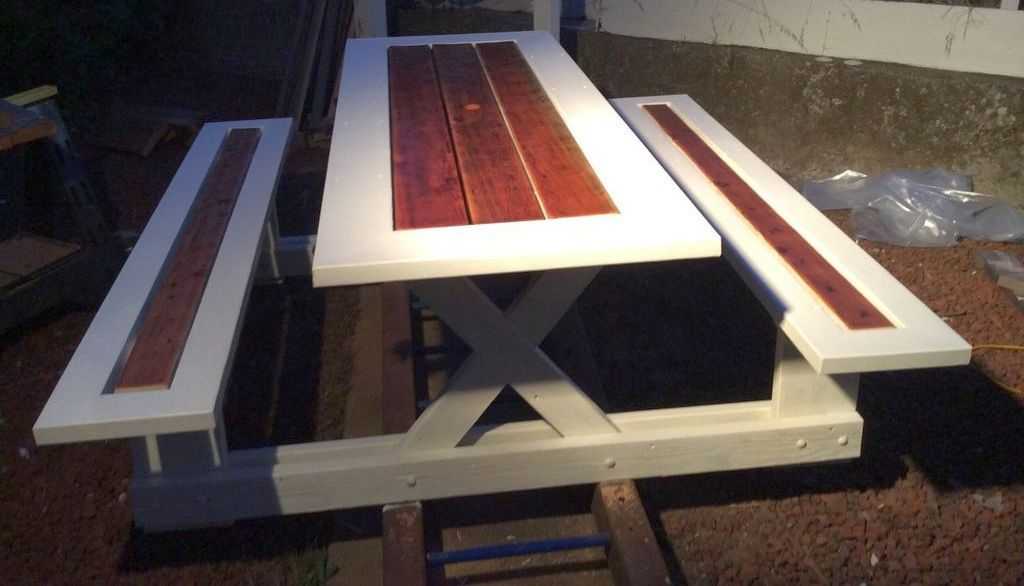
How to make a garden table from wood with benches
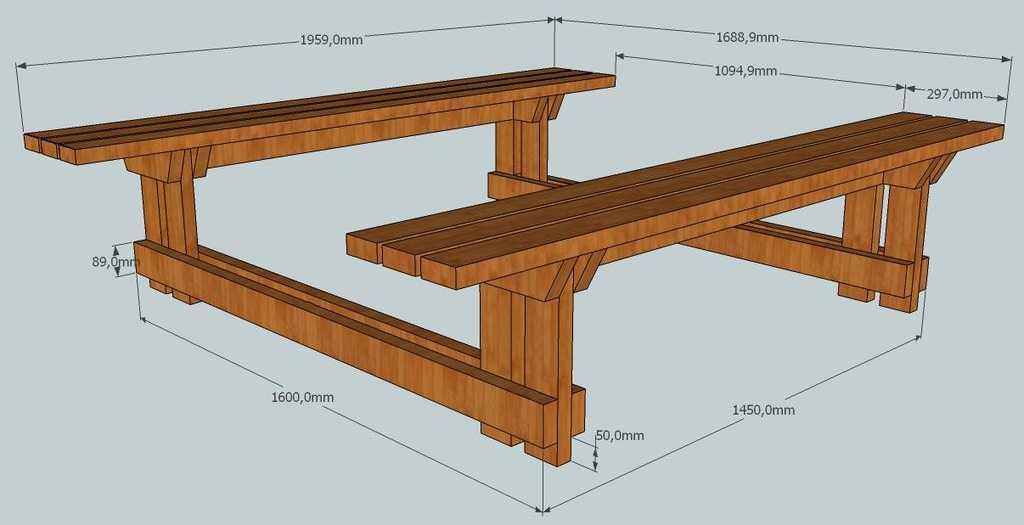
For this table, boards of 38 * 89 mm were used (dismantled themselves), but you can take standard sizes. The difference in millimeters will not greatly affect the results. In the photo below you can see what should happen.
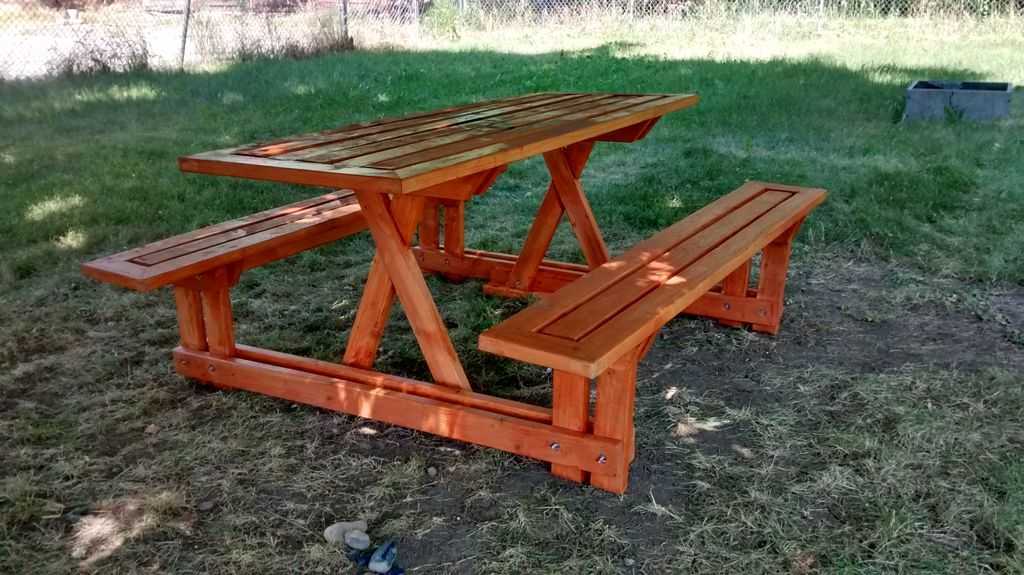
Outdoor table for giving with benches
To connect the parts, studs 16 cm long with washers and nuts (24 pieces) were used. All other connections are made with nails 80 mm long.
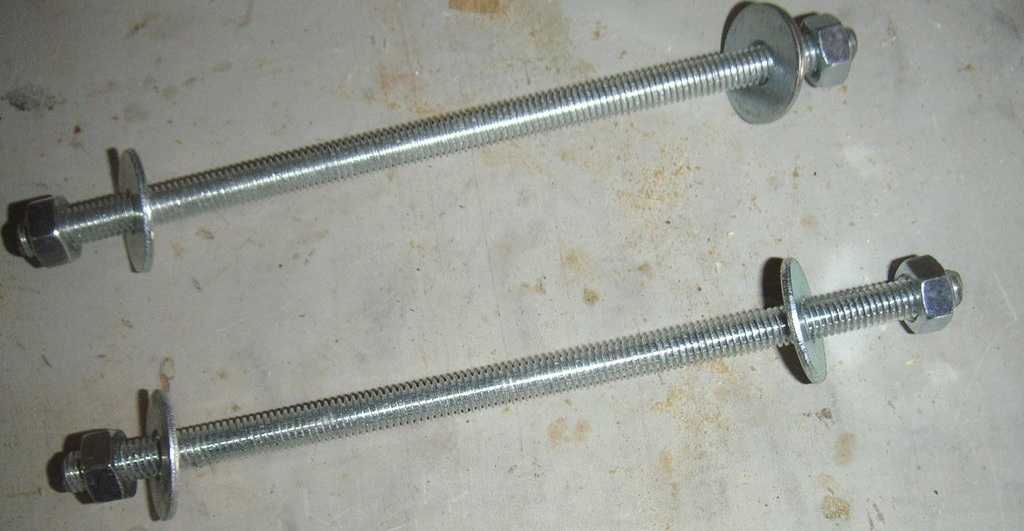
We connect parts of the table with studs with washers and nuts
The parts are installed in place, a through hole is drilled with a drill. A hairpin is installed in it, washers are put on on both sides and nuts are tightened. Everything is tightened with a wrench. Why is this option convenient? For the winter, it can be disassembled and taken to a shed or garage.
Making seats
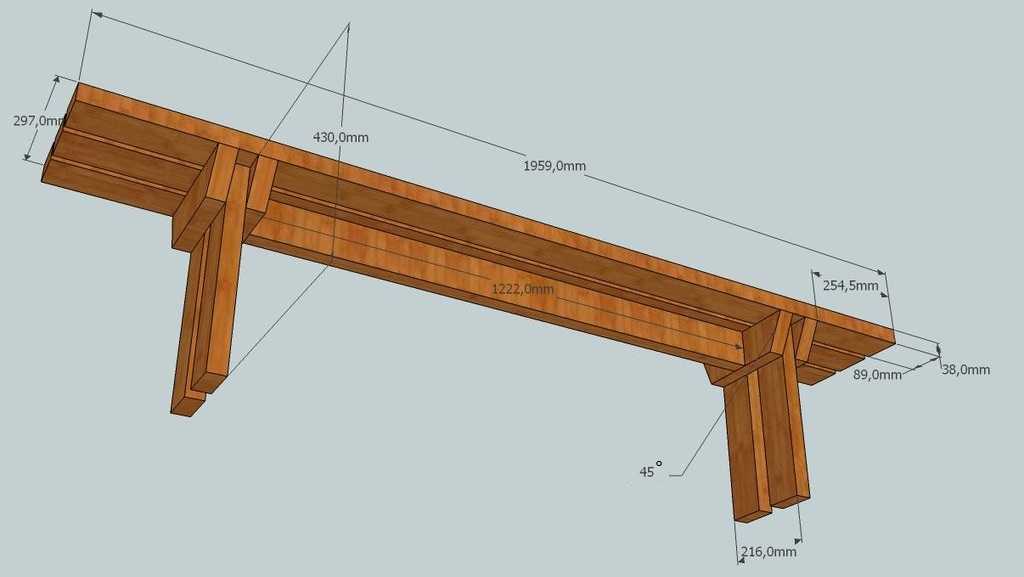
Bench drawing with dimensions
According to the drawing, we cut the boards of the required size. Everything is needed in double quantity - for two seats. We grind the boards, pay special attention to the ends.
We cut the short sections with which we fasten the three seat boards along the edges at an angle of 45 °. First, we assemble the structure that is attached to the seat from below. We take a board about 160 cm long, at the end we attach two short boards sawn at an angle. You need to attach it so that this board is in the middle.
Seat bottom support assembly
Then we attach the legs to the resulting structure (you can use nails). Then we add the boards cut at an angle and pull everything together with studs and bolts.
We attach the seat boards to the resulting structure. Since this is a table for the street, you do not need to knock them close. Leave a gap of at least 5 mm between two adjacent ones. We nail it to the supports (which are cut down), two for each board.
We fasten the seats together
We fasten the finished seats with four boards 160 cm long. We fasten each leg with studs (if you walk, you can put two studs by placing them in a diagonal or one above the other).

We connect the legs to the boards using pins
Putting together a table
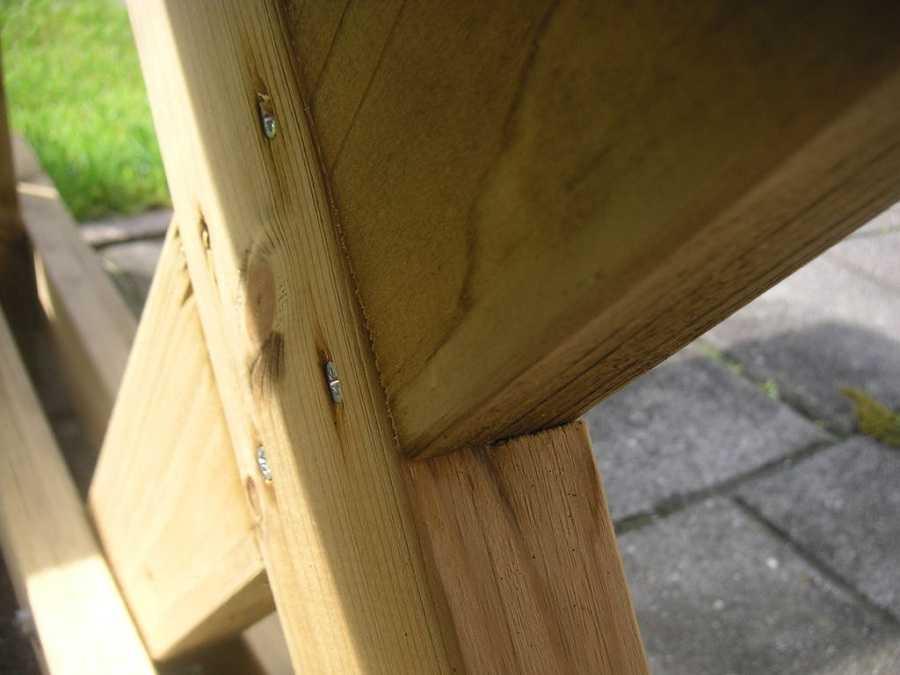
The table is assembled in a different way. Please note that for the countertop, the cross boards are cut at the edges at 52 °. We attach them at such a distance that the legs enter. There are 2 nails for each board. You can finish, with small hats, or you can hammer in deep, and then mask the holes with putty.
How to make a wooden outdoor table
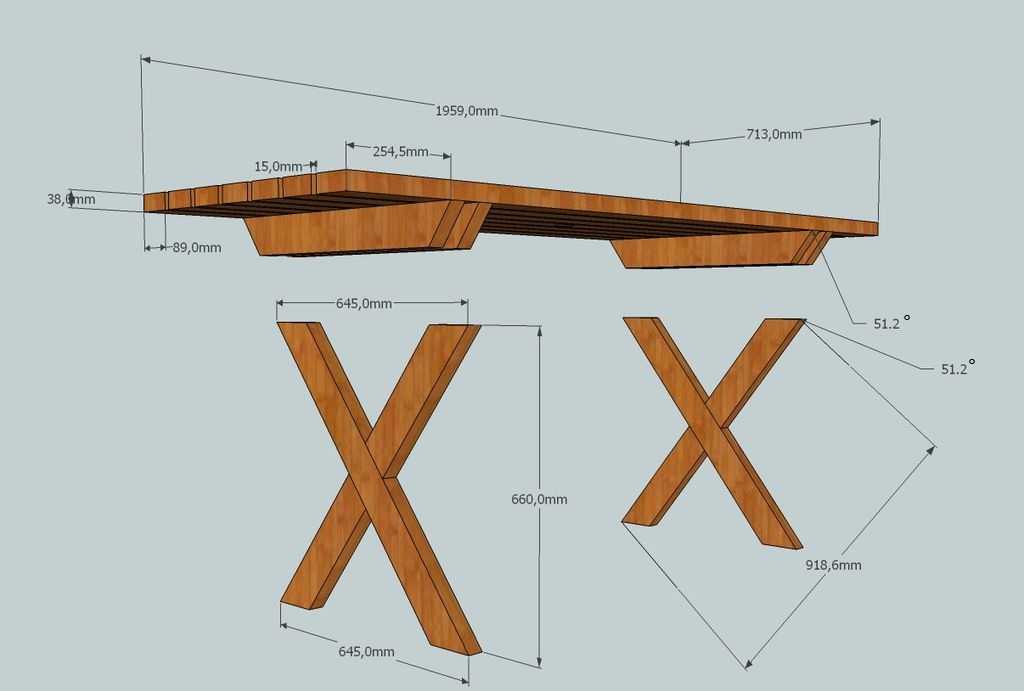
Now we need to assemble the cross-legs. We take two boards, cross them so that the distance between their ends is 64.5 cm. We outline the intersection with a pencil. At this point, you will need to take out the wood half the thickness of the board.
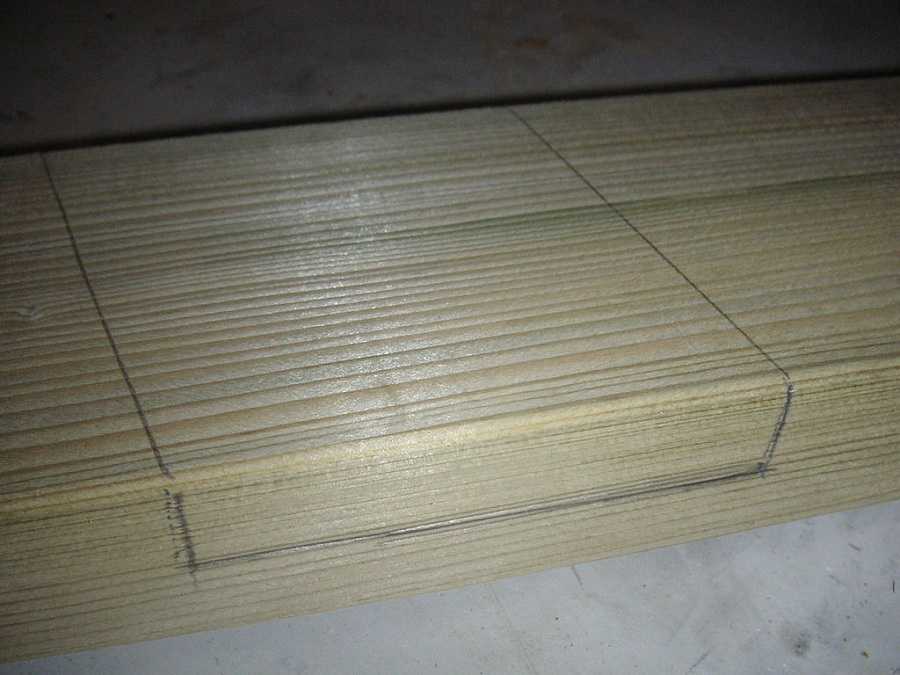
This will need to be cut
We make the same notch on the second board. If you add them, they turn out to be in the same plane. We connect with four nails.
How to make X-shaped legs for a garden table
We make the second leg for the table in the same way. We are not assembling the table yet.
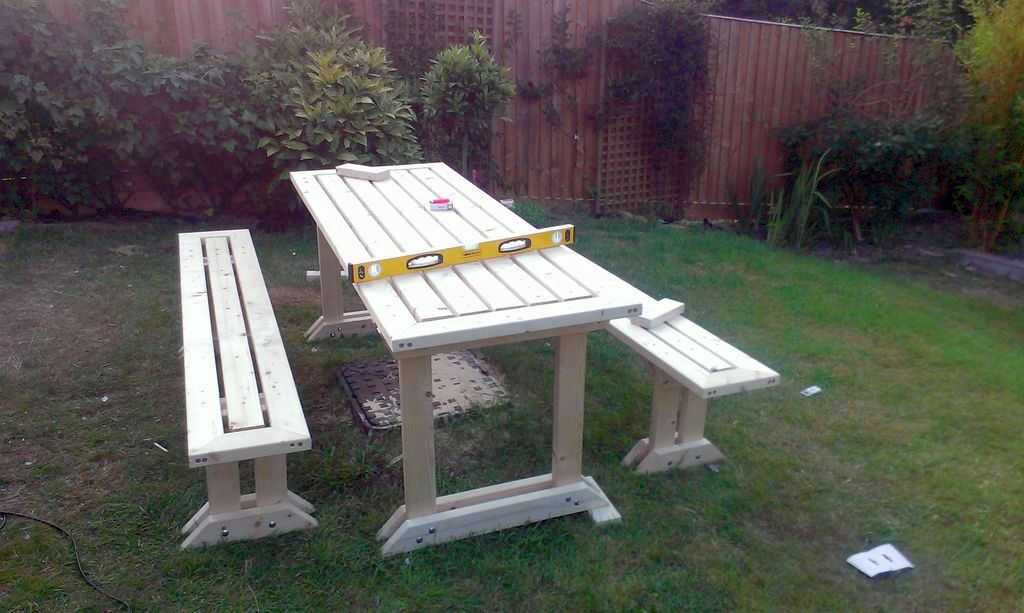
Installing the table
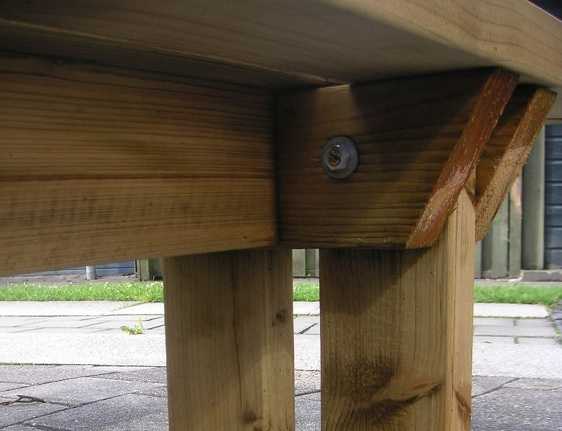
Now you need to fix the legs to the structure on which the benches are installed. We put them at an equal distance from the benches, fasten them with hairpins.
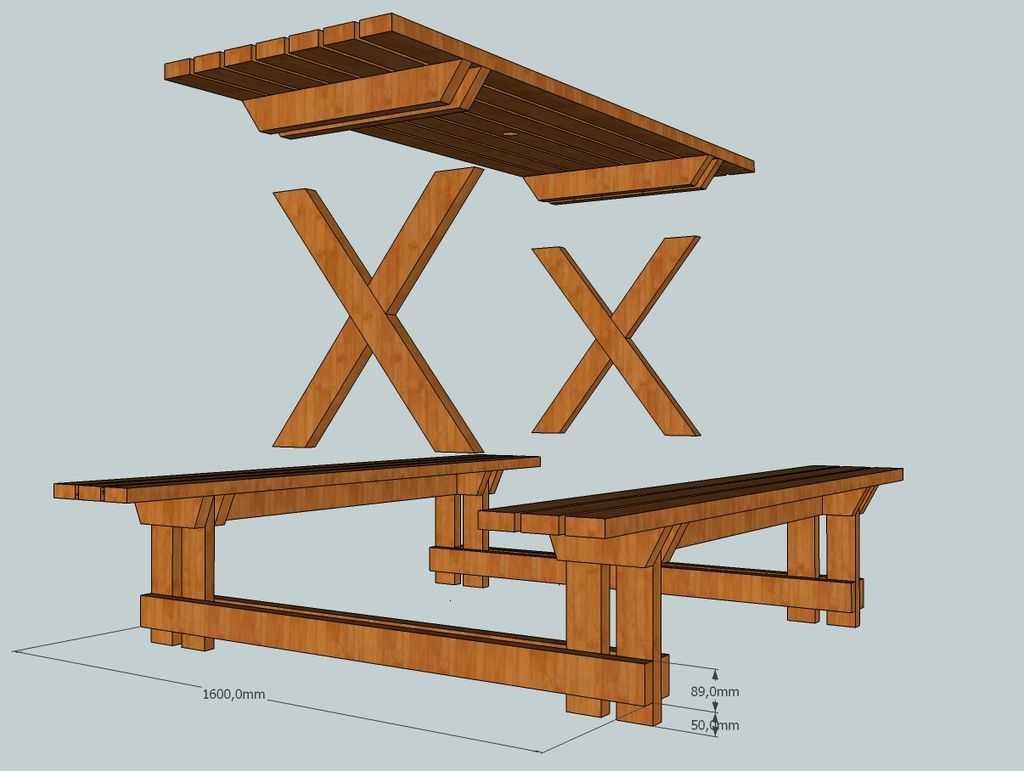
Setting up the table
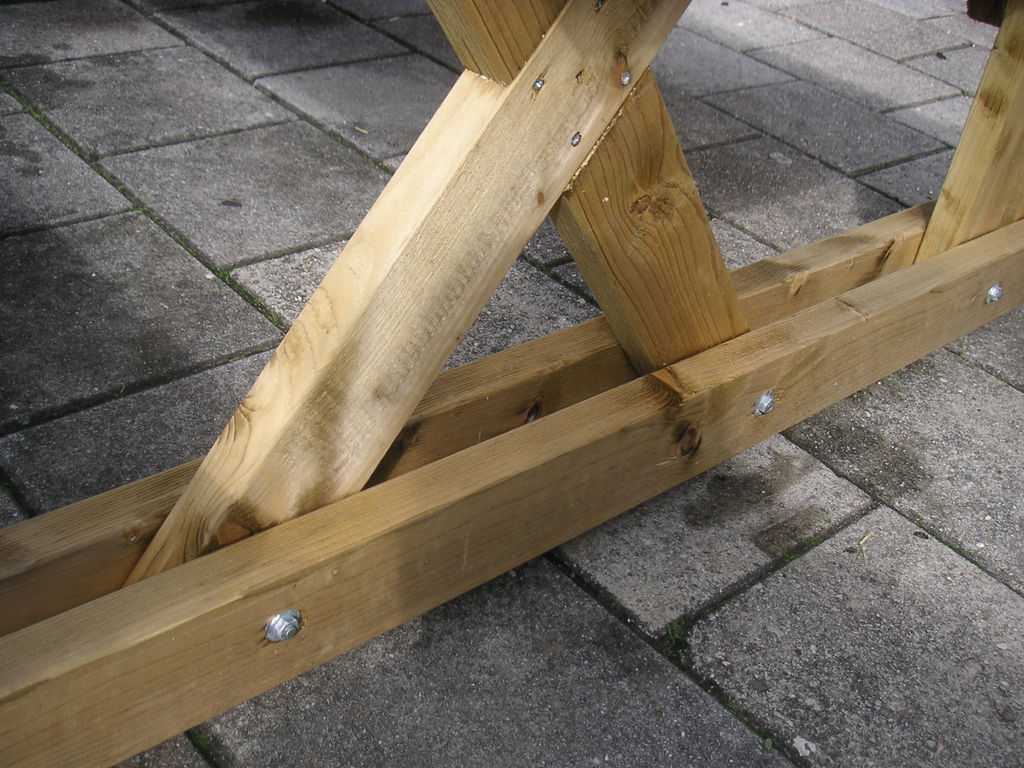
Table leg attachment assembly
Now we install the tabletop. We also fasten it with pins. The last stage is painting. Here everyone does as he pleases.
Outdoor table for giving with benches
Variations on a theme
According to this drawing, you can make separate benches and a table for a summer residence, a garden. The design is reliable and easy to perform.

Separate benches and table for the garden according to the same drawing
You can make the look more decorative by slightly redesigning the seats and countertops

Another option with separate benches
Painted white
Diy table for giving: drawings
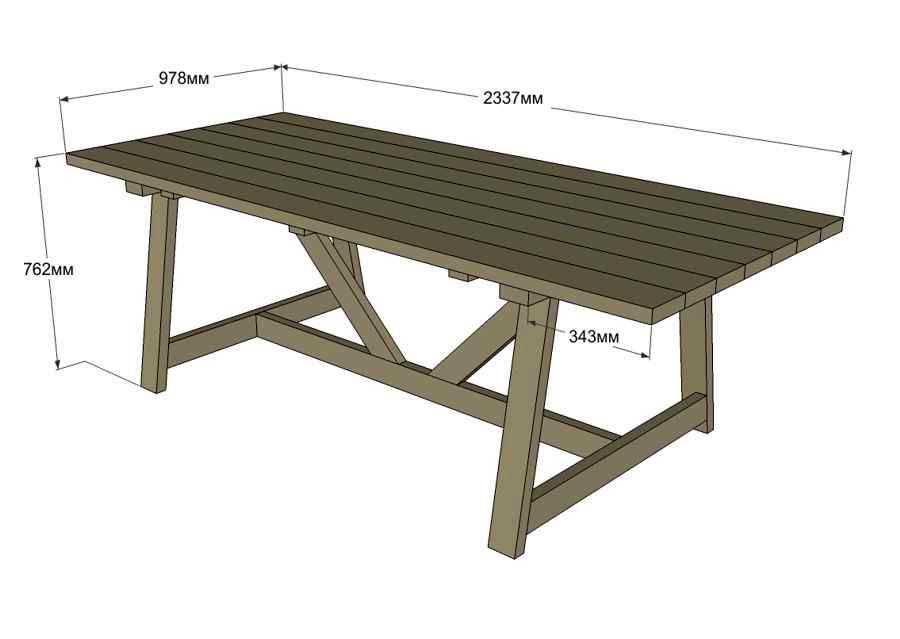
Stable country table

Simple table with X-shaped legs
Wooden garden table

Homemade wooden table with a crossbar at the bottom


Amazing!
Instructive, clear and all ideas are simple and interesting at the same time. Thank you very much!
It would be nice to have a variation of benches with backs ... ..